

Building an RV-3 is not for the faint of heart, yet it can probably be more rewarding (to those who love building) than any of the RV line. If what you like is to follow step by step instructions, this kit is not for you ? but for those who like to solve puzzles, follow clues, and create things from raw stock using accumulated knowledge from your own background and lots of research, then you?ll be in hog heaven! A lot of it is pure fabrication?.Take for instance, the long fuselage side skins ? the ones from the cockpit to the tail.
We riveted on the port side skin Monday. All went very well, and as we were wrapping up for the day, we thought we?d cleco on the starboard skin to get ready for another round of rivets. Then I remembered that it?s a very good idea to look at the drawings now and again (the instructions for this part of the kit are only about half a page long ? not much use in looking for details there?), and sure enough, I needed to put in the access plate and cover for the elevator horn/pushrod interface. Whew ? glad I looked! While it could be added later, it sure would be a lot easier to add to the skin now. So, off I went on a drawing hunt, looking for details.
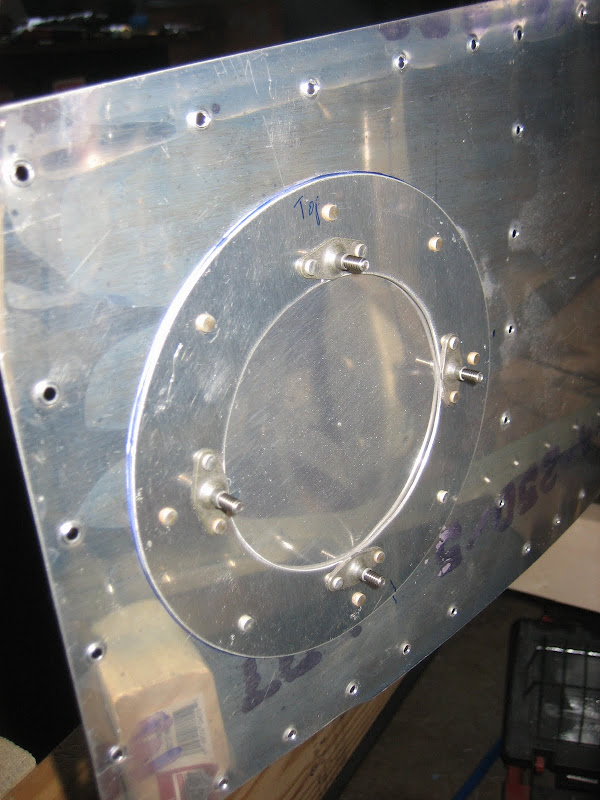
Hmm?here on the drawing it shows the center of a four-inch, round inspection cover to be located at a specific location relative to the aft bulkhead and longerons. And it says to look at Drawing 36 for the details. Well, I don?t know where Drawing 36 is right now ? not in my fuselage bundle, so I?ll go check the reduced drawings in the preview plans. Sure enough ? a side view showing a 1? wide flange of 0.040?, with K-1000-8 nutplates, and a 3/8? lip for the cover. It clearly says a 4? cover ? but also a 4? inspection hole. Well, if the cover is 4?, and you need a 3/8? lip, then the resulting ?hole? to put your hand through is going to be less than 4??.but let?s not quibble. That?s it, all the information that Van supplies! Time to create?.
Well, heck, K-1000-8 nutplates are going to give me round-head screws sticking out into the airstream, and who needs #8 screws for such a little plate ? there isn?t hardly room on the flange for them! Countersunk #6?s would look a lot nicer (and match the similar places on the RV-8 as well). Fortunately, I have a nice assortment of hardware handy, so four countersunk nut plates were easy to grab ? I think four will be enough, don?t you? Simple judgment ? and a look at the RV-6 round covers confirms it?s a good idea. I happen to have scrap trimmed off the front of the side skins big enough to cut out a 4? disk, so the cover plate is covered ? now where did that 0.040 scrap go? Oh yes ? the scrap bin (imagine finding something where it should be?)! Looks like I have a nice sized piece ? let?s see 4? diameter cover, 3/8? overlap, 1? wide?.5/8? outside of the disk, carry the decimal?.divide by zero?.looks like 5 ?? for the diameter of the flange! OK, I can get that out of this piece.
Of course, I don?t have circle templates that big, so out comes the drafting compass ? scribe some lines, then head to the band saw to do the rough cuts. The platen on the disk sander makes a nice place to spin the pieces to bring it to the scribed lines for final diameter, and voila ? two very nice round disks! I still have to cut the circle out of the middle of the flange (and the side skin), but that problem can wait. Next is laying out locations for the nutplates, using the jig to drill for the rivets, and countersinking the holes to fit. What size drill for the #6 nutplates again? Oh yeah - #27, according to the handy chart I have taped to the inside of the toolbox lid. Keeping the design simple, I put the four nutplates across from each other in an ?X? (I could have offset them a little, just to make sure the cover only went on one specific way, but that would simply annoy me during future maintenance?.), and as quick as it took to watch the women?s Olympic snowboard-cross event on the TV, I had the nutplates mounted, the cover drilled and dimpled, and the center hole marked on the flange.
Time to make some REAL aluminum chips ? I love the little air nibbler Louise gave me for Christmas! Drilling a pilot hole with the step drill was easy, and I went to making those little quarter-moon chips the nibbler sends flying around the shop. I finished the hole with the die grinder ? first with a fluted bit, then with a sanding drum. Then it was time to do some careful measuring and marking, take a deep breath, and cut a similar (but smaller) hole in the side skin. You know, the more time you have invested in a part, the more careful you need to be when performing additional fabrication operations on it. This was completely match drilled and dimpled to the fuselage ? it would be a shame to ruin it now! Fortunately, I thought to use the actual access cover as a template to draw my circle, just in case it was not perfectly round, and the resulting hole came out very nice ? and upon test fitting to the fuselage skeleton, it even seemed to be in th right place!
Dimpling and riveting followed ? something to distract me from the Men?s Figure Skating ( I must admit that I am much more interested in the speed events ? give me a good Downhill!) now showing on the shop TV. Of course, I had to decide just how many rivets I needed to hold the flange to the skin. AC43.13 was tucked away inside the house, so I cheated ? I looked again at a finished RV and figured that 8 rivets, equally spaced, would be enough. Of course, I wasted about ten minutes trying to find a protractor before finally using simple geometric construction techniques to bisect the angles and find the off-axis holes. And then, of course, I was able to reach all but ONE of the holes with the 4? yoke on the pneumatic squeezer. Fortunately, I have one of Mel?s favorite tools ? the dimple dies with the holes in the middle to use with a pop-rivet tool ? to get that one done.
Almost finished now, it was time to rivet my creation to the side skin. Of course, I could squeeze all of the rivets except the one I couldn?t reach with the squeezer....so out came the back-rivet plate and gun. I turned down the pressure for that one AD3 rivet, and the job was finished!
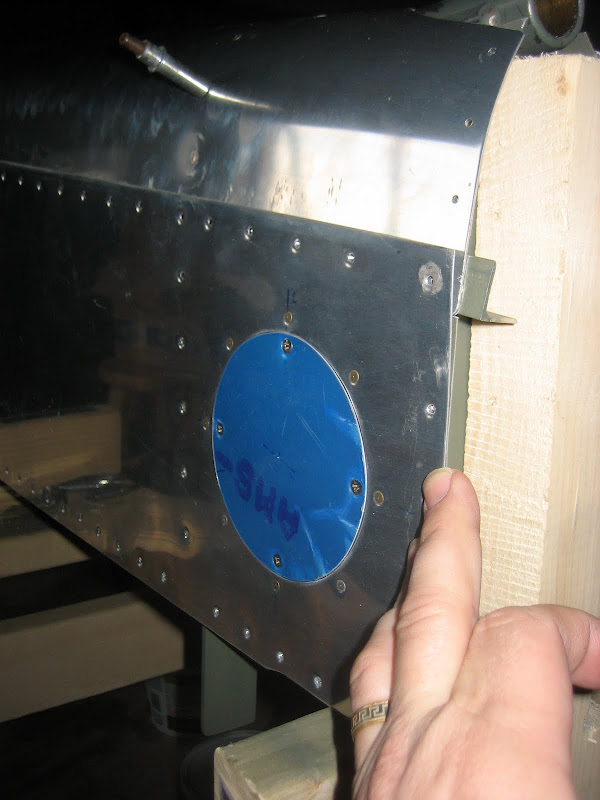
Well, finished for the starboard side that is?.I read here on the interweb that those who have gone before recommend putting a plate on both sides (just like all the later RV models have), despite the plans showing only one. I guess I have a day or two to decide before Louise gets home from work and says ?let?s rivet on that starboard side!? I can already guess what the ultimate decision will be?.so maybe I need to find another perfect sized piece of 0.040 scrap?..")
Paul
We riveted on the port side skin Monday. All went very well, and as we were wrapping up for the day, we thought we?d cleco on the starboard skin to get ready for another round of rivets. Then I remembered that it?s a very good idea to look at the drawings now and again (the instructions for this part of the kit are only about half a page long ? not much use in looking for details there?), and sure enough, I needed to put in the access plate and cover for the elevator horn/pushrod interface. Whew ? glad I looked! While it could be added later, it sure would be a lot easier to add to the skin now. So, off I went on a drawing hunt, looking for details.
Hmm?here on the drawing it shows the center of a four-inch, round inspection cover to be located at a specific location relative to the aft bulkhead and longerons. And it says to look at Drawing 36 for the details. Well, I don?t know where Drawing 36 is right now ? not in my fuselage bundle, so I?ll go check the reduced drawings in the preview plans. Sure enough ? a side view showing a 1? wide flange of 0.040?, with K-1000-8 nutplates, and a 3/8? lip for the cover. It clearly says a 4? cover ? but also a 4? inspection hole. Well, if the cover is 4?, and you need a 3/8? lip, then the resulting ?hole? to put your hand through is going to be less than 4??.but let?s not quibble. That?s it, all the information that Van supplies! Time to create?.
Well, heck, K-1000-8 nutplates are going to give me round-head screws sticking out into the airstream, and who needs #8 screws for such a little plate ? there isn?t hardly room on the flange for them! Countersunk #6?s would look a lot nicer (and match the similar places on the RV-8 as well). Fortunately, I have a nice assortment of hardware handy, so four countersunk nut plates were easy to grab ? I think four will be enough, don?t you? Simple judgment ? and a look at the RV-6 round covers confirms it?s a good idea. I happen to have scrap trimmed off the front of the side skins big enough to cut out a 4? disk, so the cover plate is covered ? now where did that 0.040 scrap go? Oh yes ? the scrap bin (imagine finding something where it should be?)! Looks like I have a nice sized piece ? let?s see 4? diameter cover, 3/8? overlap, 1? wide?.5/8? outside of the disk, carry the decimal?.divide by zero?.looks like 5 ?? for the diameter of the flange! OK, I can get that out of this piece.
Of course, I don?t have circle templates that big, so out comes the drafting compass ? scribe some lines, then head to the band saw to do the rough cuts. The platen on the disk sander makes a nice place to spin the pieces to bring it to the scribed lines for final diameter, and voila ? two very nice round disks! I still have to cut the circle out of the middle of the flange (and the side skin), but that problem can wait. Next is laying out locations for the nutplates, using the jig to drill for the rivets, and countersinking the holes to fit. What size drill for the #6 nutplates again? Oh yeah - #27, according to the handy chart I have taped to the inside of the toolbox lid. Keeping the design simple, I put the four nutplates across from each other in an ?X? (I could have offset them a little, just to make sure the cover only went on one specific way, but that would simply annoy me during future maintenance?.), and as quick as it took to watch the women?s Olympic snowboard-cross event on the TV, I had the nutplates mounted, the cover drilled and dimpled, and the center hole marked on the flange.
Time to make some REAL aluminum chips ? I love the little air nibbler Louise gave me for Christmas! Drilling a pilot hole with the step drill was easy, and I went to making those little quarter-moon chips the nibbler sends flying around the shop. I finished the hole with the die grinder ? first with a fluted bit, then with a sanding drum. Then it was time to do some careful measuring and marking, take a deep breath, and cut a similar (but smaller) hole in the side skin. You know, the more time you have invested in a part, the more careful you need to be when performing additional fabrication operations on it. This was completely match drilled and dimpled to the fuselage ? it would be a shame to ruin it now! Fortunately, I thought to use the actual access cover as a template to draw my circle, just in case it was not perfectly round, and the resulting hole came out very nice ? and upon test fitting to the fuselage skeleton, it even seemed to be in th right place!
Dimpling and riveting followed ? something to distract me from the Men?s Figure Skating ( I must admit that I am much more interested in the speed events ? give me a good Downhill!) now showing on the shop TV. Of course, I had to decide just how many rivets I needed to hold the flange to the skin. AC43.13 was tucked away inside the house, so I cheated ? I looked again at a finished RV and figured that 8 rivets, equally spaced, would be enough. Of course, I wasted about ten minutes trying to find a protractor before finally using simple geometric construction techniques to bisect the angles and find the off-axis holes. And then, of course, I was able to reach all but ONE of the holes with the 4? yoke on the pneumatic squeezer. Fortunately, I have one of Mel?s favorite tools ? the dimple dies with the holes in the middle to use with a pop-rivet tool ? to get that one done.
Almost finished now, it was time to rivet my creation to the side skin. Of course, I could squeeze all of the rivets except the one I couldn?t reach with the squeezer....so out came the back-rivet plate and gun. I turned down the pressure for that one AD3 rivet, and the job was finished!
Well, finished for the starboard side that is?.I read here on the interweb that those who have gone before recommend putting a plate on both sides (just like all the later RV models have), despite the plans showing only one. I guess I have a day or two to decide before Louise gets home from work and says ?let?s rivet on that starboard side!? I can already guess what the ultimate decision will be?.so maybe I need to find another perfect sized piece of 0.040 scrap?..
Paul

