What's new
Van's Air Force

Don't miss anything! Register now for full access to the definitive RV support community.

Failed experiment with my alternate air solution

bruceh

Well Known Member
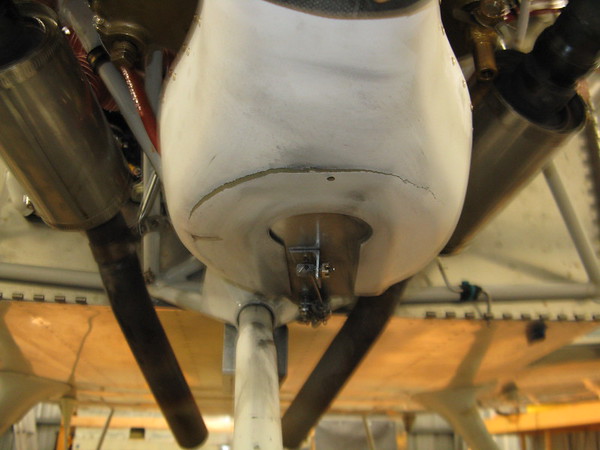
I'm going through my first condition inspection at 106.3 hours. So far only a few tiny things to fix until I noticed that my alternate air sliding door that I fabricated seemed loose. Still in place and functioned fine. The design keeps anything from accidentally getting sucked into the engine, and that seems to have worked. Upon closer inspection it is easy to see why it is loose.

IMG_6459-M.jpg


Just a bit cracked around the edges of the fiberglassing that I built up to hold the sliding door and underlying aluminum plate in place.

The underlying aluminum plate just slid right out after I got the airbox removed from the engine.

IMG_6465-M.jpg


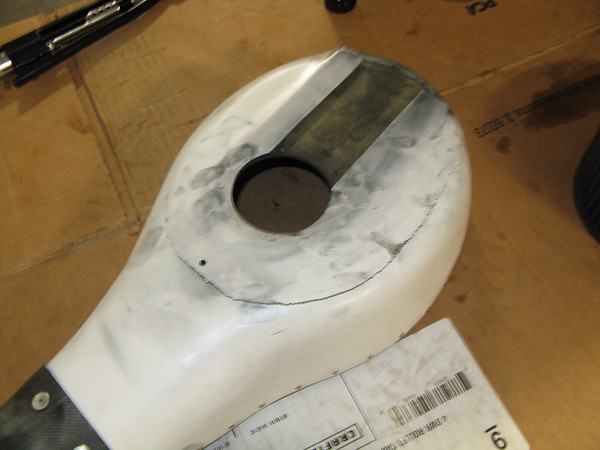
Looking at the failure, I think it just wasn't enough layups of fiberglass and once the vibrations got things loose it started weakening the structure.

IMG_6466-M.jpg


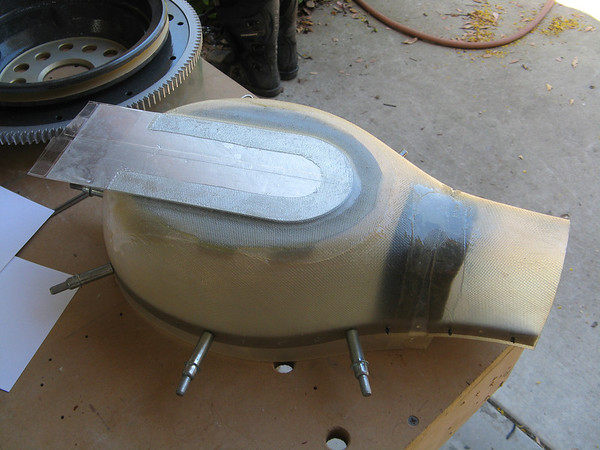
So I guess this is why we "experiment". I am going to make some adjustments to the original design. First, I'm going to reinstall the aluminum plate with more G/Flex epoxy and this time I will put a couple of rivets through the plate and into the airbox to keep it secured even if the epoxy lets go. The shop ends of the rivets will be inside the airbox, but I will position them so they are safely under the rubber edges of the K&N filter. That way they still can't get sucked into the engine if the rivets break. Second, I will re-layup more fiberglass over the cracked portions and hopefully give it much more strength.

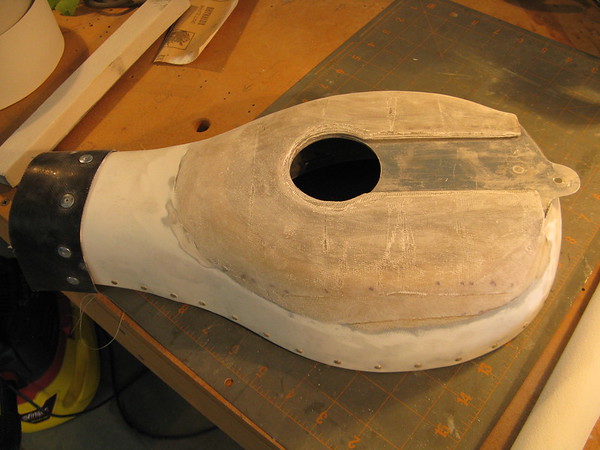
My original design and build photos indicate that I had only 4 thin layers of fiberglass on here. I should probably double that number just to be safe.

IMG_3789-M.jpg
 
alt air

humm, every alt air config I have seen in that location has failed in a relatively short amount of time. there must be a significant pressure pulse inside the FAB to cause that damage. if it fails the threat is no carb heat. the risk is potentially no carb heat vs intake obstruction. both are real threats with different values. I choose to remove my alt air config before first flight and glass it over. I am still looking for a better alt air config.
 
Last edited:
I have a similar alt air design, Albeit more crude than yours. I have about 100 hours on mine with no issues.
I'm guessing that the entire FAB didn't crack, just the portion laid up on top of the FAB for the Alt Air?
I'm a total novice on the whole fiberglass airplane building, so FWIW....
I've had some of my experiments peel like that when I
A. I didn't properly clean the surface prior to "roughing it up" and ground contaminants into the surface I was fiber glassing to
B. I didn't properly rough up the surface aggressively enough, like 30-60ish grit
C. I didn't overlap (scarf) the edges of my new fiberglass enough

Good luck on your next edition!
 
what kind of joint did you use when you laid the glass? All the same size fiberglass sheets or did you overlap them growing in size?
 
I think the fiberglass I added just didn't bond well enough to the original FAB fiberglass. The cracking is around the edges where it lifted (or was pushed out by the high pressure from inside the airbox). There was 4 layers and they did overlap, but they just didn't hold on to the underlying material. The original FAB fiberglass underneath is fine and has no cracking. The cloth I used is just too thin for 4 layers to be enough structurally.

No worries about carb heat, since this engine is fuel injected.

Tonight I roughed everything up, cleaned it thoroughly and used the G/Flex epoxy to put the main pieces back together. Once that sets up I can do more layups over the cracks, and this time I will really get it roughed up so they will hold. I also put a rivet on the plate to physically hold it in place.
 
When I was going through the decision about FAB alternate air it seemed to me that the original metal flapper door with magnet holding it closed was the best solution and the problem they "fixed" with all the other arrangements was one of improper securing of the magnet, leading to it disappearing. I liked the idea the door opening automatically with no intervention needed in a time that would otherwise be very stressful (power loss on takeoff being the most stressful).

I simply used the old design with baffle material as the hinge but floxed and fiberglassed the magnet in very solidly. Still no signs of problems at 325hrs.

In the pictures it looks like a very clean separation between layers which leads me to believe there is a bonding issue rather than only a strength issue. It could be that I'm just not seeing things clearly in the photos. If you are bonding fiberglass to metal there are specific epoxies that are designed to do that well, and others that are notorious for not doing it well. I had Hysol recommended to me and used some that was provided by a friend. There seems to have been some major consolidation in the industry so I'm not sure what product to recommend now, but here is a possible resource: http://www.henkelna.com/us/content_...__Aerospace_Product_Selector_Guide_lo_res.pdf
Those better at research are welcome to follow up:D

All in the interest of education and recreation!
 
Jeremy and I are of the same mind here. Since you're reworking it anyway, perhaps you might consider a no-pilot-action-needed solution. Sucking up a bird or a plastic bag at 150 ft doesn't leave a lot of time for diagnosis and action.
 
What type of resin did you use?

A joint like that shouldn't fail. If the box is made of epoxy resin and you used poly-ester or vinyl-ester resins (the smelly ones) they wont' stick to epoxy resins. However epoxy WILL stick to poly-ester or poly-vinyl resins.

Steve Barnes (The new owner of FAIRINGS-ETC.)
 
I used West System Epoxy resin on the layers that I added. The plate was glued down with G/Flex. Definitely a bonding issue on the layers I added, but made worse by pressure and vibration.

I'm going to continue to play with it and give it another shot. Worse case I can just grind it all off and fill the hole or use the original Van's metal mechanism (which I still have).
 
Fiberglassing done, looking pretty sturdy. I'm going to put some micro over this and then sand it down smooth for painting.

IMG_6490-M.jpg
 
FOD

Not sure if I showed this before, but just another reason to experiment with Vans design.

This is a view from the floor looking up at the carb inlet.
A friend was flying his RV on a cross country flight when the engine coughed, quit momentarily and then resumed flying, but rough.
On return home we started trouble shooting.
One cylinder and exhaust valve was damaged for reasons unknown.

The filtered air box was removed and the alternate air assembly had failed and parts were missing.
The picture shows part of a rivet/washer assembly that stuck in the carb inlet.
The remaining parts that were ingested went through the engine.
Fortunately the old Lycoming just spit them out and kept flying.

fab%20fod.jpg


Dave A.
 
alternate air automatic valve

Does anyone take a look at the Robinson R22 alternate air automatic valve?
It is based on a system with four springs, and mechanics guys here told me they never found any issue with that. It is certified also ...
It's look like it can installed on the Van's air box.

Any comments?

Gerard
 
That setup kinda scares me!!!

That sure is a lot of pieces to get loose and be ingested. Must work tho. I sure don't hear of Robinsons falling out of the sky for that reason tho.
 
alternate air automatic valve (next step ...)

After a new look today at the R22 and discussing with the maintenance guy,
I just ordered the parts from Robinson to install on the FAB.
The R22 engine is Lyco 320 derated to 140HP so if it works for it I hope the springs will be good enough for my Lyco IO-320.
I soon as the engine will be running (in a couple of weeks ... :D ) I will post an update.

Gerard
 
I wouldn't have a problem with the design although I'd use a castle nut and cotter pin in a drilled bolt instead of the lock nut.
 
Alt Air Door

Haven't gotten to this yet but I will graft the alternate air door from a Twin Comanche induction elbow to the bottom of the Vans fab. The spring rate should be correct for this application since my IO-320 came from same Twin Comanche. Have not decided whether to just leave it fully automatic or add a manual override. It's fairly simple compared to the R-22 setup. Many of the Piper Cherokee models have something similar in the lid of the airfilter housing.

Don Broussard

RV 9 Rebuild in Progress
 
R-22 alt air door

Wondering if anyone has successfully made this adaptation. This seems like such a obvious solution. I had an R22 and verifying the function was part of preflight. That would be the only drawback I see is the inaccessibility to verify function with cowl on.

Starting FAB soon and would rather not use the cable operated door.
 
I just use a brass Reed valve. Automatic activation, light, simple, reliable. You guys are overthinking this with complex solutions.
 
Alternate Air

I just use a brass Reed valve. Automatic activation, light, simple, reliable. You guys are overthinking this with complex solutions.
Ross, do you have pictures or drawings? How thick is the brass reed valve? Is it preloaded (by bending?) in any way? What delta P does it need to fully open?
 
Ross, do you have pictures or drawings? How thick is the brass reed valve? Is it preloaded (by bending?) in any way? What delta P does it need to fully open?

Posted it a couple of times here in years past if you search. Brass sheet stock about .010 thick, takes only maybe 5-10 inches H2O differential to pull it open. The rest is up to your imagination and creativity...:)
 
Back
Top