What's new
Van's Air Force

Don't miss anything! Register now for full access to the definitive RV support community.

Time saving ideas for an RV-10 build?

rotoiti

Well Known Member
My emp kit arrived and I am half way through the inventory. Before I start building, I would like to get your opinion on time savers you may have found.

A time saver is where I can save some significant time for (maybe) some additional $$ upfront. Alternatively, something that should be done now (ie. battery mounts) as opposed to possibly being more time consuming later.

Both my wife and me have day jobs so neither of us can commit full time to the project, yet we would like to finish the project in a finite time :)

So far, the time savers I can identify are
- quickbuild wings/fuse (huge time saver I think)
- Cee Bailey's window kit

Are there any other time savers I should be aware of?
 
RVBITS gear fairings (available through Cleaveland)
Aerosport Products interiors - too many products to mention
Have SteinAir or Aerotronics do your panel

Like most of these, they have significant cost impacts..
 
I think the biggest time saver for me is to slow down enough to not make egregious errors - and save the time you would have spent fixing/redoing/waiting for parts. My mentality has gone through a subtle shift from trying to keep the pace up to trying to do everything just once. Makes a difference, although I am by no means error free.

The other time waster (besides spending time reading the forums instead of working...) is stressing about 'big' things like pro seal, canopies, or whatever it is that you might dread for no good reason other than it's an unknown, at least to you.

==dave==
 
One regret I have (which was partially forced by very cramped building space) was to not have put all small parts (rivets, bolts, nuts) into well ordered small drawers with an indexed finding system, at the same time I did inventory.

I must have spent 100's of hours later looking for the proper paper bag, and then looking thru that bag for the correct part.
 
Keep it fresh

Work on it a little bit every single day so you don't have to waste time going back and trying to figure out what it was that you did last week.
 
Never leave for the night with a task half done. e.g., nut and bolt attached snug but "I'll torque it tomorrow". If you must leave something undone - and it will happen - mark it plainly (I used a roll of red tape) so you won't forget to come back to it.

Same thing for the plans. Check off what has been done, and mark in large red marker anything which has been left to later.
 
Build Quality

I would recommend to decide right now what is considered acceptable quality of finish work.

There is nothing wrong with accepting less than Oshkosh overall show award quality as long as it is safe.

There is nothing wrong with going for the Oshkosh Gold cup either.

Determine what is acceptable to you and then when (not if :eek:) something happens that is below your set threshold of quality, don't blink and eye, just redo it. There have been many days wasted by builders agonizing over whether or not to redo a mistake or just accept it as it is when the redo would have taken less time than the agony.

Use pre-wired avionics if you are not electronic savvy.

Work on it every day. Even if it means just sweeping the shop.
 
I second that

Built to the plans, no modifications.

ANY mod you do takes lots more time than you expect.
There are tons of things you can buy to speed your build but they will add significant cost to the build.

Not many things in the tail that will speed the build. Most come further along. Only item I can think of that would help is mounting adel clamps or other attachment points before putting the top skin on.

Also to prime or not.... Priming and priming prep will take between 20-30% additional time.

While working on the tail read people's blogs and you will see most of the common aftermarket mods.

One other thing that can save some time, just peal the blue plastic off, don't cut rivet lines. First step to painting is to scotch bright the skin, don't worry about some light surface scratches.
 
+1 for organization...

Just like Bob said, organize. It seems counterintuitive to spend all that time to adequately organize all your inventory into a compartmental system like this http://www.mykitlog.com/users/display_log.php?user=mikrettig&project=803&category=6821&log=128282&row=12. A lot of builders say "those little brown bags are already organized." :p Trust me, organizing your little parts will save loads of time! I organized the compartments into boxes of "like" hardware (i.e. all screws together, all rivet sizes together, all bushings, nutplates, etc.). Searching the inventory list for the proper brown baggy stinks..
 
Sell your emp kit and buy an already flying 10. I'm serious. All those mods, QB fuse and wings, and pro built panel will add up the cost significantly. Basically you're trading time for money and in the end you might not even save that much time.
 
Sell your emp kit and buy an already flying 10. I'm serious. All those mods, QB fuse and wings, and pro built panel will add up the cost significantly. Basically you're trading time for money and in the end you might not even save that much time.

That is a very sound advice and something that we have considered. We decided against doing it for a few of reasons:
- we don't have $200k+ for a flying RV-10 now. I know there are some that are cheaper than that but they seem to go quickly. That being said, we don't have $150k either (which seems on the lower end of the pricing spectrum) but we may have these resources by the time we finish building.
- all decisions have been already made in a flying RV; if we want to retroactively change some of these, we'd need to rebuild that part (for which we already paid)
- we like tinkering and building stuff :)
 
Minimize your time on the internet. Some is valuable, too much is a big waste.

Plan your panel a month before you buy it. Otherwise, you'll end up doing it multiple times because the hardware changes so quickly.

Worry more about what you're gonna do in the next week or two than what you need to buy/learn/whatever to complete a task 6 months down the road.

Know that you're building an airplane, not a workshop. Buy tools and upgrade your space as necessary, not because you want your shop or tool chest to be a showpiece.
 
Last edited:
Worry more about what you're gonna do in the next week or two than what you need to buy/learn/whatever to complete a task 6 months down the road.

I am trying to see if I have to make some decisions early. I.e. backup battery or dual electric bus -- support for this stuff should be built at the time empennage is being finished, right?

I don't care much for a panel right now. I know it's gonna be glass of some kind but I'll do my research when I get there :)
 
Have fun

Like you, my wife and I are always thinking ahead. We enjoy the build and time spent with each other. If possible find Rv builders group in your area to see their builds and get ideas from. Your knowledge base will grow and all the extras will become clear. As best you can don't stress about it and enjoy the process.IMHO
 
I am trying to see if I have to make some decisions early. I.e. backup battery or dual electric bus -- support for this stuff should be built at the time empennage is being finished, right?

I don't care much for a panel right now. I know it's gonna be glass of some kind but I'll do my research when I get there :)

It's a little easier, but not critical.

I have dual PC680s. All I did is modify the tray, which is removable. So it could be modified at a later date. That section is pretty open until you put that last top skin on and glass in the canopy cover. So you really have plenty of time.

There really aren't many mods for the tail.

Avery Rudder cable fairings - not required, but look nicer than the default

Rudder Trim - if you put a spring biased system like the one from Aerosport, this can be added at any time. It took me about an hour and I just installed it a couple weeks ago. If you are putting in a electric rudder trim, this would be the time to make the mods.

Antenna Placement - a little early, but if you have a good idea what you need, getting the holes drilled in the empennage is much easier now before you actually need to crawl into the tail. With that said, I crawled in the tail and drilled mine, so this isn't really critical either.

There are some "gotchas" that you should be aware of before you start riveting. Be sure to check the list on Tim Olson's site. (myrv10.com)

I would also recommend doing most of the fiberglass work when the plans call for them. The exception would be the canopy cover, but that's another long conversation. I regretted saving all that work until the end. My wife and I spent most of last summer working with sanding the glass.

Here's an area that you may want to may a cosmetic decision. You can install per plans, or many glass in the tips of horizontal and vertical to hide the transition between the aluminum and glass. There is no right answer here, just which look that you prefer. I would recommend using nutplates on the bottom rudder fairing in case you need to remove to work on the tail position/strobe light.

Do you feel like you are attempting to take a drink out of a fire hose yet?

Good luck with your decisions and build!

bob
 
Its a minor thing, but I think having a pneumatic squeezer was a HUGE time saver. It's only a few hundred dollars and can be resold for nearly the same price when done. Hand squeezing those larger AD4 rivets is time consuming and hard.
 
Its a minor thing, but I think having a pneumatic squeezer was a HUGE time saver. It's only a few hundred dollars and can be resold for nearly the same price when done. Hand squeezing those larger AD4 rivets is time consuming and hard.

I thought it was a good idea so I bought one used off this forum a couple of weeks ago :) I got the main squeeze and assortment of yokes too.

Now I need to figure out how to make the pneumatic squeezer adjustable.
 
I thought it was a good idea so I bought one used off this forum a couple of weeks ago :) I got the main squeeze and assortment of yokes too.

Now I need to figure out how to make the pneumatic squeezer adjustable.


You need:

471.jpg


http://www.averytools.com/prodinfo.asp?number=274
 
Or, just add SS washers under the sets for fine adjustments. Mine came with sets of varying height for coarse adjustments.
 
Organization step 2

I'd add: Take the organization one step further- I found there were only a few items used frequently (#6 and #8 screws, #30 and #40 rivets, etc), and grouped them together. Also, group the bolts with the nuts and the washers of the same size together. You'd end up with a kit of #6 stuff, one of #8 stuff, one of #30 stuff, etc. A little kit with the wrenches, sockets, and screwdrivers to go with the common items works well once you're further along.

Dwight
 
Here is my advice for getting it done.

1. Build at home, not an airport.
2. Define a build schedule and try to stick with it. An example might be, 2 hours each weeknight, four nights a week, 15 hours per weekend, 3 weekends per month.
3. Bye the quick build.
4. Don't spend build time on this forum, build the airplane and use this tool to find or validate answers.
5. Don't spend your time building a fancy shop in your garage.
6. Try to make the option decisions and order the parts, do not waste time waiting on parts.
7. I don't like vans bag system but that's what we get, organize the bags by number, I used copy paper boxes to keep them organized and lined up. I wish vans would send common hardware by part number and only kit the specialty parts.
8. Make sure you always make more deposits in the spouse support account than withdraws working on the airplane.

Pat
 
Last edited:
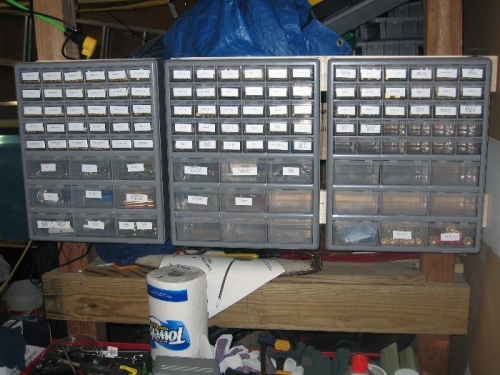
I bought a bunch of those yellow mini bins you can get at Lowe's or Home Depot. Mounted them on the wall and put all the little bag contents in them in a logical order - little rivets stepping up to big rivets.

As somebody else said - don't waste time priming unless Van says so.

John
 
Good suggestion about organizing bag contents. I spent 3 hours yesterday labeling separate Stanley mini-compartments (as suggested earlier in this thread) and tossing rivets into them. There are 25 kinds of rivets and they all fit nicely in one 25 compartment Stanley box. I think this will be time well spent.
 
May I offer a differing concept to you on the rivet organization.

I like to take a container of rivets to the area I am doing my riveting, so they are in easy reach as I go along. All other rivets are safely put away in a storage rack.

A single 25 compartment box is great until you drop it, and all the rivets get mingled together.

If you have separate containers, you dont have this issue.

Just food for thought..............
 
Me too!

I got this one:
http://www.amazon.com/Stanley-25-Removable-Compartment-Professional-Organizer/dp/B00005QWYF/
When the lid is locked shut the rivets cannot move between compartments -- tested :). Each of the compartments is removable so I can pick it up and move to the work area while locking the lid safely so that others don't spill.

You can't beat the Stanley Organizers. I usually keep a couple of small empty bins in each container (organized by harware type - i.e. all rivets together, etc). Then I use this little empty bin to scoop some rivets out of the larger bin, or platenuts or whatever, to be used for working. That way, if it spills, I haven't lost the entire bin of rivets. Additionally, the rule in my shop is "if you drop a rivet, it's gone." Don't go trying to find it or use it in your work, because it may be damaged (stepped on) or you may find a different length rivet from a previous drop. This rule also saves some time. :)
 
I got this one:
http://www.amazon.com/Stanley-25-Removable-Compartment-Professional-Organizer/dp/B00005QWYF/
When the lid is locked shut the rivets cannot move between compartments -- tested :). Each of the compartments is removable so I can pick it up and move to the work area while locking the lid safely so that others don't spill.

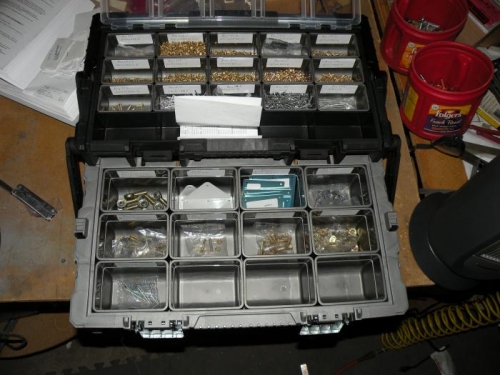
Murphy's Law states that you will knock it off your bench when the lid isn't latched. After the second time, I switched to standard parts drawers from Lowes. By the time I was done I had four bins and really needed a fifth.

FP16112010A000AK.jpg
 
Murphy's Law states that you will knock it off your bench when the lid isn't latched.

Bob,

That's why you don't take the whole thing to the bench; only the items you need. The Stanley Organizers have removable containers, so it works similar to what you have now.
 
Murphy's Law states that you will knock it off your bench when the lid isn't latched. ...

I make it a point to not walk away from mine with the lid unlatched. So far so good. I use Home Depot Model # 17185073 Hardware Organizers. One was sufficient for all the empennage hardware, as shown in the photo below. I now have one for rivets, one for hardware, one for plumbing fittings, and one for small miscellaneous parts. All organized alphabetically by part number regardless of which kit or bag they came out of (except for AN426-3-3.5 rivets - there are so many of those, they go in a large bin in the bottom). The curved bottoms in the bins make it easy to grab small parts.

FP31122011A00002.jpg


On my first project I organized in plastic drawers by bag number. What a disaster! The plans and instructions make no reference to bag numbers, and I never could keep up with the part # vs. Bag # index I had to make.
 
I went cheap and low tech. I just kept everything in the little paper or plastic bags they came in. I organized them numerically by the lable on the bag and placed them in rows in cardboard trays that 4-six packs of soda come in (at COSTCOs or BJs etc). I placed the inventory sheet with the tray and would look up whatever I needed and just worked right out of the bag, purtting it back in the tray when I was done.

Truth in lending -- I do have one organizer box similar to the ones like Bob posted that I put bench stock items that I've picked up here and there (primarily from ACS as I bought one of their fastener assortments).

Specking of organization, put your tools back where they belong when you're done. I'm the worst at leaving where I was last working and I can't tell you how much time I've spent simply looking for the odd tool because it wasn't where it was supposed to be.
 
What I did.

I used old gourmet coffee tins with lid to keep each rivet style, and size. Each tin labeled with the rivet designation/size.

51Q6ZTYtLJL._SX385_SX385_SY500_CR,0,0,385,500_PIbundle-6,TopRight,0,0_SX385_SY500_CR,0,0,385,500_SH20_.jpg


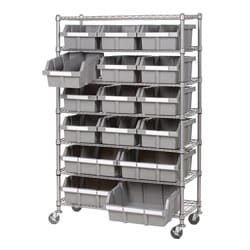
I used a bin rack from Sams club to hold the coffee tins. All the 426 in one row, #3, #4 etc had a separate bin, each bin held the coffee tin with various lengths. Ditto for all various rivet type and size.

Clecos each had a bin for their size, other small parts in labeled bins.

P14382014.jpg
 
Last edited:
Heh, I didn't know the bag # is not used in the docs so I labeled every container with bag number *and* the rivet symbol. Sorted them by type and length; looking pretty good so far.

Good idea with the tins however the coffee I drink comes in round glass jars -- harder to get stuff out.
 
My 2c - 1)Pneumatic squeezer!!!!!!!!
2) Use a good deburring tool like the yellow three bladed one from Avery. The cheaper ones are rubbish and frustrating to use.
3) Dimple instead of counter-sinking wherever possible - Dimpling is quicker to do and provides a stronger joint. Check on scrap material to ensure material thickness is OK to dimple if in doubt.

Just a note on the pneumatic squeezer......If squeeze power seems low (ie rivets not squeezing completely) then OPEN the gap adjustment - don't close the gap further as power will be further reduced. This seems counter intuitive but is true. (Not a bad idea to learn internal workings of the squeezer)
 
Last edited:
Don?t modify anything!

While I really like the DJM Throttle Quadrant in my -9 it took me an additional 40 to 50 hours to figure out how to mount it, make the mount, remake the mount, measure the cables, etc. There no such thing as a simple modification.

However, I really like having a ?custom? plane and would do every single mod again.

Regarding tools, order the tools you will need ahead of time, which means you must read ahead. This will mentally prepare you for the next task and will keep you from trying to use the wrong tool for the job at hand. When you do that, you WILL bugger up a part, reorder and rework the part, and buy the correct tool.

Buy more clecos than you think you will ever need. The same goes for drill bits. Also, buy a few of the countersink micro stops. Just changing bits and adjusting them is a waste of time.

Good luck with your build!
 
Never dimple for a nut plate. Use the NAS1097 reduced head. Buy a cheap countersink and dedicate it these rivets. Or just use a hand csk., after a few tries it is faster.

Get a foot pedal for your pneumatic squeezers. Clamp the squeezer in a vice and dimple all the edges of formers, ribs, j channels at about 5 seconds per hole. Cheap at McMaster-Carr.

Drop a rivet, loose a rivet. Don't use any more Cleo's then are necessary to hold the structure together. Get a pneumatic cleco device. Get a good 90 degree drill. Use a small grinder and polishing wheels to finish all edges and inside of the lightening holes. Use a low speed screwdriver with a good deburrers bit for most deburrers. Get a couple of in/out deburrers for the rest. Back rivet whenever possible.

Just do it!
 
Welcome to VAF!

Just a note on the pneumatic squeezer......If squeeze power seems low (ie rivets not squeezing completely) then OPEN the gap adjustment - don't close the gap further as power will be further reduced. This seems counter intuitive but is true. (Not a bad idea to learn internal workings of the squeezer)

Anton, welcome to the good ship VAF:D

Great first post, you are right on with the counter intuitive comment.

Good to have you aboard.
 
Back
Top