What's new
Van's Air Force

Don't miss anything! Register now for full access to the definitive RV support community.

Firewall penetrations diameter?

sbalmos

Well Known Member
Hi again everyone,

I'm trying to determine what diameter of firewall penetration kits to order from Spruce. In one penetration I will have all of the EFII ECU firewall forward control lines, the Garmin EIS sensor lines, basically everything low power / sensor. In another penetration I will have all the high power buss feeds from the dual batteries and dual alternators going into my EFII Bus Manager.

Gut instinct makes me think the 3/4" diameter penetration kit would be enough space, given the low/high power lines are separated? Would love some validation, alternate suggestions, or otherwise. Thanks!
 
Scott

I have pondered this a bit. I bought some .75 inch stainless tube. When I got home I realized that just one #2 wire pretty much filled it up. I could not source any thin wall stainless anywhere in Seattle, though you just know it is there, somewhere.

What to do? Ventured to the aviation isle at Home Despot and found a solution. Grab rails for a shower stall come in all sorts of lengths, thickness is suitable and the things are cheaper than ordering ordering online and paying shipping. The smaller diameter grab rails appear to be about 1 1/8 in diameter, and there are fatter rails, as well.

I had a bit of thin stainless sheet, say .032. Produced a hole in a suitable sized flange, inserted suitable length of tubing from the grab rail and silver soldered the two together.

I put a bead on the side that goes on the engine side of the firewall to help secure fire sleeve and screw clamp. Might not have been a necessity, but it appeals to my sense of security.
 
Hey Scott,

I'd certainly go with larger rather than smaller pass-throughs. I installed two 3/4" ports on my relatively simple build and there was adequate space, but definitely a tighter squeeze than I expected, especially with the thick-ish fire sleeve wrapped around the wires.

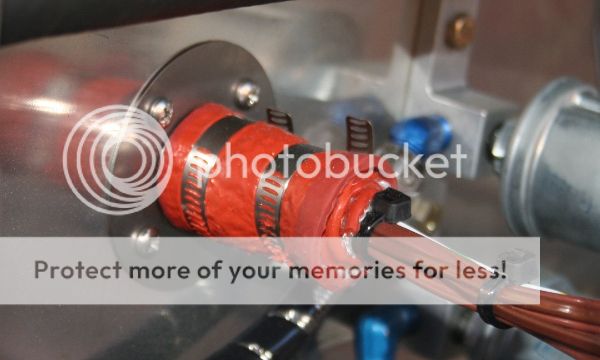
Are you going with this type of pass-through? Highly effective, but you can see how much space the inner fire sleeve takes up in relation to the size of the wire bundle. Make sure to put a blob of fire sealant on the end when you finish up.

 
Last edited:
Those safeair1 kits as pictured from RightRudder are awesome! I recently installed two - one on each side near the outer top edges so the wires can follow the engine mount to that penetration point.

One thing I noted is my first hole was done with a unibit and that hole was a mess and needed lots of cleanup. A unibit left a jagged ridge on the hole where instead of cutting, the hole kind of pushed a small flange out around the hole instead. That took a while to cleanup while under the dash working with flying metal bits above the head.

My second hole used a punch from harbor freight and that was a quick and painless way of creating a finished hole. I'm sold on using punches for stainless steel firewall penetration!

Both the safeair penetration points and the fancy eyeball based ones have standardized to a standard punch size of 1 & 1/8".
 
Unfortunately SafeAir has joined the Averys in pretty much closing up shop after a great run. More power to them enjoying the sunset of life. :) The firewall penetrations are one of the things that is no longer produced. So I'm going with the stainless pass throughs from Spruce. I'll go with a pair of 1" ones on my next Spruce order.

Ohhhh man do I wish I had known about that Harbor Freight hydraulic punch set a lot earlier. I'm going to have to pick up a set this weekend. I'm in the same boat, either drilled or unibit holes that are jagged. And I barely put a dent in cleaning them up with files, Dremel, nothing seemed to work. Most were bolt holes whose edges are cabin-side, so I just cranked down on the washers and nuts a little more, compressing away the edges. Not pretty, but it worked.
 
I didn't know about safeair... I believe i purchased those back a little while ago and just barely got them installed. They were rather expensive for the material supplied. The ease of having a kit though speaks for itself.

I would have liked to have had a 1" punch too. Perhaps a manual greenlee knockout punch is slightly cheaper for an individual punch?

Those punched holes also have a slight ridge to them too but nothing like the mess that a unibit produced for me. The harbor freight set was all big holes punches but I have used a couple already. For instance, there are some lightening holes in the battery tray that went real quick with the larger punches from that same harbor freight punch set.

keep building!

Scott
 
Back
Top