
Van's Air Force
You are using an out of date browser. It may not display this or other websites correctly.
You should upgrade or use an alternative browser.
You should upgrade or use an alternative browser.
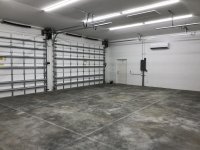
Hangar floor coating North Texas
- Thread starter Redbud40
- Start date

Interesting that you post about this now. I’m currently researching the same thing. My issue is that the Mooney that used to live in my hangar apparently didn’t have an oil plug. Seems like pretty much all they put in it ended up on the floor. I’ve used a bag of oil dry, but I’m sure that will make adherence of any paint type of covering difficult.
I’ve been considering a rubber covering that is just rolled out on the floor, but is is pretty high.
I’ve been considering a rubber covering that is just rolled out on the floor, but is is pretty high.
fl-mike
Well Known Member
I'm about to do 1200 sq ft with ArmorPoxy II job-on-a-pallet in my new 30x40 shop. I'll let you know how it goes. This is brand new concrete though, no oil stains. They provide the etching solution, rollers, spiked shoes, etc. (BTW, 1500 sq ft is the same $ as 1200 sq ft due to the price break at 1500).
I debated various coatings., polished, and bare for a while. I don't like flakes because I tend to drop washers, etc. so this is straight light gray with a touch of non-skid thrown in.
I debated various coatings., polished, and bare for a while. I don't like flakes because I tend to drop washers, etc. so this is straight light gray with a touch of non-skid thrown in.
If you DIY, investigate chemical etching over grinding. I did mechanical grinding, it was a horrible process. I figured it would be better as far as adherence, but I'll probably never get rid of all the concrete dust in my hangar. Though I guess I am not as worried about doing fiberglass work in there now as I figure what's a little more dust to add to the rafters. I used another online source, armorpoxy is good stuff too. Just don't do the stuff you buy at hardware stores; a quality two part will hold up as long as the prep is good.
Same boat
Please keep us posted on the Armorpoxy II. I am considering it or Performance Epoxy-Coat for my new hangar. PEC was quite a bit cheaper and had good online reviews but a friend used it and complained that it changed shades when rolled more than twice. His floor looked ok to me. I just want the protection in case I happen to purchase the above referenced Mooney one day.
Please keep us posted on the Armorpoxy II. I am considering it or Performance Epoxy-Coat for my new hangar. PEC was quite a bit cheaper and had good online reviews but a friend used it and complained that it changed shades when rolled more than twice. His floor looked ok to me. I just want the protection in case I happen to purchase the above referenced Mooney one day.
David Paule
Well Known Member
I've got a white epoxy floor in my hangar and while it looks nice and is easy to clean, it gets slippery when wet. Very slippery. Also, the floor is slick enough that my tug spins its tracks.
I got the place this way. But I would have been happier with bare concrete.
Dave
I got the place this way. But I would have been happier with bare concrete.
Dave
As briefly mentioned earlier, do NOT use flakes in any floor covering. It sure looks pretty until you drop any small object. Anything small disappears into the flake mix, and you'll wish you had a white or gray floor.
Don't ask me how I know.
I will concede that your experience may vary....BUT...
I used a gray two part epoxy (brand no longer available) and lightly sprinkled black and white flakes. The flakes camouflage irregularities in the concrete and differences due to applying epoxy in sections, plus flakes add some grip to the surface. AND I had no problem finding dropped objects. Overall I was very happy with the appearance and functionality.
If you are adamantly against flakes, I suggest you use a bit of sand sprinkled on the wet epoxy. Otherwise the epoxy coated floor gets very slippery.
markrettinger
Member
Another vote for Swisstrax. About $3.50/sq foot, lasts forever, you can easily wash it, and you can take it with you if you ever move or sell. You can remove and replace individual pieces. There is no comparison to it, in my opinion.
fl-mike
Well Known Member
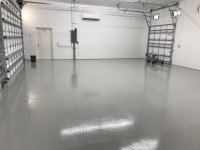
I recently coated the floor of my new workshop with AmorPoxy II job-on-a-pallet.
The shop is new construction and is 30x40 feet, so 1200 sq feet.
I purchased 1500 sq feet of coating because the price break is a 1500 and it ends up being the same as 1200. I suspect you get the same amount of product either way because it is in gallon increments.
I received:
2 – 1-gallon jugs of acid prep
4 – 2-gallon epoxy kits, light gray
3 – 1-1/2-gallon ArmorCoat urethane topcoat, light gray
3 – small cans of non-slip additive
4 – 18” roller covers
2 – 18” roller frames
2- 5-gallon buckets
2 – bucket liners
1 – mixer attachment for a drill
1 – pair of spiked shoe “sandals”
I spent a lot of time cleaning and prepping the floor before starting. I had tiny dots of overspray from urethane foam insulation that had drifted onto the floor. That gave me the most problems as it was difficult to get off and I was afraid it would come through as uneven texture. I tried pressure washing, floor scraper, sand paper on a 2x6 board, but ended up with a razor blade as the only really effective means. That took a LONG time before I was satisfied. Luckily, I installed AC first!
Some chips and defects were filled with concrete patch and then the floor was pressure washed again, then vacuumed.
I filled the expansion cuts with self-leveling concrete crack filler (Sikaflex brand) after pushing some backer rod foam down into the cuts to reduce the amount of filler needed. (I found that very deep filler produced bubbles that were near impossible to fill after the first pass cured). First, I cleaned out the cracks with a hook tool and vacuumed the debris. I found that slightly overfilling the cracks to a small “hump”, letting it cure, and then slicing flush with the floor worked best and fastest (and was oddly satisfying!).
Now the fun started.
I applied the acid with a stiff brush and rinsed off with the pressure washer. No big deal. I let the floor dry for a few days.
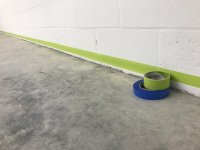
I masked the wall so that I have about ¾” of floor paint coming up the walls because the intersection is ragged in a few spots and getting a nice clean line was difficult. I used a roll of tape to space the other roll or tape off the floor to make a nice even line. A chalk line didn’t work because the block walls were not even enough. The roll-of-tape spacer trick was way faster and easier anyway.
Lesson learned: I forgot that this is urethane and used regular tape. This resulted in a lot of bleed under the tape, especially at the door-floor tape lines as the urethane attacked the tape adhesive. If you want a clean line, use urethane-safe tape, like automotive masking tape ($).
Lesson learned: Loctite the spiked sandal spike nuts. Lots of tales on-line of finding a ¼-20 nut in the floor paint. There is no time to be fixing while the epoxy is kicking!
The epoxy went down fine, but the working time is limited to about 30 minutes in hot Florida, and once it starts to kick, you can tell. I had a helper, so we mixed up a two-gallon kit, and we were hustling to finish before it kicked. We did 4-300sq ft sections, which was easy as the expansion cuts were on 10 foot squares. Use the rollers. I fell victim to Youtube wisdom and tried a 1/8” notched squeegee first. This paint is way too thin for that. Use the roller! We were furiously trying to pull the puddles out of the corners. Use the rollers! I did pour it on, but we just rolled it out from there. My helper cut in the edges and corners while I rolled, and then he rolled once that was done. After the squeegee disaster on the first kit, the other kits went fine. The epoxy layer cures to a flat sheen.
We let the epoxy cure overnight and then moved to the urethane topcoat. It is gray too, but when wet is a slightly lighter color, so seeing your coverage is no problem. It is thinner than the epoxy and goes on a bit faster. This is also (for solid colors) where you mix in the non-slip additive. For this coat, I used roller trays and it worked fine. This layer doesn’t kick as fast as the epoxy, so we felt less rushed. I kept a half of the last kit un-mixed for touchup, and I needed it. You will miss some spots, so keep some spare.
Lesson learned: the anti-slip additive sinks to the bottom of the bucket pretty quickly, so they recommend agitating it while applying. The problem is that this resulted in much more “grit” sheen in the areas rolled just after agitation. If I did it again, I think I would just let the roller pick it up in the pan (as poured in the pan) and I think this would result in less noticeable grit density fluctuations in the finished floor. As it is, there is plenty of grit even in the lightest areas (I think!). Time will tell.
After letting the glossy urethane topcoat cure overnight, I removed the tape and found the bleeding mentioned earlier. I marked areas we missed for touchup and touched those up with the spare topcoat/grit using a smaller roller (ordered a 9” version cover on Amazon (also a second pair of “sandals” for my helper)) and a brush.
It’s not perfect, but I think it will be fine as long as it doesn’t chip, flake, or peel. We’ll see. Total cost is probably about $2000 for 1200sq ft, maybe a bit less. ($1815 for the paint package, delivered, plus the other stuff)
Now to add more electrical outlets and lights!
P.S. The "scooter" is a four-wheel walker/seat saved from curb-side trash day. I took off the handles, brakes, and other unneeded stuff. Makes a great, smooth rolling seat. Much better than the tiny castors on my mechanics seat.
The shop is new construction and is 30x40 feet, so 1200 sq feet.
I purchased 1500 sq feet of coating because the price break is a 1500 and it ends up being the same as 1200. I suspect you get the same amount of product either way because it is in gallon increments.
I received:
2 – 1-gallon jugs of acid prep
4 – 2-gallon epoxy kits, light gray
3 – 1-1/2-gallon ArmorCoat urethane topcoat, light gray
3 – small cans of non-slip additive
4 – 18” roller covers
2 – 18” roller frames
2- 5-gallon buckets
2 – bucket liners
1 – mixer attachment for a drill
1 – pair of spiked shoe “sandals”
I spent a lot of time cleaning and prepping the floor before starting. I had tiny dots of overspray from urethane foam insulation that had drifted onto the floor. That gave me the most problems as it was difficult to get off and I was afraid it would come through as uneven texture. I tried pressure washing, floor scraper, sand paper on a 2x6 board, but ended up with a razor blade as the only really effective means. That took a LONG time before I was satisfied. Luckily, I installed AC first!
Some chips and defects were filled with concrete patch and then the floor was pressure washed again, then vacuumed.
I filled the expansion cuts with self-leveling concrete crack filler (Sikaflex brand) after pushing some backer rod foam down into the cuts to reduce the amount of filler needed. (I found that very deep filler produced bubbles that were near impossible to fill after the first pass cured). First, I cleaned out the cracks with a hook tool and vacuumed the debris. I found that slightly overfilling the cracks to a small “hump”, letting it cure, and then slicing flush with the floor worked best and fastest (and was oddly satisfying!).
Now the fun started.
I applied the acid with a stiff brush and rinsed off with the pressure washer. No big deal. I let the floor dry for a few days.
I masked the wall so that I have about ¾” of floor paint coming up the walls because the intersection is ragged in a few spots and getting a nice clean line was difficult. I used a roll of tape to space the other roll or tape off the floor to make a nice even line. A chalk line didn’t work because the block walls were not even enough. The roll-of-tape spacer trick was way faster and easier anyway.
Lesson learned: I forgot that this is urethane and used regular tape. This resulted in a lot of bleed under the tape, especially at the door-floor tape lines as the urethane attacked the tape adhesive. If you want a clean line, use urethane-safe tape, like automotive masking tape ($).
Lesson learned: Loctite the spiked sandal spike nuts. Lots of tales on-line of finding a ¼-20 nut in the floor paint. There is no time to be fixing while the epoxy is kicking!
The epoxy went down fine, but the working time is limited to about 30 minutes in hot Florida, and once it starts to kick, you can tell. I had a helper, so we mixed up a two-gallon kit, and we were hustling to finish before it kicked. We did 4-300sq ft sections, which was easy as the expansion cuts were on 10 foot squares. Use the rollers. I fell victim to Youtube wisdom and tried a 1/8” notched squeegee first. This paint is way too thin for that. Use the roller! We were furiously trying to pull the puddles out of the corners. Use the rollers! I did pour it on, but we just rolled it out from there. My helper cut in the edges and corners while I rolled, and then he rolled once that was done. After the squeegee disaster on the first kit, the other kits went fine. The epoxy layer cures to a flat sheen.
We let the epoxy cure overnight and then moved to the urethane topcoat. It is gray too, but when wet is a slightly lighter color, so seeing your coverage is no problem. It is thinner than the epoxy and goes on a bit faster. This is also (for solid colors) where you mix in the non-slip additive. For this coat, I used roller trays and it worked fine. This layer doesn’t kick as fast as the epoxy, so we felt less rushed. I kept a half of the last kit un-mixed for touchup, and I needed it. You will miss some spots, so keep some spare.
Lesson learned: the anti-slip additive sinks to the bottom of the bucket pretty quickly, so they recommend agitating it while applying. The problem is that this resulted in much more “grit” sheen in the areas rolled just after agitation. If I did it again, I think I would just let the roller pick it up in the pan (as poured in the pan) and I think this would result in less noticeable grit density fluctuations in the finished floor. As it is, there is plenty of grit even in the lightest areas (I think!). Time will tell.
After letting the glossy urethane topcoat cure overnight, I removed the tape and found the bleeding mentioned earlier. I marked areas we missed for touchup and touched those up with the spare topcoat/grit using a smaller roller (ordered a 9” version cover on Amazon (also a second pair of “sandals” for my helper)) and a brush.
It’s not perfect, but I think it will be fine as long as it doesn’t chip, flake, or peel. We’ll see. Total cost is probably about $2000 for 1200sq ft, maybe a bit less. ($1815 for the paint package, delivered, plus the other stuff)
Now to add more electrical outlets and lights!
P.S. The "scooter" is a four-wheel walker/seat saved from curb-side trash day. I took off the handles, brakes, and other unneeded stuff. Makes a great, smooth rolling seat. Much better than the tiny castors on my mechanics seat.
Attachments

fl-mike
Well Known Member
You're new place looks great! It will look even better when you fill it up and find it is shrinking by the day
On it. Give me a couple months.
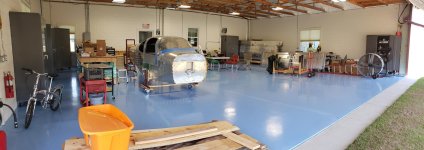
In March had a pro epoxy group do 2000 sq ft at about 2.00/sq ft. Grind, fill cracks and cuts, two coats, heavy grit near pedestrian door and main hangar door, light grit everywhere else and speckles. Love it.
No problem finding dropped items and it doesn't look dirty as quickly.
No problem finding dropped items and it doesn't look dirty as quickly.
Attachments

https://www.epoxyincorporated.com. Alecia or Jeff. Ask if a counterpart is in TX

