What's new
Van's Air Force

Don't miss anything! Register now for full access to the definitive RV support community.

Fuel Tank Step by Step

UnPossible

Well Known Member
Hey - I am finally getting around to building a new tank after a bird strike last year. As my plane is a QB, this is my first experience with building tanks.

I have all the parts about ready to be riveted together. I am trying to find a good build log with step by step instructions for the prosealing / riveting. So far I have not found the successful search words (either I get way too many search results, or nothing).

Does any have a link to a detailed build log that shows the sealing/ riveting process in detail?

Thanks,
Jason
 
I wrote up my tank building experience here.
Photos from the process are here.

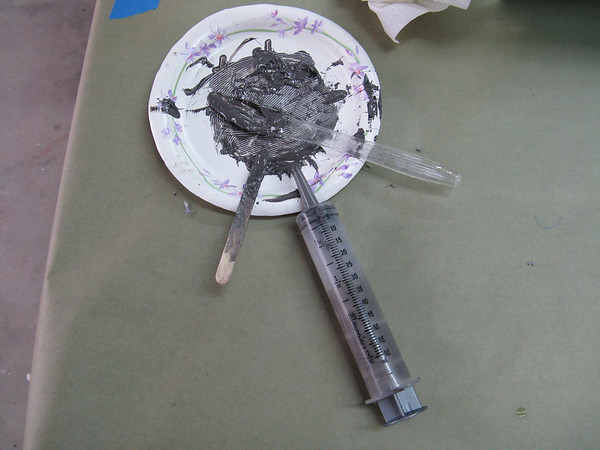
Here are the main tools used (plus lots of paper towels, masking tape and gloves).
IMG_8019-M.jpg


Paper plate for mixing/measuring, popsicle sticks, plastic knife and veterinary syringe for application. Use the stick mix and to fill the syringe. Use the syringe to lay down a nice thin bead of the sealant on the rib flanges. Use the knife to spread out the sealant, then cleco it in place. Letting it set up for a day before riveting will help keep the mess to a minimum. After riveting, use the syringe to cover all of the rivet heads, and build up a nice fillet along the ribs using the popsicle stick rounded end, then pull the masking tape and you will have a nice clean job.
 
Tips

I wrote up my tank building experience here.
Photos from the process are here.

Here are the main tools used (plus lots of paper towels, masking tape and gloves).
IMG_8019-M.jpg


Paper plate for mixing/measuring, popsicle sticks, plastic knife and veterinary syringe for application. Use the stick mix and to fill the syringe. Use the syringe to lay down a nice thin bead of the sealant on the rib flanges. Use the knife to spread out the sealant, then cleco it in place. Letting it set up for a day before riveting will help keep the mess to a minimum. After riveting, use the syringe to cover all of the rivet heads, and build up a nice fillet along the ribs using the popsicle stick rounded end, then pull the masking tape and you will have a nice clean job.

Basically how I did it top.
My process and a few tips are in my blog.
 
I've never been able to get comfortable with the idea of letting the sealant cure with only clecos holding the skins down. In my view, there's too much risk of not getting a tight fit between skin & ribs. If the sealant isn't squeezed out almost completely, the rivet is then loaded in bending instead of shear. No question that a lot of planes are flying after building the tanks that way, but the risk is there.

If you don't like the regular method, why not just rivet dry, and then seal both edges of the ribs and the shop heads?

On the subject of prep and application:

I was fortunate; someone taught me to use cheap quart size ziploc bags. Turn a bag inside out & place on the scale; zero the scale. Measure out roughly a golf ball sized quantity on the scale. 'Uninvert' and close the bag, getting the air out. Mix using a 'rolling pin' made from a short length of PVC or aluminum tubing. Roll it all to one corner, and snip ~1/8" diagonal off the corner. Now you can use the bag like a cake decorator to apply the sealant. Virtually no mess.

BTW, don't forget to clean the rivets in solvent, as well as the skins & ribs.

Charlie
 
Buy a box of the tongue depressors from ACS to use for mixing and spreading the sealant.

Make sure you have plenty of Nirile gloves on hand. This stuff Is really messy and it seems to get everywhere.

If you realize it's a big, messy job and that it's going to take awhile to complete it's not that bad. You'll figure it out as uou go along.
 
My Method

I was unable to get a syringe and man I wish I had. Messy is not the word to describe using tongue depressors.

I did lay a bead under each rib and then placed the rib.

I did measure exactly the right amount by weight of component pro seal.

I placed the bucked the rivets in while all was wet and not cured.

It appears to meet the ballon test and this spring it will get gas when i first fire up the engine.

I used a syringe later on a part and it sure helps to get a better bead to work with
 
I think whether or not the sealant squeezes out with just cleco pressure is related to how much sealant is used. If you apply a ton then the thickness left in the joint will be greater. Also, one can put an 8-32 nut between the cleco and the tank to apply more pressure. I let the sealant cure prior to riveting. Will it leak? I'll tell you in a year.

On the subject of application, I bought the pneumatic gun off ebay. I will sell it when I'm done. it was $80 or so. Money very sell spent!!
 
Hey - I am finally getting around to building a new tank after a bird strike last year. As my plane is a QB, this is my first experience with building tanks.

I have all the parts about ready to be riveted together. I am trying to find a good build log with step by step instructions for the prosealing / riveting. So far I have not found the successful search words (either I get way too many search results, or nothing).

Does any have a link to a detailed build log that shows the sealing/ riveting process in detail?

Thanks,
Jason


Jason, I have some info for you if you are interested in how us RV-6 and RV-4 guys (real builders! :) ) glued together our tanks. Before you discount our methods as being old school remember our tanks have been in service for well nigh twenty years.

Here is my build log for the RV-6 tanks.

wing-83.jpg


Hope you find some nuggets that are helpful.
 
I think whether or not the sealant squeezes out with just cleco pressure is related to how much sealant is used. If you apply a ton then the thickness left in the joint will be greater

This is why my technique of using a plastic knife works so well. The shape of the knife is optimized for spreading stuff. Popsicle sticks, not so much.

The tiny serrations on the plastic knife act like a notched trowel for limiting the amount of sealant that remains on the flange. The thickness here is very minimal, so letting the sealant tack up for a day shouldn't introduce any real problems when the rivets are driven. Use a toothpick to dab just a tiny bit of sealant in each rivet hole as you go. Come back after the rivets are set and use the syringe to cover all of the rivet heads generously and make a nice fillet along the flange edges, then pull the masking tape and you will have a nice professional looking job.

Veterinary syringes (sans needles) are cheap and easy to use. I went down to the local feed store and bought several for $1.99 each. You can reuse them if you let the sealant set fully, then just push it out of the barrel with an ice pick. Search the web and you'll find lots of mail order supply chains that have deals if you don't live in a rural area.

My tanks have been leak free!
 
SCUFF

Not going to read all the links and steps that others are posting.

Here is my #1 tip for sealing tanks or getting good results with Pro-Seal.

#1 important, everything that the Pro-Seal is going to stick to must be SCUFFED. IF there is no "teeth" for it to stick to, the Alclad acts just like Teflon and will leak.

Also #1, everything must be Clean.

Also #1 everything must NOT be smooth so that there is CLEAN "TEETH" for the Pro-Seal to stick to.
 
Follow the instructions in the manual!

Do not deviate from those instructions and you will be fine.

Do not clean any part of the tank with MEK or anything else, once you have proseal on it. Wait until it dries / hardens then sand it off, DO NOT use MEK!!!

Rather than syringes, I mixed the proseal in Ziploc freezer bags and cut a corner off. Then I used the Ziploc bag like I was icing a cake.
 
Not going to read all the links and steps that others are posting.

Here is my #1 tip for sealing tanks or getting good results with Pro-Seal.

#1 important, everything that the Pro-Seal is going to stick to must be SCUFFED. IF there is no "teeth" for it to stick to, the Alclad acts just like Teflon and will leak.

Also #1, everything must be Clean.

Also #1 everything must NOT be smooth so that there is CLEAN "TEETH" for the Pro-Seal to stick to.

Gary - when you say "scuffed" are use using sand paper, etc that's more agressive than the maroon scotchbrite pads? If so, what sort of grit?
 
Back
Top