What's new
Van's Air Force

Don't miss anything! Register now for full access to the definitive RV support community.

Doors (not really) fitting

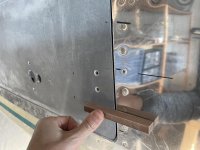
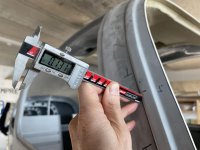
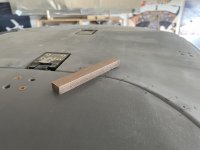
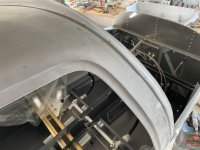
Good day, working on the doors and having the top part and side part flush with the structure I end up with the door being recessed more than 1/8 inches at the A pillar, it seems to be a lot.
Any thoughts or help welcome for the best way to fix it or avoid it...
 

Attachments

  • IMG_8515.jpg
    IMG_8515.jpg
    422.4 KB · Views: 211
  • IMG_8517.jpg
    IMG_8517.jpg
    234.4 KB · Views: 243
  • IMG_8518.jpg
    IMG_8518.jpg
    276.3 KB · Views: 242
  • IMG_8519.jpg
    IMG_8519.jpg
    291.9 KB · Views: 268
That is reminiscent of how mine were. I contoured them with micro to make them fit the cabin contours better. I also had to do some contouring on the cabin top.
 
You will need filler likely on both the door and outer frame in places to get it flush. That is typical. I notice the latching mechanism is missing in your pics. Strongly recommend NOT doing final door to frame clearance sanding until the latches are in place. Depending upon how precise your drill things, the door/frame clearances will be different with the door latched vs free hanging, not to mention the door height relative to the frame.

The large offset in the 4th pic could have been avoided with more clamps or more clecos with bracing to get a better bend during the bonding step. The final curve is more about how it is layed up and supported during curing than the part shape. Won't be noticed too much after fairing it, but may need to work a bit on the inside of the door in that area to get visually pleasing alignment. You will wind up with a pretty sharp angle in that area from the windshield to side window and noticeably different than the otherwise flat areas of the door. Unfortunately this won't be noticeable until shinny paint is applied. May want to consider bulging the side window out a bit in that spot to reduce it. Really will need to lay everything up and look.

Larry
 
Last edited:
Remember that if they are perfectly flush now, they may be be proud after you install the sealing bulb (or alternative) around the door. Final fit needs to be fully assembled.
 
Completely agree - had to do many layers of epoxy, thickened with additives, to build up the windscreen pillar on both sides so the edge of the door was not sticking out into the airflow. I'm sure there is some magic to aligning and cutting the doors perfectly that will match the curve, but I didn't find it. Maybe on my tenth build I will know how to make them fit on the first try.
 
Thanks, I plan on the McMaster seal and will work on it before going further to see how much of an impact it has on the general geometry of the door.
 
I see you have not put layers of fg cloth and completed the bonding and installation of the wind screen. I found that once you add a layer of cloth across window bond and then add micro to cosmetically finish it you may have to add micro to bring the edge of the door out flush.
 
McMaster seal

Like everyone else said, wait with final fitting until all other parts are installed.
Including rear window, door window and closing/locking hardware.
Installing the McMaster seal will make an excellent and clean looking seal but it will also take a good amount of time and effort to get it properly fitted.
To begin with, that seal will distort your door everywhere until you adequately sand down the fiberglass lip on the door frame. In some places especially on top and top corners you'll have to remove nearly half an inch before the McMaster seal will allow the door to close properly.
 
All clear now, thanks for the good inputs, I will fit everything (seals, windows, gas strut, mechanism) before doing anything cosmetic to get rid of what's left of this recess...
 
Back
Top