What's new
Van's Air Force

Don't miss anything! Register now for full access to the definitive RV support community.

How to fix chattering countersink hole?

Red_Baron

Member
G'day,

I am using a 3 flute #30 countersink tool for my fuel tank nutplates on my -7. Some of the holes come out ok. Some seem irregular as the bit chatters ( I believe this is the correct term...)

Any ideas on the best method to tidy these irregular countersinks up, or should I just leave them be?

Any advice appreciated.
 
Make sure you have a new countersink bit.
Don't take too big of a bite on it.

I think you are talking the small holes.
Do them first put in the platenut and then
countersink the big holes last. The platenut
will hold the center of the countersink and it
won't chatter on you.

Hope it helps.
Boomer
 
The trick is to back up the flange with a piece of wood, clamp it tight and drill into the wood with a #30 then proceed to countersink, the wood provides a guide for the countersink pilot keeping it steady. It worked for me
Greg
 
....best method to tidy these irregular countersinks up....
Unless the rivet hole is only very slightly larger than the pilot on the countersink bit, the pilot on a standard countersinking bit itself can be an aggravating factor in producing those undesirable chatter marks. The fix can be fairly simple. My favorite way is to deftly remachine those chattered countersinks using a zero flute countersink bit. Doing so will often remove the chatter marks in short order. Although this builders tip specifically addresses machined countersinks generated in Plexiglas, the zero flute bit also happens to work very well on aluminum too:

http://www.vansairforce.com/community/showthread.php?t=47568&highlight=flute+countersink+bit
 
bit speed

G'day,

I am using a 3 flute #30 countersink tool for my fuel tank nutplates on my -7. Some of the holes come out ok. Some seem irregular as the bit chatters ( I believe this is the correct term...)

Any ideas on the best method to tidy these irregular countersinks up, or should I just leave them be?

Any advice appreciated.

Slow your speed down....way down when you countersink (a variable speed electric drill works the best).
If you want to fix the screwed up hole (providing you have enough material left) a) clamp a backup with pilot hole in it (any material will do) under the original hole
b) turn your countersink very slow with light-moderate pressure

hope this helps
 
You can buy a single flute c/s bit, similar to what Rick showed but with a pilot tip like your 3-flute model.

It's been a long time since I did the wings; did you mean a #40 (3/32") c/s tool? FWIW, I followed advice of a few others on the nut plates that are riveted to thinner skins and dimpled both the skin's rivet holes and the nut plate rivet holes. It requires a female dimple die that's a bit smaller in diameter than a typical die, or filing down one side of a standard die. My experience was that the nested dimples seem to help keep the nut plate perfectly centered under the screw hole better than using a screw, and the screw isn't in the way when you rivet the nut plate.

Charlie
 
I did something similar to Greg with the exception that I got a piece of flat aluminum from Lowes and backed up my spar flange while I was match drilling. When it came time to countersink the guide on the countersink bit had something to guide it the last few mm. No chattering and perfect countersink.
 
2 flute

The 3 and 4 flute countersinks are really used for harder metals like steel. The single and 2 flutes are for softer metals. So start with that first off, also the pilot needs to be just a bit smaller than the hole you are c'sinking. Go slow and use a back up as described above. That works most of the time.

To fix the chatter marks use what Rick is describing, that works the best, just make sure you don't go to big with the size of the c'sink
.
 
Last edited:
I didn't like the 2-flute countersink, and found it had a tendency to *really* chatter. I *love* the 1-hole dude, but it is *aggressive* and I found it very easy to take too big of a "bite", especially at the ends of flanges and such (seemed like material would flex a touch more, and the hole with the cutting edge would "grab" it and dig in). Also, if you use a 1-holer, be sure to clear the chips after each countersink, or the swarf stuck in the countersink will make nice little circular scratches around the *next* countersink.
 
Many thanks!

As always, thanks for the advice guys and gals. Much appreciated.

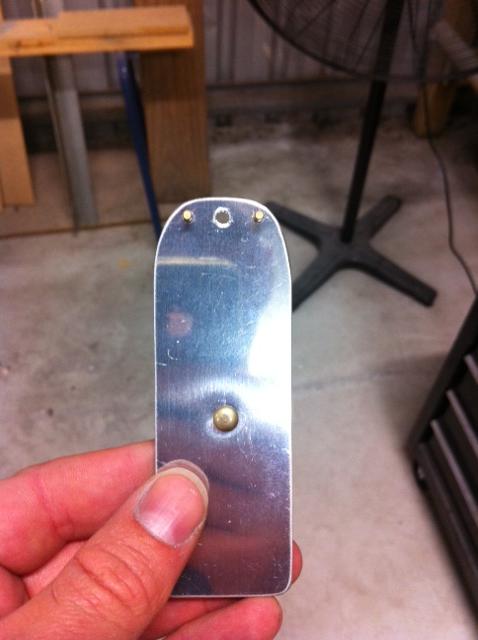
I was VERY fortunate that I hadn't drilled the countersink holes deep enough. This gave me the option to repair the irregular holes by drilling them deeper to the correct diameter.

Based on the advice from the guys in this forum, and a bit of research from Brad Oliver's website (RV7factory.com) I was able to make myself a pilot hole guide for my countersinking flute.
nutplate-hole-guide-2.jpg

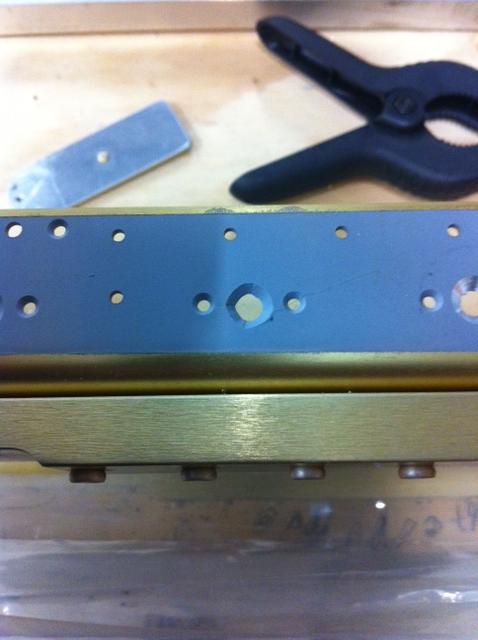
Here is probably the worst example of an irregular hole. Most of the holes were round and smooth, and the others that were irregular were much less severe than this one.
irregular-nutplate-hole1.jpg

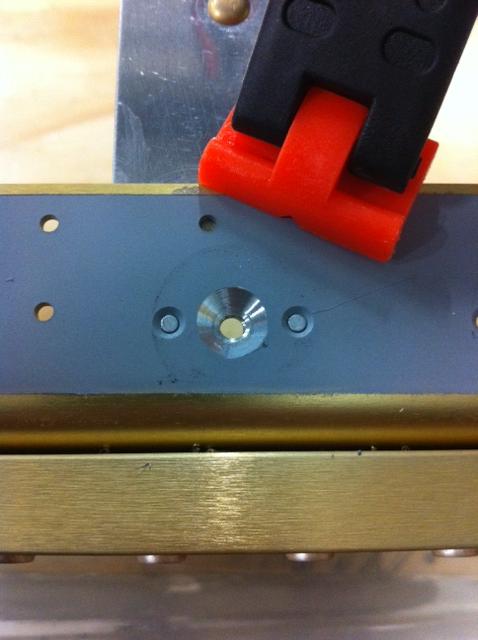
Using my new pilot guide, I was able to fix this particular hole so that it now looks like this.
fixed-nutplate-hole.jpg

It's still not perfect, but it's MUCH better than it was before. I'm still fixing the holes as I'm going very slow and careful. It seems I may have been very lucky in not wrecking my spars. Another lesson learnt in the building journey.

Having an absolute ball!!!:D
 
Good job Gavin! I always tell people that learning how to FIX your mistakes is the first true step towards being a master builder. Anyone can order new parts, but if you can correct your problems with the parts you have (not hide them FIX them), then you are getting the hang of things....

Paul
 
Very nice

I do this for a living and that my friend is the different between a pro and beginner.....the guy that can fix his mistakes and make it look good and you have done it. Good Job!!
 
Back
Top