I'm attached the control column to the carry-through. It seems to me that there is very little travel of hte control column, and i just want to verify that this is normal. Nothing is rigged, just the control column mounted to the carry through. WIth the stick in the full forward position, the bottom of the column (where the elevator pushrod will attach) touches the carry-through. When I pull back on the stick, the bottom of hte control column moves back, but only about 2.25 inches, before the top of the control column hits the top of the cutouts in the floor ribs. This means the elevator pushrod will only have about 2.25 inches of forward and back movement from the control column. Is this correct?

Van's Air Force
You are using an out of date browser. It may not display this or other websites correctly.
You should upgrade or use an alternative browser.
You should upgrade or use an alternative browser.
control column travel
- Thread starter prkaye
- Start date

robjohnson
Well Known Member
Did you modify the ribs properly? Not sure about the -9, but on the -7 you have to cut a pretty good chunk out of the center ribs so the control column doesn't hit the top of the ribs. Definitely doable after you have riveted them, but it won't be a really fun experience.
Hard to know
It is hard to know exactly how far the stick needs to move until you rig the controls. I ended up having to remove some of the cover and the rib on the pilot side of mine. You make sure the control surfaces move within spec, set the stops, and then make sure the controls move freely between the end limits.
Here is a shot that shows some of the top of the rib that was removed:
You can also see where I had to take just a bit out of the hole in the rib where is was catching the aileron tube with full aft stick.
I should point out that this is a 6, not a 9. I have seen similar trimming on other 6's.
Hans
Last edited:
I'm working on the same subassembly right now. My control column also hit the bottom of the rib cutouts on full forward stick. I ground out one such spot, to find it then hit a different rib cutout. I've ground out three rib cutouts, and now believe I have plenty of stick travel. The positive elevator stop(s) will be the true limiting point forward/aft travel. I'm working on the final adjustments for the elevator p-rod now.
N941WR
Legacy Member
Phil,
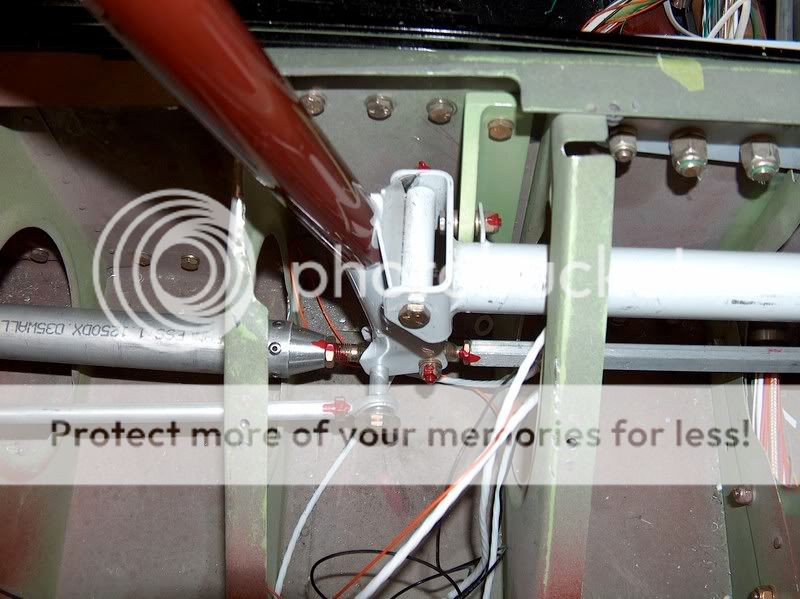
Here is a good picture of the controls installed in my -9.

As you can see, no modifications were needed to get full stick travel. With the controls installed, the stick doesn't hit anything. W/O them installed, there may be some issues.
Check your plans, is it possible you have a rib in backwards or some such issue?
Here is a good picture of the controls installed in my -9.
As you can see, no modifications were needed to get full stick travel. With the controls installed, the stick doesn't hit anything. W/O them installed, there may be some issues.
Check your plans, is it possible you have a rib in backwards or some such issue?
smithhb
Well Known Member
It appears you have a rib installed incorrectly. (Bet you have the same problem on the right side too.) The flange on the left of the control column should be facing left. This is a pretty common mistake and can be remedied by trimming the flange (as you have done.
You will also need to trim the "hole" the control column travels in more than the plans describe. You should be able to "push the stick" forward until the stick is touching the panel without binding on the ribs. I used a Dremel to cut out enough of the ribs for clearance.
You will also need to trim the "hole" the control column travels in more than the plans describe. You should be able to "push the stick" forward until the stick is touching the panel without binding on the ribs. I used a Dremel to cut out enough of the ribs for clearance.

robjohnson
Well Known Member
Hey Bill,
Look at your center 4 ribs -- if you recall, you had to remove a portion of the rib, as per the plans. If Phil didn't do this, this would certainly cause his forward to aft movement issue. Kind of hard to tell with no pictures from Phil. This is the portion I was referring to when I mentioned modification.
I agree with the other poster that something isn't right in the other pic that is posted. I haven't seen a need to modify the top flanges like that before....
Phil,
Here is a good picture of the controls installed in my -9.
As you can see, no modifications were needed to get full stick travel. With the controls installed, the stick doesn't hit anything. W/O them installed, there may be some issues.
Check your plans, is it possible you have a rib in backwards or some such issue?
hmmm
I did trim the holes in the ribs... but holy smokes,, I did put two of the ribs in backwards! On DWG 22 it shows the third floor rib in (on each side) faces outboard, wher all the rest face inboard. How did I miss that?? More importantly, how do I fix it??? But why is that my floor still fits (the holes still line-up)... strange.
This is not the rib that the control column sits inside though... the control column sits inside the four inboard-most floor ribs, and these are all supposed to face inboard according to DWG22.
Also, please realise the 2.25" travel is not measured at the top of the control stick... I measured the travel of the bottom of the control column (the part that bolts to the pushrod). The top of my stick travels through an arc about 13 inches front to back. Just not sure if my meaning was clear...
N941WR
Legacy Member
Rob,
You are correct, I did have to trim mine. It has been a long time since I made that section.
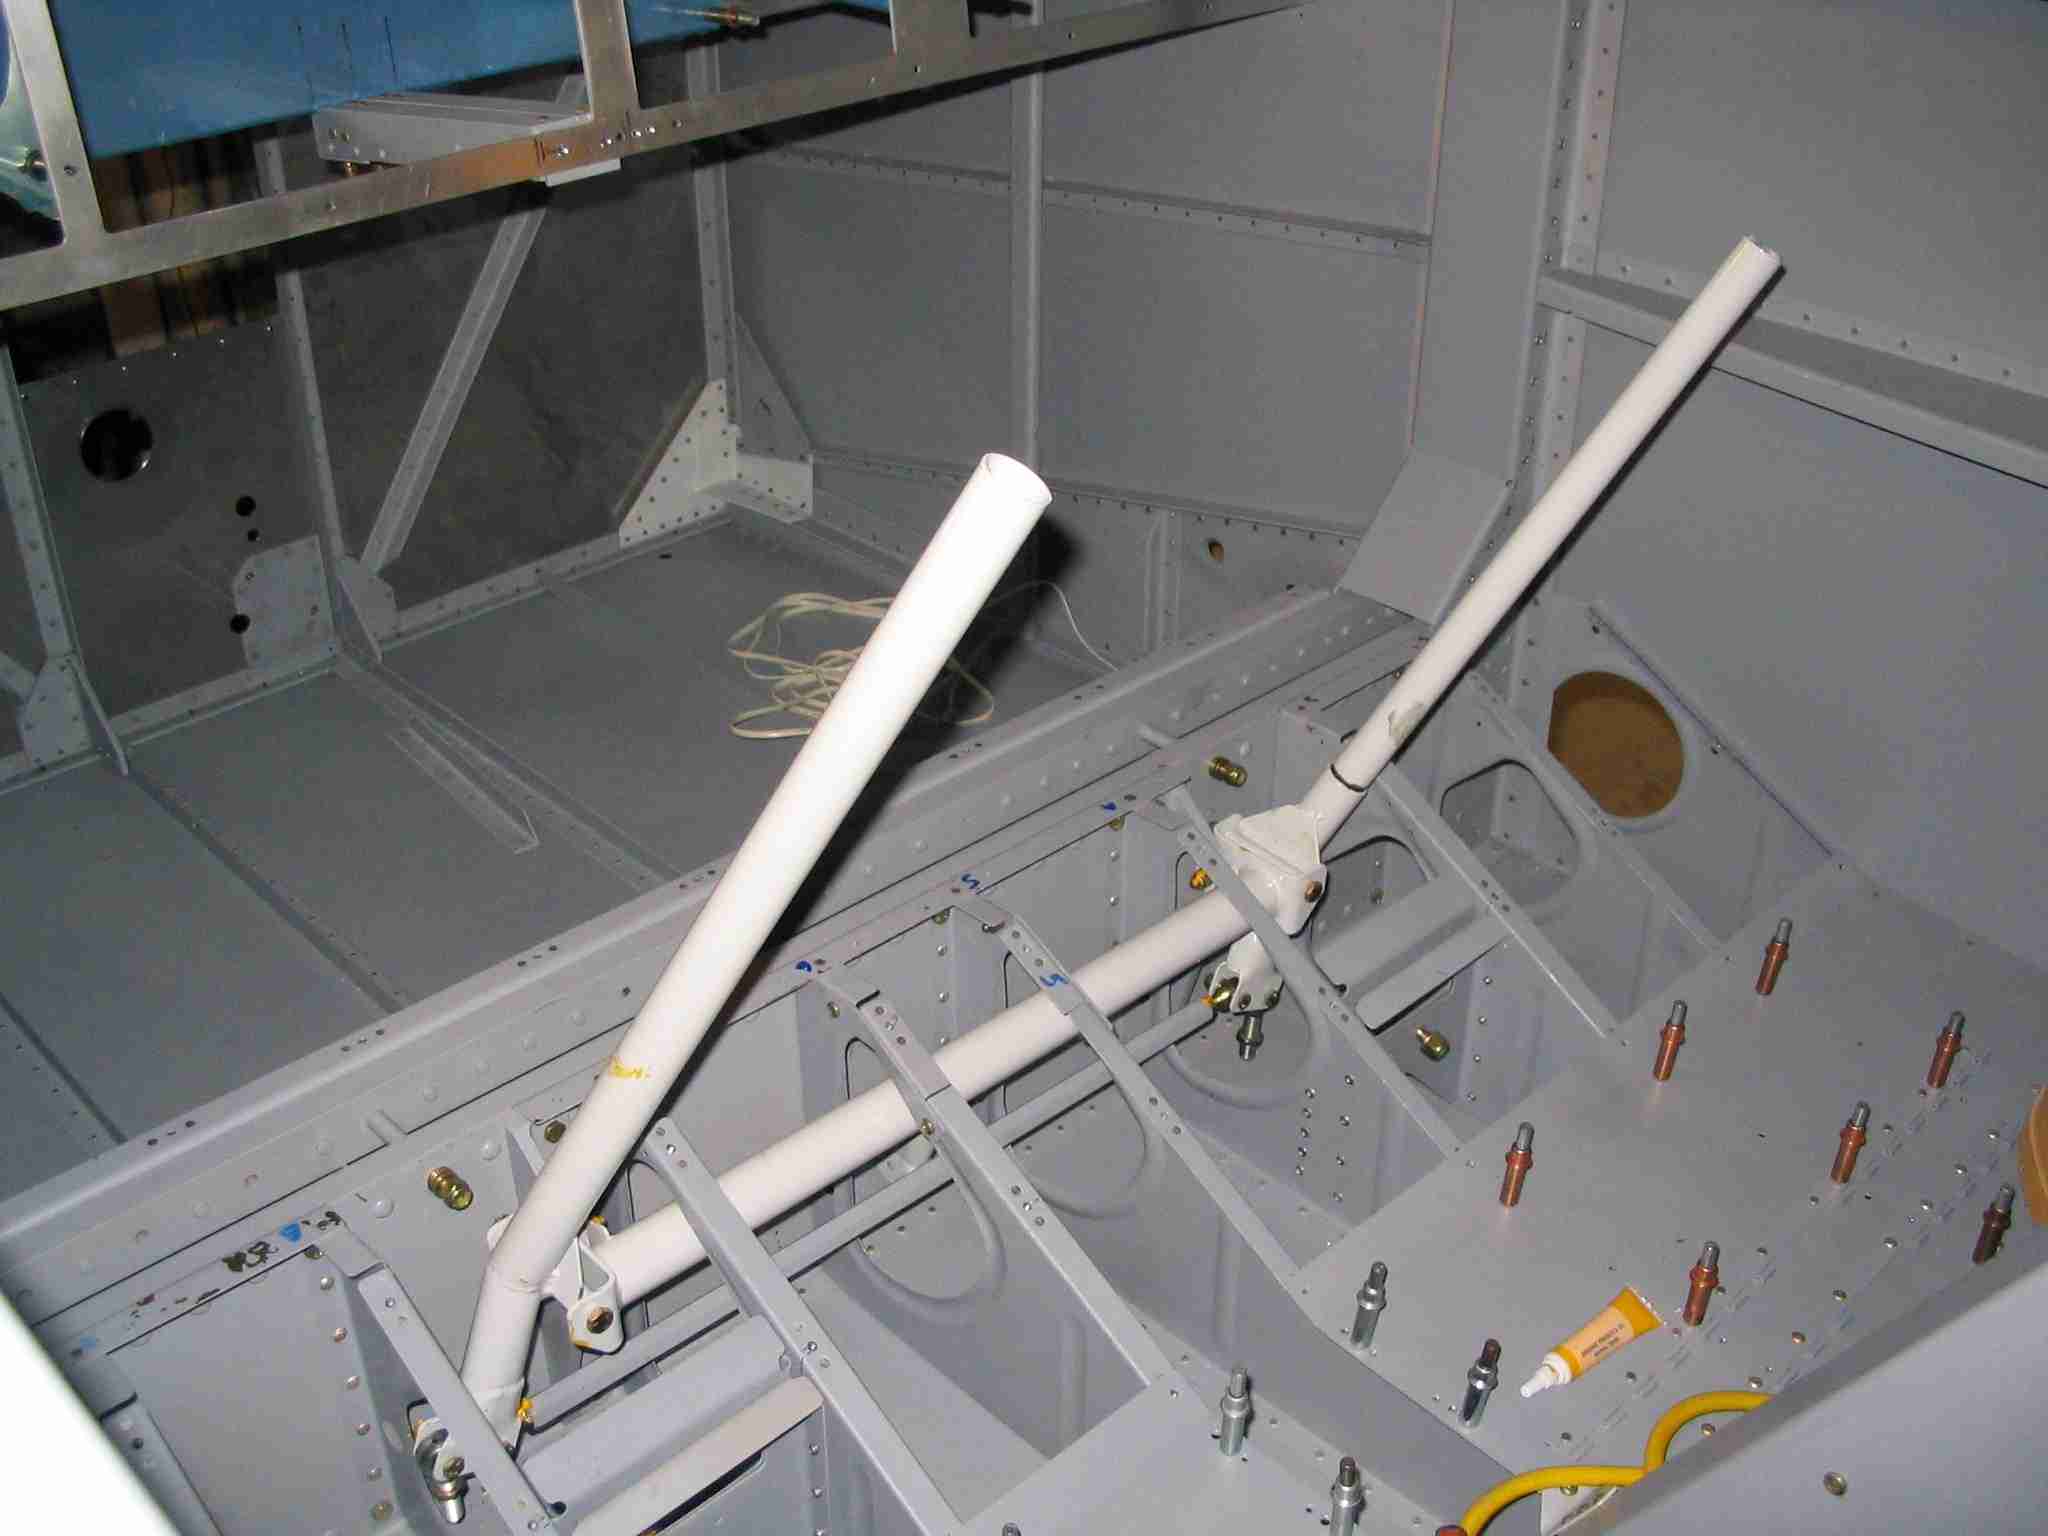
You can see better details of the cutouts in this picture:
Phil,
You have two options to fix your backwards rips.
Option 1. remove them and put them in the correct place. Sounds like a lot of work but really not that bad. You might have to use a special bucking bar to rivet them back to the spar carry through.
Option 2. Trim the flanges off that interfere with your stick movement and rivet on a flange to the other side of the rib. Note, with those ribs in backwards the holes in the seat pans will not matchup.
If it were me, I would remove the ribs and put them in the correct orientation but you are not me.
Just remember, it is not the mistake you make but how you fix it that counts.
You are correct, I did have to trim mine. It has been a long time since I made that section.
You can see better details of the cutouts in this picture:
Phil,
You have two options to fix your backwards rips.
Option 1. remove them and put them in the correct place. Sounds like a lot of work but really not that bad. You might have to use a special bucking bar to rivet them back to the spar carry through.
Option 2. Trim the flanges off that interfere with your stick movement and rivet on a flange to the other side of the rib. Note, with those ribs in backwards the holes in the seat pans will not matchup.
If it were me, I would remove the ribs and put them in the correct orientation but you are not me.
Just remember, it is not the mistake you make but how you fix it that counts.
Trim the flanges off that interfere with your stick movement
The flange only interferes very slightly on the pilot side, stick full aft and left. (No interference on passenger side). But if I visualize these ribs in the other way, there would still be intereference... instead of the stick hitting the outer edge of the flange, it would be hitting the side where the flange meets the web. (see my next paragraph, a mirror-image of the rib will have the flanges in the same position, only the web will be on the other side).
Note, with those ribs in backwards the holes in the seat pans will not matchup.
The holes in the seat pans actually DO line up. I've had my seat pans and fwd seat floors screwed in with no problems (I put nutplates to make them removeable). I think this makes sense though... even if the ribs were put in the other way, the flanges would still be in the same position... the rivet holes along the bottom for example are centered on the lower flange, so the flange would still be centered in the same location even if it were a mirror image (only the web would be on the other side).
Last edited:
N941WR
Legacy Member
My mistake and it is good to hear the holes do line up.The holes in the seat pans actually DO line up. I've had my seat pans and fwd seat floors screwed in with no problems (I put nutplates to make them removeable). I think this makes sense though... even if the ribs were put in the other way, the flanges would still be in the same position... the rivet holes along the bottom for example are centered on the lower flange, so the flange would still be centered in the same location even if it were a mirror image (only the web would be on the other side).
I think it might be time to call Van's.
The other option is to do nothing at this point. Once you get the wings and tail on, you can hook up the controls and see if there is still an interference issue. It is possible you will be ok.

