What's new
Van's Air Force

Don't miss anything! Register now for full access to the definitive RV support community.

Proper crimping of large wires

crabandy

Well Known Member
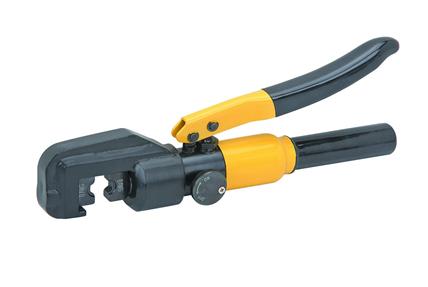
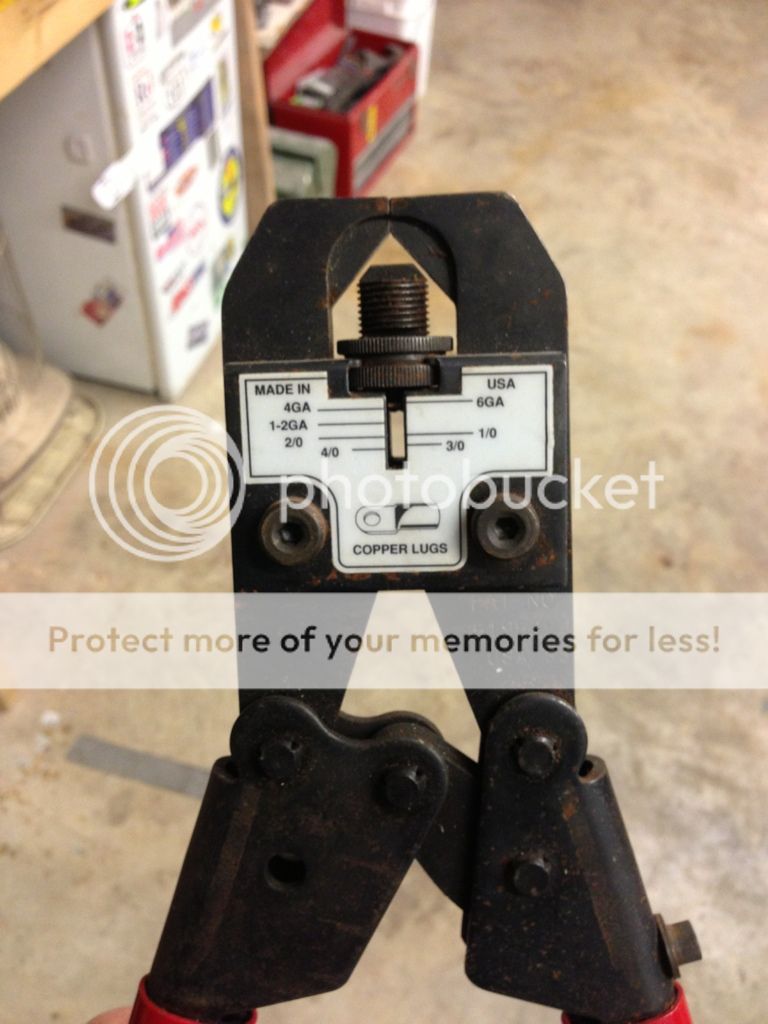
Here is what I borrowed from my local A&P
D8F9BFF7-BE16-469F-B821-C5B5BA745868-13273-000006EC3070D347_zpsda95fe78.jpg

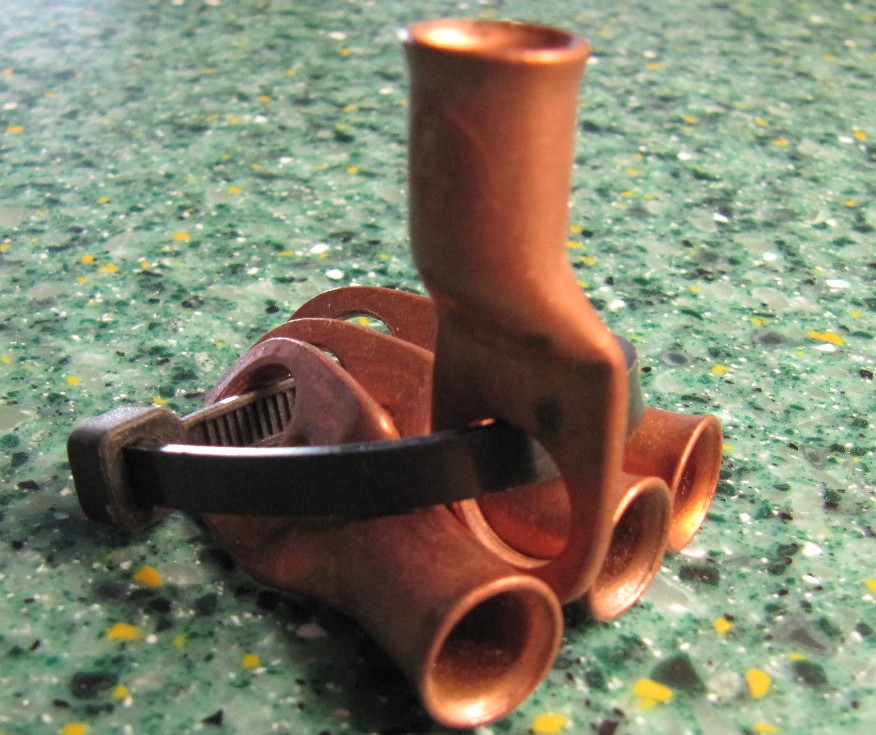
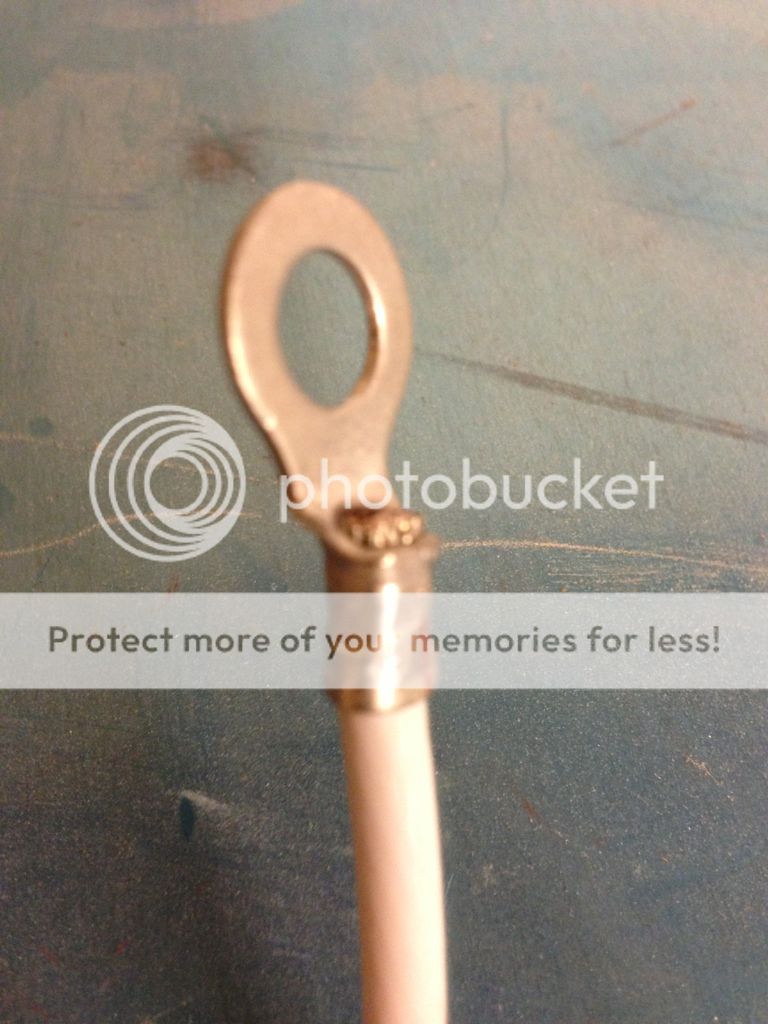
Here is my first crimp on 6 AWG for the Alt B lead
FF759CD6-E20E-4863-A6C8-3E69BD059E24-13273-000006EC1EC0EFCD_zps76d4d050.jpg

Does the crimp look correct?
Should I be doing one crimp and then rotate the terminal 90 degrees and crimping again?
I couldn't find any instructions online for the tool.
Thanks, Andy
 
Not sure from the picture but it would be nice to capture some (1/16") of the sleeve in the crimp. For a test, I'd put the connector in a vice (use some aluminum plates to protect the eyelet) and then pull REAL HARD.

Here's an option for a real nice crimper for crimps from 14 to 0 AWG. I've had this for a few years and it works GREAT!!!!! :D Rosie

Hydraulic_crimper.jpg


To address my comment further on trying to capture some of the sleeve (insulation), please note the terminals below that I used in my plane. They are flared ever-so-slightly and my comment referred to the insulation filling the distance of the flare: THE FLARE IS NOT CRIMPED but 'covers' a bit of the insulation. Any slight bends in the wire, once connected, will allow the insulation to contact the flare and provide a small amount of strain relief. Sorry for the confusion.

Lug.jpg
 
Last edited:
Not sure from the picture but it would be nice to capture some of the sleeve in the crimp. For a test, I'd put the connector in a vice (use some aluminum plates to protect the eyelet) and then pull REAL HARD.

....

Rosie,

I can't find any documentation that says the insulation should be captured under the barrel of a large uninsulated terminal as shown in the picture. The tool shown is for 6 gauge and above wire.

In fact, all data I find says specifically that the insulation should not enter the barrel of the crimp.

Do you have any instructions that say otherwise?

I presume when you say "sleeve" you mean "insulation", or am I misinterpreting your posting?
 
I did get some more direction on the crimper, one crimp only with the seam into the triangle. I did not crimp any part of the insulation, I will do the pull test though.
 
Bob Knuckles advocates the use of soder on large terminals and I concur. Over the years experience with farm equipment big connector problems occur when moisture is allowed to penetrate terminals. This is not something that happens in the short term but eventually corrosion can/may degrade the connection in a crimp only terminal.
I crimp large terminals, from #8 to #2 in size, and then soder, using correct techniques and products. This fills all the gaps between the terminal and the wire.
Finally I apply shrink tube to the connection. I use an expensive type of shrink tube for this application that has a glue on the inside. The shrink tube extends past the terminal to capture the insulation of the wire.
All of this effort is done to make the connection tight, secure, that will resist moisture and vibration issues over time.
I realize that many advocate no soder on aircraft electrics but with larger cables there is not the breakage issue as there is with smaller wires, especially if done properly and no excess soder is wicked past connection into the wire. The addition of heat shrink also stabilizes the joint.
These planes are meant to last many years, how about an electrical connection will last as well.
 
Last edited:
I bought this from Harbor Freight and love it. I actually hate Harbor Freight but couldn't resist these squeezers. The dies are not made of tool steel or anything hard like that which makes them easy to machine. You can make your own design for crimping. I used it on all my large connections. My wire is this stuff and helps with cranking my IO-540 with my battery in the back of the airplane.

http://www.periheliondesign.com/fatwires_files/FatwireInstallationManual-2.pdf

Not sure from the picture but it would be nice to capture some of the sleeve in the crimp. For a test, I'd put the connector in a vice (use some aluminum plates to protect the eyelet) and then pull REAL HARD.

Here's an option for a real nice crimper for crimps from 14 to 0 AWG. I've had this for a few years and it works GREAT!!!!! :D Rosie

Hydraulic_crimper.jpg
 
Bob Knuckles advocates the use of soder on large terminals and I concur. Over the years experience with farm equipment big connector problems occur when moisture is allowed to penetrate terminals. This is not something that happens in the short term but eventually corrosion can/may degrade the connection in a crimp only terminal.
I crimp large terminals, from #8 to #2 in size, and then soder, using correct techniques and products. This fills all the gaps between the terminal and the wire.
Finally I apply shrink tube to the connection. I use an expensive type of shrink tube for this application that has a glue on the inside. The shrink tube extends past the terminal to capture the insulation of the wire.
All of this effort is done to make the connection tight, secure, that will resist moisture and vibration issues over time.
I realize that many advocate no soder on aircraft electrics but with larger cables there is not the breakage issue as there is with smaller wires, especially if done properly and no excess soder is wicked past connection into the wire. The addition of heat shrink also stabilizes the joint.
These planes are meant to last many years, how about an electrical connection will last as well.

I like that method too...

Bob's details here -

http://www.aeroelectric.com/articles/big_term.pdf
 
The Terminal Tool

For those looking for a good tool for crimping large wire gages, Bill Wightman here on the VAF sells a product called The Terminal Tool. It comes with dies for most large wire sizes up to, I think 2gage. Actually, I just checked their website, http://www.theterminaltool.com/ and they now have dies for 1/0 also.

It is a fantastic tool, beautifully made. I think it is about $140.

BTW, Gill is right, do not crimp the insulation into the lug.
 
Welding supply stores carry these:

crimper.jpg


I think I gave $15 for mine a few years ago.

It works great for a few larger wires. Unless you are going into production, why spend all that $$$ on these fancy crimpers? (other than you just like good tools and have the money to spend)

I can assure you that you won't pull one of my terminals off my fat wires...

There is one disadvantage to this type of tool. You can't use it without having the wire/terminal & tool out on a heavy bench or solid surface....
 
Last edited:
Plus one for Brian's crimper solution

I used the same tool with 2AWG wire last week and it was a very solid and tight crimp. Of course I was on the concrete garage floor with it for solid foundation. On one lug I added 2 spikes of 14 AWG house wire 1/2 inch long and tapped them into the bundle before crimping. Very nice tight crimp.
 
I made my own tool to crimp the welding cable that I used for the ground, battery and starter leads.....
rm73tg.jpg


2it4ms0.jpg


mtpdlf.jpg


Just place in the vise and give a firm blow with a hammer. Note the hole drilled to insert the solder.
 
I strongly recommend seamless, tinned, connectors on all sizes of wire. If you choose to solder, make sure you avoid any wicking into and under the insulation or you will make a ready point of failure.
 
Hate to resurrect this thread, but need a little clarification...

I picked up the Harbor Fright "REAL NICE CRIMPER" as I gathered from this thread that could be used on the AWG2 main battery cable, but the dies provided don't allow the lug to even fit between the jaws! I could start it to fit with a not-so-subtle whack of a hammer, but kinda defeats the purpose...

Anyway...

Back to original plan, which was terminal tool, but website says out of stock, and haven't been able to get reply after a week of trying - anybody know if they're still in business?

Not that interested in the sledgehammer/wedge method....
 
Welding supply stores carry these:

crimper.jpg


I think I gave $15 for mine a few years ago.

It works great for a few larger wires. Unless you are going into production, why spend all that $$$ on these fancy crimpers? (other than you just like good tools and have the money to spend)

I can assure you that you won't pull one of my terminals off my fat wires...

There is one disadvantage to this type of tool. You can't use it without having the wire/terminal & tool out on a heavy bench or solid surface....

I found this tool worked best by placing it in a vice instead of rapping on it with a hammer.

Don
 
After seeing this thread a while back, I researched the pull test. The MIL-T-7928 pull test force for a #2 wire is 550 pounds. Yes, five hundred fifty pounds. (assuming that is the right reference)

This reset my thoughts about crimpers. I am waiting for the terminal tool to resume shipment of the #2 die, but may go for the HF tool if in a time pinch.

BTW - Bob, I absolutely LOVED your video on the Vans crimped cables!!
 
Crimping Really Big Cables

Does anyone know of a good source that would crimp the ends on or custom build a couple of 6 AWG cables for me? I need one for the Alternator to the ANL fuse, and another from the battery contacter to the VP-X.

Much Thanks!!
 
Crimper

Since I had a bunch to do when building my RV10 I bought a crimper at a local supply house that crimped 3 or 4 different sizes of wire. It only cost $35 or $40 dollars.
 
I had to get some cables for my golf cart, went to NAPA and they sold me the lugs and crimped them on my old wires for me for free. They used a crimper like the one pictured.
 
Most electrical wholesale companies will sell you the terminals and loan you the crimper while you are there. They typically carry the better solid body terminals not the cheap split ones.
 
Since this matter is not specific to just the RV 7, I moved the thread to Building Tips, will be easier to find in the future.
 
My local FBO had an FAA approved manual tool and they always did it for free as long as I bought the fittings from them. Afterwards I would solder the ends and apply a couple of layers of heavy shrink wrap.

A sailboat shop should have an industrial swaging tool as well.

WARNING! DO NOT USE VICE-GRIPS
 
My all time favorite Terminal Tool
and yes, it was developed by an RVator as far as I know.
http://www.theterminaltool.com/

Almost water tight and airtight connection.
A truly concentric crimp, and the tool is beautifully made.

Like all tools, it has some limitations in that you need to clamp it in a vise to get the leverage needed to form the crimp.
In other words, you can make up all the cables that do not have to be routed through small holes. The long battery cable for example can be made up with one lug crimped and the other has to be done on the airplane with another tool.
I don't need mine anymore but I cannot part with it.

That is some clean looking terminal ends,has anyone checked the hydraulic unit from Harbor freight?
From Rosie: Yes, PERFECT crimps! I used (borrowed) a hydraulic crimper from work then found this years later (and bought one). I'm in-to-tools.
 
Last edited by a moderator:
jump

Not to jump this thread but is 2 guage really necessary on the battery and starter runs? From my calculations on length (RV7 standard battery location), 4 guage is more than adequate for the required starter load. Overkill or am I overlooking something?:confused:
 
One argument for using 2ga is less voltage drop.

But I agree with you, the runs are short on my 7A, so I'm using 4ga for all the heavy lifting cable:
  1. Battery to Battery Contactor
  2. Battery Contactor to Starter Contactor
  3. Starter Contactor to Starter
  4. Firewall Ground to Engine
  5. Battery to firewall ground
 
That is some clean looking terminal ends,has anyone checked the hydraulic unit from Harbor freight?

I have tried to get a terminal tool, but the guy never got back to me. I wonder if they are still in business. It would be my favorite, but I had to move on.

Yes, I bought the HF unit and it did not have dies large enough for the battery cables, so it went it back. I went to ebay and got a more powerful chinese hydraulic unit. It is so-so. Not thrilled with the quality of the dies. They don't line up well. I made some samples and was going to test the pull until I found the pull test for #2 is about 500 #!!

The one I chose is the "c" frame type and the one with the yoke and pin could be better. If the early posted unit works, no need to get a hydraulic unit.

Like a lot of off-brand chinese imported tools, it does the job, but nothing to be really proud of. Not a handsome looking crimp like the terminal tool.
 
Last edited:
Just to add on in response to harbor freight hydraulic tool not having dies big enough. Amazon sells the dies below which fit and are larger (actually bigger than AMP 2 awg terminals) for 2 AWG. Worked good. I had tried to grind my HF dies as some suggested but that didn’t turn out great.

https://a.co/d/jis7kSH

Desc: Lichamp Hydraulic Crimper Replacement Dies, Hex Lug Dies for Steel Cable or Terminal Crimper Tool, 9 Sizes from 12 AWG to 2/0 AWG, 1009SL

Mark
 
I have a hydraulic crimper as well. And like the dies you linked, they seem to be numbered in millimeters instead of US Wire Gauge numbers.
 
Back
Top