What's new
Van's Air Force

Don't miss anything! Register now for full access to the definitive RV support community.

Wing Jack warning!!!

Jackm

Well Known Member
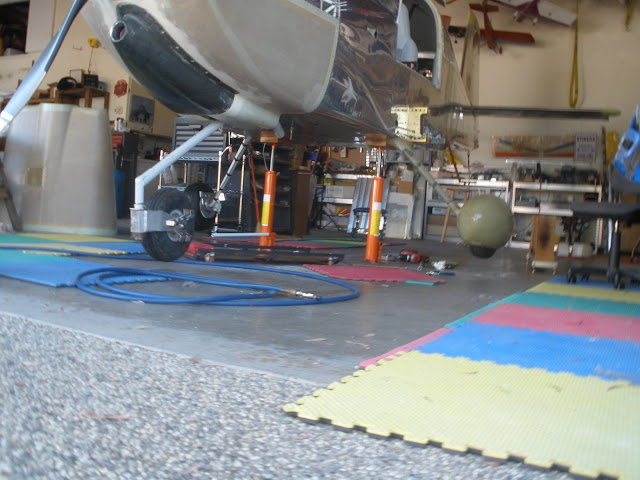
This week we started our first annual on our RV10. We had inspected the wheels and brakes and decided to replace the tires and brake pads and service wheel bearings all in one shot after initial inspection. During the build we had the RV10 up on the stands numerous times with these wing jacks with no problems.....Well today we had a problem:(..... and it was my fear from the the moment we started using these a year ago. The airplane was just a inch off the tires...a loud snap and a crunch with no danger but it could been much worse as I was working on removing the cotter pin to remove the wheel retainer nut. I didn't think I was creating any movement to the airplane but who knows....I was a Dumb *** for not watching close. The reality is it happens fast and safety is a concern.
IMG_20150228_164246084.jpg

I am not exactly sure what went wrong but a few thoughts so this doesn't happen to others if you are using the same system.
1. Do Not lift both sides up at same time, Block the tires on opposite side and nose to prevent the aircraft from moving the aircraft.
2. Do Not lock the homebuilt pipe cap to the stud bolt...oversize the hole and leave the nut above the pipe cap slightly loose to allow the cap to pivot as you lift and lower the aircraft...mine was tight.
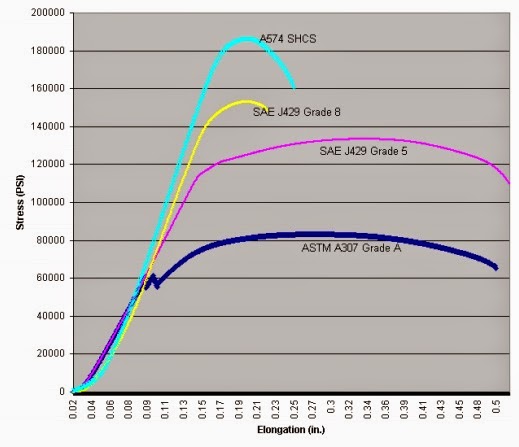
3. Use Grade 8 bolts for the stud and keep cap as close to wing skin as possible.
IMG_20150228_170139652_HDR.jpg

The fix is somewhat simple with installing a stall warning inspection kit in the place of the hole.
This ruined my day but no one got hurt...hopefully this prevents any future incidents.
IMG_20150228_170639083.jpg
 
Jack,

Sorry to hear about your misfortune.

I'm curious, what do you think would have happened if your bolt didn't shear?

I've got a custom milled solution that a friend made for me. It seems to cope with angles adequately.

I also don't push my luck when the aircraft is on the stands. Anything that I can do before jacking, like removing cotter pins, slightly loosening bolts/nuts, etc minimizes movement and potential accidents. For example, I'll back off the wheel nut a half a thread or so to elimate having to use extreme force while on the jacks.

I do agree that folks need to be careful when they got the aircraft jacked up and take appropriate safety cautions.

Here's a photo of my jack stand. It's an URL to mykitlog page. For some reason I can't get the URL for the photo with Safari this morning.

display_log.php


Bob
 
Just looking gives one a sick feeling at first. Thank you for sharing your experience.

Jack, to the exact cause of failure - I am surmising from your post that the pipe cap fits pretty tight on top of the end of the cylinder, and that the angle of the pipe cap and rigid connection did not allow any pivoting - then when jacking the pipe cap was bending on the attachment bolt and broke the bolt?

Is this correct?

OK - Don't use a grade 8 bolt, use a grade 5. Grade 8 is more likely to break than bend, whereas the grade 5 will bend instead.
 
"Wing Jack" be your call sign

...

1. Do Not lift both sides up at same time, Block the tires on opposite side and nose to prevent the aircraft from moving the aircraft.

...


Thanks for reminder Jack sometimes I skip using my square wheels. Sorry to hear about the damage. The positive side is now you have a stall warning inspection plate. Did you put any doubler?


Wing jack

I know there are many methods & opinions but I jack one side at a time by using a 1ft 2by12 well padded under the main spar just inboard of the gear leg. Steady as a rock. I am not the builder but he gave me that advice & it works well. YMMV
Keith
 
That really sucks:eek:
Jacking an aircraft is always a risky process and I hate that Van's does not incorporate provisions for jack pad mounts into the plans. If I ever built another RV I will make provisions for something like this where the pad is bolted to the aircraft and the weight is properly transfered to the spar (not sure the tie down was designed for this especially on the 10). I may even purchase a set to play with and see if they work on my 7A.

12-03533.jpg


http://www.aircraftspruce.com/catalog/topages/bogert30M-C210.php
 
Last edited:
Walt, that would be an excellent idea .
I have never liked the wing tie down bolt as a jack point.
I use the same kind of jack but place it on the fuselage underneath the wing spar carry through.
A padded 6x6 one inch piece of plywood spreads the load and lifting on the inside requires much less lifting distance than using the mid wing tie down location.

A location to bolt on a pad would be great.
 
Timely thread. I'm leaving for HF in a few minutes to get a jack to make one for the airplane.

Here's a thought. Put a safety "box" between the wing and jack. Imagine a metal cigar box (no top) upside down with a hole in the bottom. The "tie down screw pipe cap thing" goes through the hole in the cigar box into the wing holding it tight against the wing. If the jack slips off the tiedown, it's captured by the box minimizing or eliminating damage. The box would also spread the load on the bottom of the wing like a boat jack.
 
Whatever you use be sure that the jack/jack point can pivot freely as the angle changes. Most aircraft jacks use some type of ball/socket arrangement for this reason, and as Bill indicated above this is likely the cause of failure in this particular case.
 
Jacking aside....

Pretty sure the skin is structural. When installing the new access plate, you'll need to be sure the rivet and screw arrangement is adequate. Vans would probably help you with that.
 
free movement of the pipe cap when jacking...

I always put a hand on the pipe cap and actively twist and rotate it to make sure that it has free movement during jacking.
 
Walt, that would be an excellent idea .
I have never liked the wing tie down bolt as a jack point.
I use the same kind of jack but place it on the fuselage underneath the wing spar carry through.
A padded 6x6 one inch piece of plywood spreads the load and lifting on the inside requires much less lifting distance than using the mid wing tie down location.

A location to bolt on a pad would be great.

Yep.

2 X 6, used a spade bit to make a small "cup" in the wood to capture the top of the jack.

P6250010.jpg
 
Also regarding the new access hole, it might be a good idea to have larger radii at the corners, more like the other access hole in the photo. Relatively sharp radii like you are showing at this stage can lead to cracking later, as the stresses concentrate at the corners.

Dave
 
Jacking aside....

Pretty sure the skin is structural. When installing the new access plate, you'll need to be sure the rivet and screw arrangement is adequate. Vans would probably help you with that.

Yes ...Vans has been emailed already with question of approval or other means to repair. The square section cut out is under size for the plate and will get radius corners...if Vans approves...I just could not stand to look at it any longer without cutting it out!
As far as it binding could have been the issue but I am sure it was because I was moving the airplane more than I should have when working on wheel nut retainer. It rolled and sheared forward which is not the direction it would bind while jacking....But after it happened I lowered the other side quickly...then lifted it just a bit...A small amount of movement creates a ton of stress on that 3/8 bolt and with both sides up it doesn't take much movement to load up that bolt. If the load is all vertical I believe it could be sufficient but add a bit of side load is the killer here. I will be building something similar to Walt's idea with a flat plate surface with rubber belting attached and a bolt to locate the plate in the tie down.
 
Yep.

2 X 6, used a spade bit to make a small "cup" in the wood to capture the top of the jack.

P6250010.jpg

Mike.

Does Vans approve this as a lift point with wings on and fuel in tanks? If so I would prefer this way of lifting.
 
Suggest ditching the pipe cap...

Sorry to see this...


With the pipe cap, the bolt is being asymmetrically loaded, at some distance from the stress point. Yikes!! I can see why it broke...

You may want to consider ditching the pipe cap and countersinking the ram of the jack to capture the bolt head. Without the pipe cap, tighten the nut to the bolt head, then tighten the assembly into the tie down.

I used this system for 18 years with the Mooney, The biggest issue was getting enough weight to hold the tail down...

My jacks were modified "Princess Auto", long stroke but I drilled and countersunk the ends of the rams to capture the bolt heads. The jacks are bolted to 13" inverted wheel rims.

The normal annual on the Mooney involved swinging the gear, climbing in and out to do that and whatever else the mechanic wanted while supported. The jacking system never felt insecure.

I use the same bolt assembly / jacks on the -8. The jacks must be raised higher (than the Mooney) to lift the wheels so I am considering adding some side bracing to the tops of the jacks for additional stability.
 
Sorry to see that, ouch!

If you use a large 12 point socket instead of the pipe cap, you can place the base of the socket flush with the wing ( I use a large washer with HDPE tape on it to protect the paint). Snugging the bolt down avoids a bending load on the bolt. The ram of the jack rides on the head of the bolt, providing free pivoting action.
 
Use Plywood

For this very reason I selected plywood.
I also jack up only one side at the time, chock the other side and have the tail tied down. This is a very stable arrangement.
Lets face it, you can only change tires one at the time unless you have a crew waiting to help.

Does Vans approve this as a lift point with wings on and fuel in tanks? If so I would prefer this way of lifting.

I sure hope so, If the wing can carry the fuselage, the fuselage center section
should also be able to carry the wing.
The pad is placed directly under the 2 center section spar carry through, spreading the between both of them.
Besides you are only lifting one side at the time but even if you lift the entire airplane as Mike does in the picture it is still very stable and and I cannot see
how you could damage anything.

Would be interesting to see what Van has to say about this method of lifting.
 
Sure hope the wood doesn't split!

Dave

A better option than the 2x12 would be three layers of 3/4" plywood running perpendicular to each other. The ply stackup won't split.

I wouldn't trust the 2x12 when subjected to a localized stress such as a jack.
 
Jack welded to the bottom plate?

Yep.

2 X 6, used a spade bit to make a small "cup" in the wood to capture the top of the jack.

P6250010.jpg

Mike S.....I see no angle braces for the cylinder jack. Is the base of the
Jack welded to the bottom steel plate to prevent tipping over?

Jim
 
BillL;963560 OK - Don't use a grade 8 bolt said:
A common mis-understanding. A grade 5 is more elastic, true, so it will bend, but then break, well before the grade 8 reaches yield. Grade 8 will still bend, it just has a narrower range between yield and shear.
Either should be fine in a jacking application, but grade 8 provides a significant margin in both yield and shear.
Although difficult to tell, the bolt that failed appears to be neither based on appearance only. I could be wrong but The length of the arm is relatively short, and the dead weight of 1/2 of an RV10 less the minimal tail weight doesn't appear to be enough to fail a grade 5 or 8 in shear, which would require over 5,000 lbs.
Someone smarter than me (Dan) could do the math......
Regardless, thanks to the OP for posting. Jacking any aircraft is serious business. I use Jack House jacks that have a built in, dished out ball socket on top. I used Vans supplied plastic inserts until recently as one of them started to show some signs of bending. I now use a grade 8 bolt with the head rounded off to allow it to rotate at the base.
These are one of the most passed around tools at the air park and have jacked dozens of aircraft. I have no concerns about jacking by the tie down, as recommended by Vans.
 
Last edited:
Not a mis-understanding . . .

A common mis-understanding. A grade 5 is more elastic, true, so it will bend, but then break, well before the grade 8 reaches yield. Grade 8 will still bend, it just has a narrower range between yield and shear.
Either should be fine in a jacking application, but grade 8 provides a significant margin in both yield and shear.


Although difficult to tell, the bolt that failed appears to be neither based on appearance only. I could be wrong but The length of the arm is relatively short, and the dead weight of 1/2 of an RV10 less the minimal tail weight doesn't appear to be enough to fail a grade 5 or 8 in shear, which would require over 5,000 lbs.
.

It is not the value of the yield and tensile strength that is at issue. It is strain.
link: https://www.fastenal.com/web/en/69/bolted-joint-design
Here is the curve:
elastic-range-diagram.jpg


In this Jack's case the straight portion of the ram was the lever wedged inside the pipe cap. The loading case was one of fixed bending, not a fixed load which would have progressed to failure right up the curve. This is indicated by the length of the grade 5 curve. Strain in measured in inches per inch.

Also, the bending moment (arm) for the loading case was not just the off set vertical load, it was the bending due to lack of swiveling of the pipe cap. So the moment arm was from the point of contact to the centerline of the fuse, and with the weight of the airplane loading it.

Lets be careful out there using rote information.
 
New version

IMG_20150301_120751050.jpg


I am still puking...but I managed to pull myself together and build a much more secure version... In our case,it is 100 percent more secure.
 
Last edited:
Jack, can you describe how this does not slip off, and is the load going into the spar?
 
If I ever built another RV I will make provisions for something like this where the pad is bolted to the aircraft and the weight is properly transfered to the spar (not sure the tie down was designed for this especially on the 10). I may even purchase a set to play with and see if they work on my 7A.

Years ago I talked to Van's about the best way to jack up the -10. They said to use this location. I have a similar setup, but inside the cap (not a pipe cap, but one with a little more play), I have an inverted cone that sits on top of the jack (in the recess) so it can pivot a little.

I'll definitely take a little more precaution when jacking, however, after seeing this.
 
Bill,
It is bolted to the tie down and it has a 3/8 rubber belting pad. I was worried about it flexing the skin but it does not appear to.
 
It is not the value of the yield and tensile strength that is at issue. It is strain.
link: https://www.fastenal.com/web/en/69/bolted-joint-design
Here is the curve:
elastic-range-diagram.jpg


In this Jack's case the straight portion of the ram was the lever wedged inside the pipe cap. The loading case was one of fixed bending, not a fixed load which would have progressed to failure right up the curve. This is indicated by the length of the grade 5 curve. Strain in measured in inches per inch.

Also, the bending moment (arm) for the loading case was not just the off set vertical load, it was the bending due to lack of swiveling of the pipe cap. So the moment arm was from the point of contact to the centerline of the fuse, and with the weight of the airplane loading it.

Lets be careful out there using rote information.

Fair enough Bill. I am still not seeing enough strain to cause a 5 or 8 grade fail, but I obviously don't have a good enough understanding of the forces involved to judge.
 
I also suggest that you ditch the pipe cap...

The tiedown points are more than strong enough to support an RV if you follow a couple of rules (think about it.... if they were designed to hold the airplane down with a lift force capable of lifting the weight of the airplane while it is tied down, then they are also capable of hold the same weight up)

The most important aspect is do not use a threaded pin (bolt) that protrudes out of the wing very far.
In our shop we use pins that use full engagement of all the threads that are typically on a course thread 3/8 bolt, and then only protrude about 5/8" max below the wing skin. Anything longer than this and the bending load on the bolt (and the lower end of the tie down anchor in the wing) begins to increase a lot, risking failure of the bolt.

Our shop jacks are made with the typical hyd. cyl. that is commonly used but instead of a cap on the top we have a piece of thick wall tubing who's ID closely matches the OD of the ram on the jack. It is slipped over the end of the ram and extends about 1/4 above it, to make a raised fence so the pin can not slide off. This gives a little bit of movement so the pin can move slightly if there is any binding during jacking.

BTW, I think the suggesting someone made of only jacking one side at a time is a bad one. Because of the flexibility of the gear legs, lifting just one point makes the airplane want to shift around a lot more. Doing a symmetrical, straight up lift is much safer in my opinion. If I am jacking solo, I switch back and forth between the two sides until I have the wheels clear of the floor.

20 years of jacking RV's this way I have never had any problem; though I have watched two improperly supervised aero engineers drop the prototype RV-6A on the top of an extended jack after lifting the airplane onto scales, so I guess anything is possible :( (no, Van wasn't one of them......)
 
what a bummer

anytime you have a bolt that is subject to bending, STOP and correct it. bolts are for tension and shear loads only. the threads will concentrate the stress approx 4X.
 
Mike.

Does Vans approve this as a lift point with wings on and fuel in tanks?

Dunno-----did not ask. This shot is when I was doing the wheel pants, and the only place I could think of.

Sure hope the wood doesn't split!

Dave

Me too:eek:

For this very reason I selected plywood.

Would be interesting to see what Van has to say about this method of lifting.

Yep, to both.

A better option than the 2x12 would be three layers of 3/4" plywood running perpendicular to each other. The ply stackup won't split.

Correct, I need to do that, just never even thought of it.

Mike S.....I see no angle braces for the cylinder jack. Is the base of the
Jack welded to the bottom steel plate to prevent tipping over?

Jim

Yep, welded all the way around the base.
 
I also suggest that you ditch the pipe cap...

The tiedown points are more than strong enough to support an RV if you follow a couple of rules (think about it.... if they were designed to hold the airplane down with a lift force capable of lifting the weight of the airplane while it is tied down, then they are also capable of hold the same weight up)

The most important aspect is do not use a threaded pin (bolt) that protrudes out of the wing very far.
In our shop we use pins that use full engagement of all the threads that are typically on a course thread 3/8 bolt, and then only protrude about 5/8" max below the wing skin. Anything longer than this and the bending load on the bolt (and the lower end of the tie down anchor in the wing) begins to increase a lot, risking failure of the bolt.

Our shop jacks are made with the typical hyd. cyl. that is commonly used but instead of a cap on the top we have a piece of thick wall tubing who's ID closely matches the OD of the ram on the jack. It is slipped over the end of the ram and extends about 1/4 above it, to make a raised fence so the pin can not slide off. This gives a little bit of movement so the pin can move slightly if there is any binding during jacking.

BTW, I think the suggesting someone made of only jacking one side at a time is a bad one. Because of the flexibility of the gear legs, lifting just one point makes the airplane want to shift around a lot more. Doing a symmetrical, straight up lift is much safer in my opinion. If I am jacking solo, I switch back and forth between the two sides until I have the wheels clear of the floor.

20 years of jacking RV's this way I have never had any problem; though I have watched two improperly supervised aero engineers drop the prototype RV-6A on the top of an extended jack after lifting the airplane onto scales, so I guess anything is possible :( (no, Van wasn't one of them......)

If you jack the airplane with the 3/8 threaded bolt with cap or any sleeve mechanism..so the airplane is suspended with two 3/8 studs and weight on front wheel...add fuel in tank to create some slosh...then go to wing tip and give it a nudge (please don't do this) and watch the side load force on those studs. In my case I obviously was too aggressive and a idiot...but I will say it is recipe for outcome like ours.
What I like about this forum and why I posted this was....I have seen numerous posts of issues of others and wondered to myself " how in the world did he manage to do that" but it was a reminder not to do the same. We learn from others mistakes...at least I hope I do. In my case I must be number one to do this and I admit to being a Idiot ( I am so glad Bryan Douglass hasn't seen this cause he would confirm) but it can be prevented by coming up with a much more fail safe solution. Therefore our solution is this and I feel confident we will only fix one wing in my lifetime:)
IMG_20150301_120751050.jpg
 
Wing Jack

Thank you for starting the thread.
I've been following closely and hoping someone will post the perfect wing jack solution.
 
For what it's worth...

Was at the hangar today so took a few photos...

These worked well for 18 yrs with the Mooney.

The -8 is higher so I'm considering adding some bracing for additional stability.

YMMV


Ron,
What did you use to countersink the hole at the top of the jack piston?
 
Last edited:
jacking point

I use these with similar modified concave hydraulic jack ends as Ron_RV8 but I put an additional short vertical pin in the hole. I countersunk the hydraulic jack end slightly deeper into the modified concave to fit the pin. The vertical pin is LOOSE and only restricts lateral movement if for some reason the ball unseats. The lift load is on the ball not the pin. I made the pins from old drill stock. The ball end is $25 from Cleveland Tool. Less drag than the standard tie down ring and you can leave them in place.

SS%2Btie%2Bdown.JPG
 
Last edited:
Ok, let the comments begin. I want to know the downside of this technique... Our line guys at Venice use it when changing tires on the taxiways, etc.
Looks like a winner to me.

It rescued a friend of mine in an RV-8.

ps the foam block is dense material and will not crush under the weight of twins, etc (according to the line guys)

2gvpwrm.jpg
 
Last edited:
Gary, that looks good, but the only issue might be hydroforming the skin around the spar. You should look and see. It might be hard enough not to do that. Let us know if you see creases along the spar.

Load transfer is the most difficult issue in jacking a plane, getting loads to the heavy parts.
 
I put a hose clamp at the bottom end of my gear leg just above the bent. The hose clamp provide added grip for a floor jack to catch it a gear leg and lift it up. I do this only one side at the time but I believe it is a far easier and safer way to jack a RV
 
Gary, that looks good, but the only issue might be hydroforming the skin around the spar. You should look and see. It might be hard enough not to do that. Let us know if you see creases along the spar.

Load transfer is the most difficult issue in jacking a plane, getting loads to the heavy parts.

Bill, I'll check with the RV-8 owner and see but I would think the line guys or FBO wouldn't use it if damage occurs (then again, hmmmm)
 
I know there are many methods & opinions but I jack one side at a time by using a 1ft 2by12 well padded under the main spar just inboard of the gear leg. Steady as a rock. I am not the builder but he gave me that advice & it works well. YMMV
Keith

Keith, I do the same. Works very well.
 
Another suggestion for Jack's new call sign could be "Punch". That's almost a nice clean hole.

This reminds me of the time one of the people was working in the rafters of the hangar at our local airport, and accidentally knocked a 2x4 free... It fell straight down and went through the wing of an Emeraude. By blind luck it hit dead center between two ribs and between the front and rear spar, damaging no structure... Just the fabric top and bottom. Still, you get the same sick feeling when you see a 2x4 standing *through* a wing as you do seeing the hole in the bottom of yours.
 
Ron,
What did you use to countersink the hole at the top of the jack piston?

You're pushing my synapses here...

I think I drilled up to about 1/2" then used a die grinder, but I could also have used the drill press to drill larger...

I really don't think the precision matters much, as long as you have a hollow to retain the bolt head...
 
We learn from others mistakes...at least I hope I do. In my case I must be number one to do this and I admit to being a Idiot ( I am so glad Bryan Douglass hasn't seen this cause he would confirm) but it can be prevented by coming up with a much more fail safe solution. Therefore our solution is this and I feel confident we will only fix one wing in my lifetime:)
IMG_20150301_120751050.jpg

Wow, Jack, that really sucks. Thanks for posting as I'm getting ready to do this for my third annual. I'll look over my design and modify accordingly. I have always lifted one side at a time and tried to be very gentle when it's up in the air. No matter, it still bears looking over the jacking method. I'm not sure that from now on I won't use BOTH the wing tied-down point and a second jack under the spar box on that side as a back up - to steady the plane and to spread the load.

As for you being an idiot, I don't think so. I saw no mention of liquid plumber - unless you're holding back :)
 
In my case I obviously was too aggressive and a idiot...but I will say it is recipe for outcome like ours.

My opinion is that your situation happened because of the type of interface you were using on the top of the jack.

As long as the jacking pin is short and it interfaces to something on the jack that can't move (cone shaped recess, etc.) the risk of the pin breaking and/or it slipping off is very low. As already mentioned in numerous posts so far, the critical factor is the pin must be short so that the bending load on the pin/bolt is low.

Based on the photo of your failed "cap", I have a strong feeling that it was actually forcing a bending load on the bolt since your pin was essentially restrained at both ends (threaded into the cap and the wing tie down) there was no unrestrained pivot point. This put a concentrated bend load on the bolt.
 
I know there are many methods & opinions but I jack one side at a time by using a 1ft 2by12 well padded under the main spar just inboard of the gear leg. Steady as a rock. I am not the builder but he gave me that advice & it works well. YMMV
Keith

That method works very well. We have been using it on several RV-10s for the last three years.
 
I've been using the wing jack but like it increasingly less, whether with a bolt in the tie down or a cap in the tiedown. Either way the wing rotates a bit as it's jacked up so the jack will never stay totally centered under the tie down, leaving one with some potential for catastrophic failure.

As an alternative, and one that's much more universally available if you find yourself stranded someday is shown in post#15 of this thread: http://www.vansairforce.com/community/showthread.php?t=113127&highlight=jacking&page=2. Gary Sobek's version here: http://www.vansairforce.com/community/showthread.php?t=68449
Apparently Van's even used to sell the ubolt and bracket version but it looks like a stainless hose clamp works too. Light for sure, plus it can be done with the universally available automotive scissor jack. Perhaps even more important, if anything slips here there's only a matter of a couple inch drop with likely nothing damaged in the process. Downsides???
 
Last edited:
As an alternative, and one that's much more universally available if you find yourself stranded someday is shown in post#15 of this thread: http://www.vansairforce.com/community/showthread.php?t=113127&highlight=jacking&page=2. Gary Sobek's version here: http://www.vansairforce.com/community/showthread.php?t=68449
Apparently Van's even used to sell the ubolt and bracket version but it looks like a stainless hose clamp works too. Light for sure, plus it can be done with the universally available automotive scissor jack. Perhaps even more important, if anything slips here there's only a matter of a couple inch drop with likely nothing damaged in the process. Downsides???

This is exactly how I lift up my RV and I believe it is a much easier and safer way.
 
Don't feel too bad. I have seen several large commercial airplanes that have come off jacks and punctured wings - jacking done by professional mechanics with the right jacks but something got missed. We're all just hooman beans.

My wings are not closed out yet so you can bet I will be reading through this thread in great detail to see what I can do right now to make future work easier. Thank you all for sharing.
 
Back
Top