What's new
Van's Air Force

Don't miss anything! Register now for full access to the definitive RV support community.

Deburring tips: practice toolbox (and other things)

irontrack

Member
Hello,
New builder with little practical experience. I'm setting up my shop and starting the practice tool box. I have a bench grinder(6" scotch brite), a file from clevland tools and the scotch brite pads. I've found that deburring on the grinder is a good way to ruin parts if you have little experience like me and i'm looking for advice.

I deburred the sides of toolbox, but the mistakes i've made so far have me worried about using the grinder for the toolbox lid and body. Any advice or pointers to videos would be appreciated. Thanks.
 
Only a light touch using the 3M wheel is need to take out the burr. With hard to get places, I used the hand deburr tool. What kind of mistake did you encounter?
 
Types of mistakes

The main one i run into is that i keep letting the wheel grab the part. So the side panels are a little bent now. I don't want that to happen to any more parts

Also, by hand deburring: do you mean the file or the scotch brite square pads?

What about rounding the corners?
 
Always, always, always hold the edge so that it is at an angle down from the wheel. If it is tilted at an up angle, it will dig into the wheel, the wheel will "grab" it, and if you are lucky, just put a big bend in it. If you aren't lucky, it will fling it across the shop...

Tim
 
Never point the edge of a part into the wheel rotation. Always down and away and apply light pressure against the wheel. I usually only work fairly rigid parts on the wheel to reduce the changes of it grabbing the part. Skins larger than a square foot I prefer to dress by hand with a file, fine grit sandpaper, finished with scotchbrite.
 
Files First

Star deburring by knocking off the big chunks and sharp overhanging edges with a mill file. Use small, round or half-round jewelers files on curved inside corners.

At the Airventure Sheetmetal workshop, the only tool we give students is a file.

Save the scotchbrite wheel, on a bench grinder or angle grinder, for final polishing, as it will not take out all cutting marks like a file will.

I can see how files make sense for parts with a greater thickness, but are they a necessary step for the sheet metal that is in the toolbox kit?

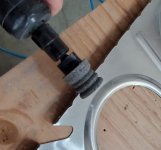
On thinner formed parts (working my way through some ribs now) I haven't found any big chunks or major cutting marks. The slight lip formed by creating the part was taken off super fast by running over the flanges and holes with a 1" scotchbrite wheel on a die grinder (especially after a groove formed in the wheel). For the flange notches I hit it all with a fine sand paper and that seemed to be plenty, so I haven't pulled out a file for any of this.
 
On thinner formed parts (working my way through some ribs now) I haven't found any big chunks or major cutting marks. The slight lip formed by creating the part was taken off super fast by running over the flanges and holes with a 1" scotchbrite wheel on a die grinder (especially after a groove formed in the wheel).

I do the exact same thing with thin pieces (especially the big skins), and tend to leave the grinder and scotchbrite wheel for heavier work like shaping angles, or deburring .040" and thicker parts. I also have a lighter scotchbrite wheel on my bench grinder, and sometimes I'll use that to give thin pieces more of a polish.
 
Scotchbrite wheel

I can see how files make sense for parts with a greater thickness, but are they a necessary step for the sheet metal that is in the toolbox kit?

On thinner formed parts (working my way through some ribs now) I haven't found any big chunks or major cutting marks. The slight lip formed by creating the part was taken off super fast by running over the flanges and holes with a 1" scotchbrite wheel on a die grinder (especially after a groove formed in the wheel). For the flange notches I hit it all with a fine sand paper and that seemed to be plenty, so I haven't pulled out a file for any of this.

I give that wheel serious respect. A quick pass is more than adequate most of the time. Always diagonal so the wheel doesn't get a groove. Some like the groove but it gets deeper and eventually requires dressing out. Skins are easier and safer for me with a Vixen file.
You'll find your happy place. Build on!

Agree on the bigger wheel. On the 1" wheel, I actually find that once a groove forms, the deburring is far easier. It's easily controlled and hits both sides with just a small tilt back and forth. I will probably just use the "butterfly" deburring tool for sheet edges as the first pass then swipe with sand paper or a schotchbrite pad, but that tool doesn't work on ribs that have been pre-fluted.
 

Attachments

  • SB Wheel.jpg
    SB Wheel.jpg
    238.3 KB · Views: 81
Last edited:
results from advice

thank you all for the advice. I applied some of it this afternoon in my shop and didn't get a single catch on the wheel. I feel much more confident now.

There are a few places I couldn't reach though. the corners of the body I could not reach with the wheel or file (file was odd/ didn't use much). I want to get the 1 and 2 inche wheels but don't have a compressor good enough for a die grinder. I'm looking at this rotary cutter with a 1/4 chuck on homedepot right now.

any thoughts on this tool for the 2" wheel?
https://www.homedepot.com/p/RYOBI-ONE-18V-SPEED-SAW-Rotary-Cutter-Tool-Only-P531/205626511#overlay
 
Ryobi

thank you all for the advice. I applied some of it this afternoon in my shop and didn't get a single catch on the wheel. I feel much more confident now.

There are a few places I couldn't reach though. the corners of the body I could not reach with the wheel or file (file was odd/ didn't use much). I want to get the 1 and 2 inche wheels but don't have a compressor good enough for a die grinder. I'm looking at this rotary cutter with a 1/4 chuck on homedepot right now.

any thoughts on this tool for the 2" wheel?
https://www.homedepot.com/p/RYOBI-ONE-18V-SPEED-SAW-Rotary-Cutter-Tool-Only-P531/205626511#overlay

I don't use air for deburring either. My compressor won't handle a die grinder.
I do have a lot of Ryobi tools except that one. Let me know if it works.
 
The best deburring purchase I ever made was for a bunch of those 1inch wheels. I found a bag of 50 of them for 63 bucks. You will find at vendor sites they sell for around 5-7 bucks a piece... I since then have not been able to find a pack on Amazon again. :( Maybe if one looks hard enough.
 
Back
Top