What's new
Van's Air Force

Don't miss anything! Register now for full access to the definitive RV support community.

Interior Finishing

merch10

I'm New Here
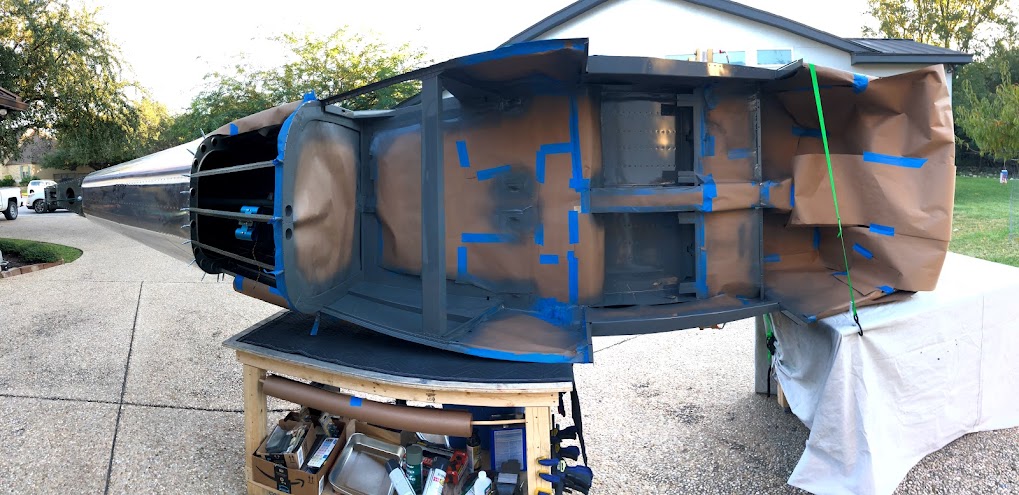
I'm currently working on page 29-14, so getting very close to riveting up the fuselage, and am looking for guidance of things which would be easier to complete now rather than after the sides are on.

I'm going ahead in going to install a access panel on the passenger side of the tunnel now for pump/filter access (that seems like a no-brainer), but is there anything else that might be easier now?

Also....I am not priming the aircraft....no judgement please ;-), I have my reasons, and am likely going to install a full Aerosports interior. With that in mind, is there anything that would still be exposed that would be good to prime/paint for cosmetic purposes prior to setting rivets?

Thanks for you input
Dave
 
A couple of things that come to mind are:

  • pilot/copilot door frames
  • baggage door frame and inside portion of baggage and pilot/copilot doors
  • baggage bulkhead and surrounding attachments
  • The panel directly under the doors will also be exposed, but can be painted after assembly.
  • Portions of the seat frames and covers.

Make sure to take care of the inside of the cabin cover before it is attached, install the overhead console and do all the body work and paint on the fiberglass while it can be on it's back.
 
I'm currently working on page 29-14...With that in mind, is there anything that would still be exposed that would be good to prime/paint for cosmetic purposes prior to setting rivets?

Bill has a good list to follow. I think most builders seems to wait and paint after skins are on. Here's a pic of what I painted on my fuse. If I were doing it again, I would simply paint the entire interior of the fuse and not mask off areas that are going to be covered by Aerosport panels, carpet, etc... Would have to be done prior to rudder pedal install.
H2Dp5f_XPbtH3cxoSVUGg--I34XmH24XL0Uk_dRr2kkO61jWkg-KCZ9GEO9lgHKnJyVZZG1mggLnLqCGo-09_UatWQjXI8GFJpjfz4yNYhpu4GoZWbwkAokFYTsz9D9SDFwhGLcu4JXf2zgRftX0yclZRW5fmD9fpKpPfsq06GrCKjR0RH0O-0hW4k9CKjU3CLgo5Obt1DCx4-t8Dw_6n5xaQSwRmLRsDsfvChVeZccPkNC9oX2Ih_9jiDpmv4vT9qZCvAWT1qPxW3S-H1EqjhPkz_nDv2z9xzif4Xl3QJ_nJh68RY66x0DcMfDN5eBGAWf6PsYyv3a-9sv5YD-DKIVQ5JotzeDE7Lfof1_Y3OzHCEk0WHL4GNkG1SUfmaSokjAny3VV_S4ZHPT8hLOAignnCaUZ5cjawsT_ok4DiWKHK1jtWLtmFVKOy1CK02GoYDQ7Cl4y5ZpIEQgIYjR-DpBKHk3FhO1mMiNHotqIlUCouykbE1CkQj277hmwCRoqV7FNSLhrWotkXyQYVePiIrkri0M-K2oOUw1mcCAWIQxa_CQkqy_FOH8fvq9bc2kkobIoesej8CCMb6mOsEAvR8vH2eWKt9aLLed1qt82Njnvtbv3Yg-CNvbuo2JZ3JE5paVJVUtDcaPeSWA39Vx69M93veSzNNZY-rKBn4F1ck05jwnVjs647IZgPC5IJhYA-Wu-CzLjpPLzhqeLuKbRWnZhyaAYoNi_hnadzA85M4yc-a_ZwqmiBBw=w1100-h495-no


PuD61xdAC17s-uYkFtAllqb7r9xhHWfCwVo__X5iOsnqPxCY1M1NsXLQck_2dMhpwsE6SqVoxcyBKhml1aeljk3opwIgKA0KWdHsHw1biYTsPSzrmtIE5VfhCznxZmn9wjzxuSJ6kD-U3KrijLsuakXl4UWoE2h_mXUFGvvuWKrOu6pxVTaYy969ejp5ZuGwJ7mccN8CuHZYXVKEYaPU7sfxXhqh-pvLZS-6acaZbbAVM9buL0EK0FyBe_E8piZbk4NSI9FUl-ZV3XzHVArJgVnJuvcGr43v0eVedbMAzODaW_FTe5-XbeKDorzUlY186gn5ErxkSugT92TlAfx8WZWmIUmXeZQudv85MX0i_nXMu5Jdjn7jAPl1w9L57G8APWQTXKzylQKIAl7qOdQCYJfiTZ6gEmq-37-iQCzj1sHUB-eVJaZ9JWe_F5KNVc7DYceAwqJwTm3Mwp-LlNeYzeIvZc5-4ioahlsnJsqFKPj14LAU7DDHzQGu1ZP4qir8LAEIAs5YyQghRE84_-ZZ_U85ynWu3XsO51bscwbJYLcfAX9OSnqmxvFRAKLbSvuNJ65gdU_WGJ_IrqfsevD8gTZ1rkf_-S_hex0RtBvJwst0bGLTinkaLEhdakxKIWGokvsc03HL7Aq_w1ScP3FaGsxfdZtxeM801pY4Qcwp-oeWlxk7iu-5LJmpPNm-epne7W7KXzN1jU82BwXX-g7CzCUPvgPBu3UdrVYNf3A8sJyJZosSbLzrm6I=w1022-h766-no
 
Bill/Randy;

Good info, thanks. Right now, I like Randy's approach and just paint the entire interior once assembled, and of course, take care of the overhead prior to installation.

Now the $64k question.....what did you use for prep & paint???

Dave
 
Interior paint

Not a RV10 but I took rhe hard route. Everything that would show was painted before assembly. I did it so rivets would show. Sherwin Williams P60G2 primer and SW Jet Flex solvent based. Jet Flex is pricey.
If I had it to do over, I would do the same but spray Kirker gray and black Enduro Prime and call it good. It's really tough epoxy primer, cheap and almost exactly matches the flat SW paint. I could save some of the weight of two coats (primer/paint) and still get the same look. Plus touch up is a cinch.
 
I primed the inside of my entire fuse with a Sherwin Williams aviation 2 part epoxy primer. For the interior color I used single stage automotive paint that I had the local paint supply match color for me. I used a flattening agent and sprayed it as a satin finish.
 
Now the $64k question.....what did you use for prep & paint??

I used Sherwin Williams P60 G 2 industrial was primer. It?s what Van?s uses on quick builds. It?s SUPER easy since it?s self etching. No sanding or scuffing. Just clean parts with acetone and spray. Easy to spray.....forgiving, and fast drying. For paint I used PPG single stage urethane. Very happy with it too.
 
Having done a 7, 8 and 2 12's....... I now have a different idea !

They were done with etch and satin topcoat.

Now, I would do etch, then use base coat and satin lacquer.

Base coat is a a 1k process, covers well and puts the colour down. The satin or matt lacquer then can build in one, two or three coats to suit.
 
I painted the interior with SPI epoxy primer (grey) with no topcoat. I was happy enough with the color and it is a semi-gloss sheen. The real benefit is chip resistance. It is tough as nails and adheres to the metal much stronger than the top coats stick to primer,

obviously this approach create color choice limitations, though I suspect it's not too had to tint if looking for something other than a specific color chip/code, assuming you start with white.


Larry
 
Last edited:
Curious if anyone has pictures of the epoxy primer that was used as finish color for the fuse interior?

Specifically the Kirk Enduro prime or SPI epoxy primer.
 
Gray SPI Primer

I used gray SPI epoxy primer on my baffles. Light gray with a slight blue tint. SPI can probably supply you with a color sample.
 

Attachments

  • IMG_2874.jpg
    IMG_2874.jpg
    407.9 KB · Views: 92
Not a RV10 but I took rhe hard route. Everything that would show was painted before assembly. I did it so rivets would show. Sherwin Williams P60G2 primer and SW Jet Flex solvent based. Jet Flex is pricey.
If I had it to do over, I would do the same but spray Kirker gray and black Enduro Prime and call it good. It's really tough epoxy primer, cheap and almost exactly matches the flat SW paint. I could save some of the weight of two coats (primer/paint) and still get the same look. Plus touch up is a cinch.

I have considered just using primer only on the interior to save weight. My concern is it has no UV protection and could breakdown eventually from exposure to sun etc.

Thoughts?
 
I have considered just using primer only on the interior to save weight. My concern is it has no UV protection and could breakdown eventually from exposure to sun etc.

Thoughts?

How much direct sunlight do you expect on the interior. I used SPI epoxy primer, with no top coating, to cover a small, cleaned up rust area on an old car. It took 10 years for it to break down with 24/7 exposure to the elements. It was still protecting from rust, but the color changed.

Most people keep a plane in a hanger or at least cover it. In that case it could take a century for UV breakdown.
 
Last edited:
Not interior photos but there are some photos of the wingtips sprayed with EnduroPrime Gray on this page. http://wirejockrv7a.blogspot.com/p/finishing-page-01012020.html?m=1
Scoll to the bottom.
I haven't sprayed EnduroPrime white or black. It's very easy to shoot.


Thanks, I like that gray color, it is darker than I had imagined. So any negatives to using this primer on interior empanage components as well as for "paint" on interior of fuselage when the time comes? Is it foolish to try and kill two birds with one stone by using primer as final paint to reduce workload as well as weight?
 
Last edited:
How much direct sunlight do you expect on the interior. I used SPI epoxy primer, with no top coating, to cover a small, cleaned up rust area on an old car. It took 10 years for it to break down with 24/7 exposure to the elements. It was still protecting from rust, but the color changed.

Most people keep a plane in a hanger or at least cover it. In that case it could take a century for UV breakdown.


Thanks for the advice. I have an RV-14A QB on order and I would really like to use Kirker gray primer w/o topcoat to save weight on the interior. I plan on keeping the aircraft hangared. Most of the interior will be covered by seats and carpet anyway.

Jim
 
EnduroPrime

Thanks, I like that gray color, it is darker than I had imagined. So any negatives to using this primer on interior empanage components as well as for "paint" on interior of fuselage when the time comes? Is it foolish to try and kill two birds with one stone by using primer as final paint to reduce workload as well as weight?

No negatives that I have found. It's a 2K Epoxy and hard as nails once it cures. I would not have concerns using it as a one paint primer/interior paint. Many use rattle can and EnduroPrime is far more durable. It's not a chromate so corrosion protection will be as a barrier.
I didn't use it as an interior paint, because I didn't know about it till after my interior was done. Mine is P60G2 with Sherwin Williams Jet Flex solvent based.
I started using it as primer on all my fiberglass parts.
 
Back
Top