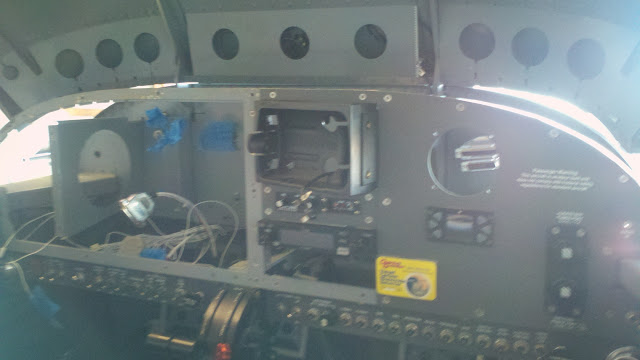
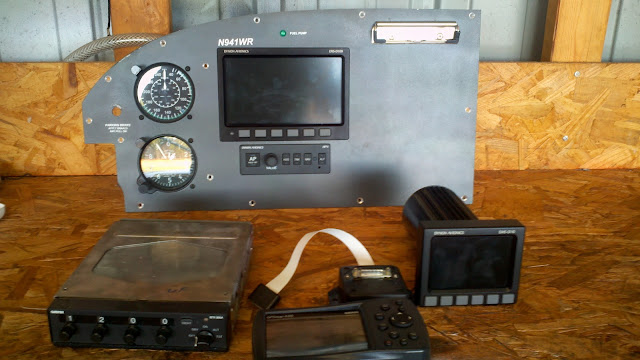
What's new
Van's Air Force

Don't miss anything! Register now for full access to the definitive RV support community.

N941WR Rebuild Update

Thanks for coming down here to show off your new paint. I sure wish you had called first. We would have stayed around. After it got to 106 in the hangar, my wife and I decided it was time to go home. Please try again. Bring "mini me" with you too. We haven't seen him in a long time. How old is he now?

Will do Robert. When we taxied by your hangar and saw the sun shining against the closed door, I understood why you weren?t around.

T is now two and a half and really enjoys flying, even if he can't see out of the RV. Only one problem, right after we lifted off out of CUB he grabbed the stick and pulled back. It is good that he wants to fly himself but his timing could be better.

We will be back down there soon. Besides, it is time to give both you and Mike another motivational ride. That and to try and kick start James on getting his plane moving again.
 
KitPlanes

If you are not a subscriber to KitPlanes, now is the time to sign up.

The August 2011 issue has an extensive article on my taxi incident, including a number of pictures.

(Knowing I was going to write an article on the incident is the reason I have never posted pictures here.)
 
SkyView here I come

About a week after I moved the plane to the airport last January, my Dynon SkyView arrived. Rather than downing the plane after just getting it flying again, I elected to wait to do the upgrade.

Well, I have waited long enough. Today I removed the old panel and started carving the new one. With luck, I have the new one ready to install by the weekend and all the wiring harnesses ready to go.

2012-03-11_17-53-54_923.jpg

2012-03-11_17-57-59_766.jpg
 
WHAT?

The week before our fly-in and you ground your plane? What are you thinking? :eek:

Hope you catch a ride with someone.
 
The panel is cut and I know how I'm going to mount the dual ADHARS.
With luck, I'll test fit the panel this weekend and start on the wiring.
2012-03-16_23-46-54_344.jpg


Boy, that was easy!
 
Bill, What have you done?
I modeled my upgrade after your panel....
geezzz...I better start saving for the Skyview!

28qzp8w.jpg
[/IMG]
 
Last edited:
Thoughts on my new panel layout?

Bill, What have you done?
I modeled my upgrade after your panel....
Too funny Bob!

I really liked my old panel layout. The D100 EFIS on the left side and the D10 EMS located in front of the passenger was a great setup. With them bussed together I could display the EMS info on the D100 and the EFIS info on the D10 when I had another pilot in the right seat or when I flew from the right seat.

There is no “need” to upgrade but the gap between “need” and “want” was too great a pull for me.

Let me start by saying this will remain a day/night VFR ship. Thus the redundancy that some people might like to have is not a requirement for me.

When I first designed my panel, the EFIS D100 and EMS D10 were new and unknown items. Thus I installed the airspeed indicator and altimeter, “just in case.” With over 350 hours on the plane and experience flying it without an airspeed indicator (due to a pitot system leak), I no longer feel the need to have an airspeed indicator.

The Garmin 496 will remain due to its weather capability. Thus, the altimeter can go as well.

The SkyView will include a Mode S Transponder, so that has been removed.

Removing the D10 EMS on the right side will leave an instrument hole over there. I may install a D6 artificial horizon over on the right for redundancy but we will see.

The SkyView retrofit is not a trivial change for a flying plane. I’m still not sure how I’m going to route the pitot and AoA lines aft. After searching this forum for solutions, I’ve realized that some of the installations are OK and others, not so much. I will try my best to be on the OK side of that scale.

With the elimination of steam gauges up front, that will reduce the number of leak prone fittings, which is always a good thing.
 
Last edited:
Yes, there is some progress being made on the panel upgrade.

While what seems like the rest of the RV world is at SnF I had to stay home and work but I did manage to get out for a few hours over the last two weekends and start installing "stuff"

The first item installed was the backup battery for the SkyView. Notice How I moved the rib over to the left. This was done during the initial build. However, I left half of the original rib in place, which I now cut out completely.
2012-04-01_14-13-32_293.jpg


Figuring out where to put the engine module was a challenge but my neighbor came over and made a few simple suggestions after this picture was taken. That thing will be mounted the weekend after Easter. Family first.
2012-04-01_14-14-38_491.jpg


The other big accomplishment was mounting the dual ADHRS units. A couple of pieces of AA were fitted and the units were bolted in place with brass hardware. The old unit for the D100 was removed after this picture was taken. It is my hope to reuse the wiring already in place.
2012-04-01_14-13-58_752.jpg

A big thanks goes out to my friend Hal and his son Stewart who crawled into the tailcone to fit those parts. Hal and his son scratch built a Sonex in a little over a year and are now co-building a clip-wing T-craft replica.

When I return from Easter I'll mount the transponder module and patch board. Once all those things are installed, it is time to drill up the floor boards, run the pitot and AoA lines, and then jump on the wiring.

The slow progress is more a result of my work schedule than anything else. Yes there are a lot of parts and pieces to install with the SkyView but that would be no different with any major panel upgrade.
 
Last edited:
I spent the better part of the day working on the plane. My wife and son joined me for a picnic lunch and I?m glad they did because my lovely wife was more than willing to help install some platenuts behind the panel.

Stein helped me work through mounting the various parts on the subpanel. Since there is limited spaced between the two panels, I elected to use keyed rivnuts and platenuts installed with #40 CheryMax pull rivets. This allowed me to dimple the panel and still flush mount some things. I could have done it all with the rivnuts and in talking to Stein, that may have been the desired method as it would allow any water that my get past my tip-up to run behind the various parts.

After I knocked off for the day, I realized I still have to mount the DB9 hub. Not a big deal but one more thing I need to get behind the panel to accomplish. (Deburing holes, mostly.)

EMS module is mounted:
2012-04-14_15-59-27_455.jpg


The Transponder module is mounted:
2012-04-14_15-59-03_291.jpg


It is difficult for me to believe it took me four hours to mount those two things.
 
And while I was working on the panel my three year-old son was learning how to taxi.
2012-04-01_13-26-27_168.jpg
 
Last edited:
Six more hours spent working on the SkyView upgrade and we are just about ready to start the wiring.

This morning I mounted the hub:
2012-04-15_11-28-56_519.jpg


Then it was time to drill up the floor. When I built the plane I ran the strobe wire down the seatpan rib and through a snap bushing large enough to accommodate both the pitot and AoA lines.
2012-04-15_16-30-55_544.jpg


The final surprise of the day was that when I pulled the pitot and AoA lines into the tail cone I found that they were exactly the right length. No scabbing on a section and no need to trim the lines.
2012-04-15_17-25-44_919.jpg
 
Last edited:
Ever notice

And why I was working on the panel my three year-old son was learning how to taxi.
2012-04-01_13-26-27_168.jpg

Bill,

Ever notice most pilots land just to the left of the center line? Looks like your son is off to a great start :D

Project is looking good.

Tom
 
On the drive into work this morning I was thinking about how to wire up the SkyView when I had an epiphany. As you know, there is limited space to run wires from the tail section to the firewall and there is even less room when you have one hole filled with the manual trim cable.

Since all the components run on the DSAB buss, you simply connect everything together. Easy enough to do but it is kind of ugly crimping everything together and then sealing it in shrink tubing. Then it hit me, why not install another Dynon five port hub next to the dual ADHRS? Then I can connect the pitch servo and both ADHRS units to the aft hub, and the wires that need to run forward to the hub installed behind the panel can also be plugged into the aft hub.

That should greatly simplify the wiring!
 
Slow day working on the plane and knocked off early.

However, I did mount the EICommander in a new location, so that is mounted. The brain box had to be moved to accommodate the Dynon Engine Monitoring Module, not a big deal as it only required two bolt holes.

Connecting the Static, AoA, and Pitot lines to the daul ADHRS was straight forward. Stein, do you sell 90 degree connectors so the lines don't have to come straight out and then loop around to the second ADHRS?
2012-04-21_13-33-20_385.jpg


Once that was finished my wife and son stopped by the hangar with lunch. After our picnic, I started on the wiring harnesses. After doing some crimping, I stopped cold before I made a mistake, packed up and came home. This evening will be spent figuring out how all the wires should be interconnected before resuming work tomorrow.

First things first, I'm in the process of painting the new instrument panel and should have it ready to go in tomorrow.
 
The panel is painted

2012-04-21_17-22-06_721.jpg

Now to get my wife out of the house for a few hours so I can bake it in the oven. Then I need to add the N-number and text for the parking brake.
 
Sometimes I'm just a DA! I realized this morning that the Dynon hub will have to move because that is exactly where the shoulder harness cable will go.

I might make a bracket to mount it under the ADHARS or bolt it up on the bulkhead. Better yet, I might be able to mount it up on tray I made for the old magnetometers. Time to do some more planning.

2012-04-21_13-33-20_385.jpg
 
Last edited:
Working in the tail section of a completed plane is a real pain!
2012-04-28_15-58-44_620.jpg


2012-04-28_14-44-29_165.jpg


My wife was kind enough to crawl back there and run wires for the dual OAT's.

BTW, if any of you order the wire harness from Dynon and put your ADHARS in the same place I did, order the 20' harness. 15' is just too short.
 
RANS?

Hey Bill, whats that Rans paper doing on the canopy? haha!
Your 9 is looking great. Wish I was that far along!
 
I have resembled that first photo.

I had the rear window out and installed the pitch servo mount on my knees. OUCH!!. I gave up , pulled the gear and engine mount and built a "rotisery". With the fuselage rotated 90 degrees I can reach the ADAHARS mount from the rear window opening.

Would it not have been easier to install the hub near the baggage bulkhead and bring the ADAHRS net cables forward to the hub? Also an easier run for the servos. Your hub use is a great idea. I am using that idea, thanks.

Have you checked the ADAHARS alignment yet? How do you intend to do that?
 
...
Would it not have been easier to install the hub near the baggage bulkhead and bring the ADAHRS net cables forward to the hub? Also an easier run for the servos. Your hub use is a great idea. I am using that idea, thanks.

Have you checked the ADAHARS alignment yet? How do you intend to do that?
That would have been a great idea, had I thought of it. Duh! Maybe I can move it tomorrow and order some longer jumper cables from Dynon to go from the ADHARS to the hub.

As for the AHDARS alighnment. I'm hoping I built is square to the fuselage. If not, I'll adjust it later.
 
The third and final location for the ADSB hub looks like it will work out well.

2012-04-29_15-31-31_361.jpg


I will order two 5' patch cables from Dynon in the morning. They will run down from the dual ADHARS to this hub.

By going this route, I was able to remove the old magnetometer cable and the old DSAB wiring leading to the pitch servo.

I'm thinking I might have removed five pounds of zip-ties while doing the rewiring.
 
Last edited:
This installation is taking much longer than I would have ever thought. Mostly because of my limited time to work on it.

Today I ran new wires from the roll servo in the right wing into the fuselage. Tomorrow I pull out more old wiring, secure the new wires, and attach them to the forward network hub.

The wires from the dual ADHARS have been installed and secured. The only thing left to do back there is to run a vacuum over the area to pick up any clippings left over.

I'm still removing unused wires from the D100 EFIS and patch wires used to record data when I was testing the auto pilot a few years back. That should reduce the empty weight by five pounds.

I keep hoping that I will be ready plug it all up tomorrow and power it up.

Probably the downside to all this is that my wife spent last sunday zip-tieing the wires together behind the forward panel only for me to cut them out to remove more old wires. She is not too happy with me right now.
 
This morning I arrived at the airport around 11 AM and proceeded to remove a bunch more zip-ties, route the network wires from the roll servo, remove a lot of dead wires from the D100 and 496, install the main wiring harness, put the panel in, insert the SkyView, and fire it up around 4 PM.

I powered right up, much to the amazement of two other RV builders. Only two small issues. Neither the EMS nor GPS data was being displayed. First things first, upgrade the units to the latest software. Only one small problem, my usb stick was at home. However, my nameless RV builder friend had one and we not so quickly had the software upgraded. I say "not so quickly" because none of us had read the manual and it took us 10 minutes of guessing before we spent one minute reading the manual on how to perform the upgrade.

Once upgraded and configured, the PDF and EMS displays came up. Shortly thereafter I connected the GPS antenna and wouldn't you know it, the SkyView found enough satellites to display the map, even with the aircraft stuffed in the back corner of my hangar.

This is what the panel looked like at the start of the day:
2012-05-06_10-33-06_237.jpg


And this is what it looked like when I left the hangar at 5 PM:
2012-05-06_16-55-25_114.jpg


I still have to connect the power lines for the 496, zip-tie the wires under the panel, configure the thing, calibrate the fuel tanks, have the transponder inspected, Install the parking brake, rivet the floors back down, put all the inspection panels back in, weigh it, and then learn to fly behind the SkyView.

Just about done!
 
PS. Now that I'm done, here are a few thoughts on the SkyView upgrade.
1. The hardware and software are top rate. Installing this system in a new build would be easy; however, retrofitting it in an existing aircraft is a pain. Truth is, the challenge with the retrofit would be the same, regardless of what EFIS you are going to install.
2. The new Dynon buss, in conjunction with their new hubs, is a snap to install. Connecting everything was much easier than installing the D100 EFIS and D10 EMS.
3. Removing the old wires while working on your back is much more difficult than installing the SkyView.
4. Portable GPS installation tip: I have a Garmin 496 that was hard wired into the old D100. This time around I put a DB9 connector on the end of Garmin cable. This will make future upgrades, replacements, whatever much easier.
 
Just a quick update, no pictures to share today.

The floors are riveted back in, the rear bulkhead, floorboards, etc. are all screwed in place, set up the SkyView, and drained the tanks.

Mother's Day will be short and I'll spend the afternoon at the airport weighing it and cailbrating the fuel tanks.

Bummer I won't be able to fly it for another week.

During the retrofit I managed to bend the rod-end that goes on the bottom of the flap motor. On Monday I ordered a replacement with expedited shipping from Van's. When the package arrived on Wednesday I found that Van's had shipped the wrong part. Thursday morning I called Van's and they told me they would overnight the correct part. Well, it is almost midnight on Saturday and still no part. :(

My initial impressions of the SkyView is very positive. The screen is bright and crisp with lots of info. It is going to take some time to learn all the settings and see how it works. More to come on that front late.

At this point I would like to thank Dynon, Fabian at Affordable Panels, and Stein. Dynon for making such a great product and offering outstanding support, even when I would call with dumb questions. Fabian for his three piece panel, what a great setup, even if his product is miss-named. Stein and his crew for answering some really dumb questions.
 
Ready to start testing!

I took the day off to spend time finishing up the panel installation.

The panel blanks I made to fill the voids from where I removed the transponder and D10 EMS fit perfect with no fitting required. What a great way to start the work session.

The two things I dreaded the most were non-events. Moving the capacitance fuel sender pins in the DB-37 connector went very well. (Rather than using my pin removal tool, I pushed the pins out with a piece of heavy safety wire.) and reconnecting the parking break (it is very difficult to reach) went very well.

Doing the W&B went very well and the lady who works at the FBO was kind enough to help (she had never see it done and wanted to watch). In addition, another RV builder stopped by to leand a hand. (Thanks Breece!)

By 5 PM the SkyView was fully configured and both fuel gauges were calibrated so it was off to pick up my son.

I can't way to fly behind the SkyView!

Spending some time learning the system on the ground has just blown me away. Dynon really did a great job with this thing! As much as I liked the D100 EFIS and D10 EMS combination, the SkyView is a thousand times better!
 
Over the weekend I put 2.7 hours on the new SkyView. There are still a few things that need to be adjusted, such as setting the map to ?Track Up?.

My initial impressions are very positive. Dynon really did their homework with this thing.

The integrated transponder is kind of cool. I?m still learning how to use it and was able to find the Ident button fairly quickly, when asked.

Still climbing the learning curve but so far, my impressions are very favorable. Boy, there sure is a lot of information on that screen!

Was the upgrade worth it? I'll let you know as soon as all the little scratches on my arms heal.
 
A few thoughts on the SkyView, now that I have had a chance to play with it.

The display is just awesome! I like that you can adjust the display. For example, if you don?t like vertical fuel level displays, you can change them to round gauges and then adjust the size of them.

The AoA is much better than the D100?s AoA and calibrating it is easier. The increasing beeping is a great indicator of how close you are to stalling and more useful than the chevrons displayed down on the screen.

The compass rose that changes to a G meter when pulling some G?s is pretty cool too.

The synthetic vision, velocity vector, and other features that one expects of such a system continues to impress.
 
Bill,

Keep posting.
I am several months behind you (probably more). Observations, tips and hints are eagerly read and filed away.
 
Listen mate, you raving about the "Skyview" is not helping. I wanted to get the Skyview but as both you Bill's know (if the second Bill is who I think it is) I went with the "D180" because of weight reasons........ now what can I remove from the 9a that will allow me to install a Skyview........ perhaps I could remove the tires from the wheels and only land on grass strips........hmmmmm.

?Simplicate and add Lightness? (I like that Bill)


Bob & Robyn Dennis (Australia)
RV9a (empty weight 893 lb)
 
Bob,

I really liked my old panel with the D100 EFIS and D10 EMS! They worked great and I can't say enough about them.

When the opportunity came along to install the SkyView I jumped on it. The upgrade was a major PITA and it would be much easier to do during the initial build. That said, I'm glad I did the upgrade.

The SkyView is just outstanding!
 
I realized that I never posted a picture of the finished panel.

New%2520Panel%25202.JPG


That is a 10" Dynon SkyView on the left, Garmin 496 at the top of the radio stack, Sigtronics 200S and ELT panel under the 496, and iCom A210.

On the right side is a Dynon D1 PocketPanel and below that is the EICommander.

Further to the right is my dual power port and last but not least is the Carbon Monoxide detector.

In the center is a DJM throttle quadrant, which I highly recommend.

The 496 was left in the plane because I knew how it worked and it gives me weather.

Missing from the picture is the transponder. That is now incorporated into the SkyView, thus no panel space is taken up by it.

This has turned out to be a very functional VFR panel and easy to fly with, not to mention easy to make.
 
Last edited:
With just 103 hours on the new engine (O-360) I found the baffle cracked vertically just aft of the #4 cylinder, where it supports the oil cooler. This surprised me because I thought the plenum would have offered enough support, but apparently not.

Rather than try doing the same thing I had done with the O-290 I elected to nestle a piece of heavy duty aluminum angle in the corner. I rounded the edge of the AA and riveted it to some new baffle pieces from Van’s. In addition, I widened the spacing for the oil cooler holes so it would better fit the Stewart-Warner cooler I installed.

With well over 100 hours on this fix, there isn’t any sign of cracking:
2012-01-27_21-53-53_700.jpg
 
I had the exact same issue with my 0-320 baffle... And I made an almost identical repair. I think this is a fairly common problem, I've seen it on a 7A with an IO-360. Anybody doing a new build might be well served to add a stiffener angle now rather than repairing it later.
 
Bill-
Are you still using the cross-brace (b/w the left rear baffle and the left side baffle) on the 0-360 like you did on the 0-290? (Wonder if having that on the new engine didn't stop the problem or whether not using it on the new engine might have contributed to the problem.)
 
Bill-
Are you still using the cross-brace (b/w the left rear baffle and the left side baffle) on the 0-360 like you did on the 0-290? (Wonder if having that on the new engine didn't stop the problem or whether not using it on the new engine might have contributed to the problem.)

No Steve, I did not put that brace on the O-360. The reason is that with the O-360 I have the cooling plenum, which I thought would serve in place of the brace. The O-290 had almost 200 hours on it when it met it demise and there were no cracks of any kind when I removed those baffles. (They now flying on another plane and I wonder how they are holding up.)

One of the possible contributing factors might have been that I installed a Stewart-Warner 10599R. Everyone told me this was a drop in replacement for the Niagara cooler that comes with the kit. Well, that is not exactly true as the S-W cooler is slightly wider and when bolting it in I might have put some stress on the baffles. It cracked less than 53 after I put in the new oil cooler

When I put the AA in place, I moved the platenuts outboard just a little bit and now the S-W and the Niagara are interchangeable.

I wish Van would make the the oil coolers truly interchangeable.
 
baffle repair

I elected , like Bill to go with the angle riveted and added a replacement .063 # 4 cylinder baffle instead of .032 and solid as a rock
 
Skyview

Guys - I saw the thread and want to chime in to how cool the Skyview is. The screen only weighs 3LB and the instruments that make her work are also very light. Pull the trigger and go Skyview - its very cool. I just added the ADSB and its pretty neat. They just came out with data logging - the very cool thing about the system is that it keeps getting better.
 
I have an IO360 in a 7. Made a strong cross brace to stabilize the standard oil cooler. I had the same crack in the baffle corner.
This after only 7 hours!
Heavy duty angle in the corner to fix it, and no further problem after 60 hrs.
 
I have an IO360 in a 7. Made a strong cross brace to stabilize the standard oil cooler. I had the same crack in the baffle corner.
This after only 7 hours!
Heavy duty angle in the corner to fix it, and no further problem after 60 hrs.

Same problem/fix on my O-320 as well. Van's really needs to update their baffle kits with this fix.

baffle_crack.jpg
 
Last edited:
I have an IO360 in a 7. Made a strong cross brace to stabilize the standard oil cooler. I had the same crack in the baffle corner.
This after only 7 hours!
Heavy duty angle in the corner to fix it, and no further problem after 60 hrs.

Did you brace between the oil cooler and the #2 cylinder? If so, I understand the reason for the crack.

My crack was exactly like Andy's, it went from yellow arrow to yellow arrow:
Cracked%2520number%2520baffle%2520C.JPG
 
This is a perfect example of some criticism I have towards some of Van's kits. Hundreds of builders, if not thousands, myself included, have dealt with same maintenance issue if done exactly per plans. But they never address problems like these. For me the fix was riveting a bent piece of stainless .063 in the corner, and re-making the back part out of .063 aluminum.
 
Absolutely ...

... as much as I respect and admire the Vans organization, and as much as I appreciate the incredible performance of their aircraft, I have the same gripe articulated by Rocket Bob. When I was in the building process, I came upon several items in the plans/instructions that were just plain wrong. When I checked on VAF I found MANY builders fell into the same trap. In some cases, it would have taken merely one additional sentence - or rewording an existing sentence - for everybody to get it right. I don't understand the apparent reticence to correct known issues, when the corrections are often so simple and easy.
 
Did you brace between the oil cooler and the #2 cylinder? If so, I understand the reason for the crack.

No Bill, I braced to the crankcase.
I should have phrased my questions differently, securing a baffle to anything other than something attached to the same cylinder will cause cracking, whether it is to a different cylinder or the crankcase.
 
Good point. It seems that portion of the baffle is joined to #4 cylinder and the crankcase. Probably flexes just fine on it's own but not an ideal place to mount a heavy object.
 
Back
Top