What's new
Van's Air Force

Don't miss anything! Register now for full access to the definitive RV support community.

Dimpling Problems

Hi All
Again I'm having newbie problems,
My dimples aren't going well, my dimples are not sitting flush inside each other when I cleko my vert stab together & the hole seems to be becoming elongated when I dimple.
IMG_0298.jpg

Here is a picture, you can see that the light shines strangely off the side of the dimple.
Has anyone got any ideas??
 
Try to be careful and be at 90 degree vertical to surface with dimple die. If you are a little off, it can mildly change your dimple.
 
Whatcha usin?

What are you using to dimple? Squeezer? Pneumatic squeezer? Make sure the dies are perpendicular to the flange.
 
I'm using a pneumatic squeezer on what i can reach with it and a DRDT-2 cframe for the skins, and i've been extra careful to make sure the die is perpendicular to the flange
 
Easy or quick?

Do you just MASH (that's Texan for push) down on the pneumatic squeezer or do you ease the ram up to the part being dimpled and ensure its 90 degrees before you set the dimple?
 
Don’t hold the part you’re dimpling to firmly. This will allow the part to align itself with the dimple dies before they set the dimple.
 
Dimple Dies

Well I had a lot of dimple issues of deflection
Around the dimples. The skins looked terrible.
I then bought a nice set of spring back dimples
From Clevland tool. Made all the difference in nice flat
Skins around the dimples.
 
Hi Taran,

Where in Sydney are you?

I am part of SAAA Chapter 11 (North West Sydney), why don't you get in touch, there are lots of people building RVs here in OZ that would be only too willing to lend a hand.

Cheers
Eddie

[email protected]
 
Thanks for the help guys,
I've ordered some new dies & ill see how they go,
And Eddie I'm down in saaa chapter 2 at Camden, and those guys seem to think it is the dies as well.

Thanks
 
I'm using a pneumatic squeezer on what i can reach with it and a DRDT-2 cframe for the skins, and i've been extra careful to make sure the die is perpendicular to the flange

Taran, when I look at your dimples I see that the shoulders are rounded. That is typical when using squeezing devices such as a pneumatic squeezer or DRDT-2 which impart a static load and allow for quite a lot of springback.

If you use a deep throat impact dimpler and give the device a decent whack with a computhane hammer you will impart a dynamic load. The end result will be crisp dimples with well defined shoulders and a deep draw. Then your rivets (or mating dimples) will sit low and flush in the dimples.

I had a friend who complained that his rivets were not setting as flush as the rivets on my aircraft (I use a deep throat impact dimpler). He'd tried all sorts of different dimpling dies. I asked him to bring over some sample strips that had been dimpled on his DRDT-2 dimpler. I then did some dimples on the same strip so that he could see the difference.

He then sold the DRDT-2 and bought the cheaper impact dimpler...and now he's a happy camper.

Don't get me wrong. A DRDT-2 or a pneumatic squeezer ( I have one of those too) are very convenient to use and will do a reasonable dimpling job, but they're not the best tools to achieve an optimum result in my opinion. I guess in the end it just comes down to how fussy you want to be.
 
Last edited:
Skins

Taran. If your skins have some deflection around
The dimples and do not look flat, try more pressure
This should help a lot. Especially with the new dies.
I can attest to the same issues that where solved.
 
Last edited:
but they're not the best tools to achieve an optimum result in my opinion. I guess in the end it just comes down to how fussy you want to be.

Everyone is entitled to their opinion....my opinion is that I disagree with the above statement. You can get excellent results with these tools.

Just another data point...everyone can make up their own mind.

Heck there is at least one on here that has built with excellent results using only a pop rivet dimple die.
 
The subject here is interesting, so I did a little test this morning to see how serious the problem is. I've used the hammer method of dimpling but am now committed to the DRDT-2 for reasons explained below.

What Bob says about the difference between a dynamic load and static load in setting the dimple is probably true. The problem I have with the hammer method is consistency. There are over 12,000 rivets in an RV, most require a dimple. I found with the hammer whacking method, my arm got weary and the sets were not consistent. If you are holding a large skin with one hand and attempting to get a good whack with the other, sometime it doesn't work out right. With the DRDT-2 each set is the same if you bring the handle full down through the over center part part of the application.

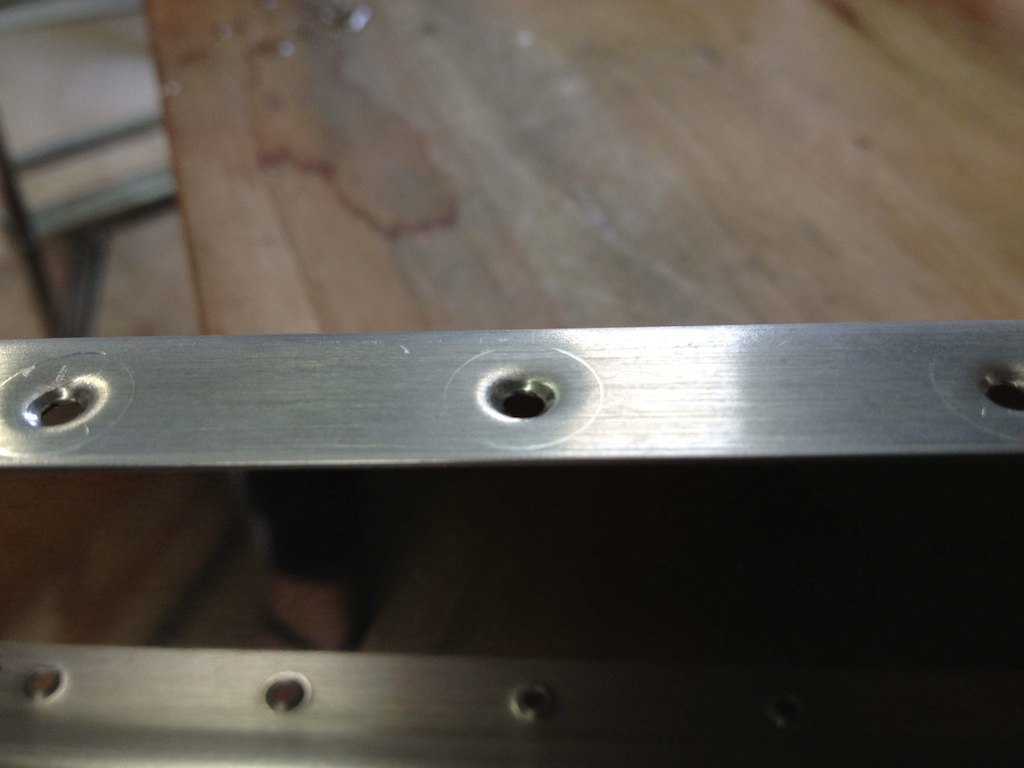
Anyway, below are 2 sets of dimples with the DRDT-2. (I sold the hammer whacking device so can not make a comparison) The first with .040 material the second with .020 material.

With the .040 material, the #40 dimple was perfect, the #30 almost perfect, and the #8 screw dimple not nearly perfect. (Van's recognizes the problem with #8 dimples, like with the fuel tanks, and recommends cleaning out the dimples with a light counter sink touch)

With the .020 material, both #40 and 30 were perfect and the #8 was almost perfect.

The DRDT-2 has to set right to work right. The final part of the down handle motion has to pass through an over center force so it really squeezes down.

I find greatest problem with getting a good set when riveting is proper alignment of the gun and bucking bar. Sometimes when riveting solo, that is quite a challenge.


Uploaded with ImageShack.us


Uploaded with ImageShack.us
 
Last edited:
Not trying to be a prick, but None of those 6 look perfect. Even the #40 in the .020 looks tall. If its perfect, you should be able to pass over it with a 400 sanding block and not scuff any anodizing off the rivet head. Try it.
 
Anyone else use the "George Orndorff Method?"

A single twirl of the debur tool knocks off a little of the shoulder and lowers the rivet head a little and does make a difference. Makes the dimple a little more like a countersink.
 
Heck there is at least one on here that has built with excellent results using only a pop rivet dimple die.

I'm guessing from this statement that YOUR interpretation of "excellent" is simply not the same as MY interpretation of "excellent". :)
 
Last edited:
Not trying to be a prick, but None of those 6 look perfect. Even the #40 in the .020 looks tall. If its perfect, you should be able to pass over it with a 400 sanding block and not scuff any anodizing off the rivet head. Try it.

It's an illusion, Dave.

The #8 screws are too high but the rivets are respectable. They are below grade except #30 in the the .040 material, it is just a smidgen above grade.

The shoulder of the dimpled hole is curved and when the rivet sits in there it is not flush, at least not so before being driven. The previous images show the mismatch between the rivet and the dimpled hole edge, but they are below grade except the #30 in the .040 piece.

I suppose there are dimple machines and techniques that make perfect-perfect dimples every time and the perfectionist builder will eventually find a way to get it done - perfectly. But I do believe those of us who would like to fly the airplane sooner than maybe never will be OK with the DRDT-2. At least I hope so. :)


Uploaded with ImageShack.us


Uploaded with ImageShack.us
 
A single twirl of the debur tool knocks off a little of the shoulder and lowers the rivet head a little and does make a difference. Makes the dimple a little more like a countersink.

This is a practice that can be very useful in specific isolated situations, but if you need to adopt it generally it indicates that you are not properly forming the dimples in the first place. It might be better to treat the cause of the problem than treat the symptoms.

The distinct disadvantage of using the deburring tool on dimples (apart from removing critical metal on thin sheets) is that it removes the alclad corrosion protection in exactly the location where you need it most (at the rivet).
 
Last edited:
Frankly I wouldn't use the pneumatic squeezer to dimple. A hand squeezer is fine and easier to control and produce good results. That and the C Frame are my tools of choice.
 
Dimpling

I often use the pneumatic s. for dimpling.
Especially ribs and I use clevland tank dies
For the ribs as skins tend to nest better. Use the spring backs
For the skins and have good results with flat skins.
 
Is the any reason why you wouldn't use the pneumatic squeezer for dimpling?

I have a pneumatic squeezer and it produces dimples that are OK, probably better than the DRDT-2 due to the force that the pneumatic squeezer can produce. But for a truly optimum result I switched to using an impact deep throat dimpler exclusively on my skins to ensure really deep seated rivets. I explained my reason for this in a previous post on this thread. For ribs, bulkheads and other small internal structures I find that using the pneumatic squeezer is more convenient and produces a result that is adequate for the purpose.

For the record, I am attaching a photo that shows how I achieve deep throat dimpling quickly on large sheets, with a high level of consistency, and with the least inconvenience. You will see that I have a sunken recess in the centre of a large workbench that allows me to slide the deep throat dimpler backwards and forwards while keeping the bottom dimpling die level with the underside of the sheet I am working on. This ensures that the sheet is always well supported and that the action of the dies is always normal (at 90 degrees) to the sheet.


image ru
 
When I coach novice builders, I see this problem a lot. It's often the adjustment of the die spacing with the pneumatic squeezer thats the problem.

Usually, however, it's the squeezer yokes themselves that are flexing. The smaller C yokes are much better at forming dimples than the larger ones. This makes a huge differece in dimple quality and urge I folks to try it.

Once a dimple is properly formed, the lead-in will be perfectly flat with a "halo" around the dimple.

Finally, if all else fails, the best system is to use the c-frame dimpler.
 
Newbie Question

Taran, did you solve the problem you were having by getting different dies? My tools won't be here until next week, but I have never done any dimpling at all. I have a practice kit, but I'm wondering if I should line some other practicing up before ordering and starting on the empennage. My toolkit from Cleaveland includes the Geezer Squeezer and C-Frame Bench Riveting Tool.

-Matt
 
Back
Top