What's new
Van's Air Force

Don't miss anything! Register now for full access to the definitive RV support community.

Honda 1.8L on RV6A Now Flying!

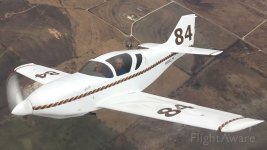
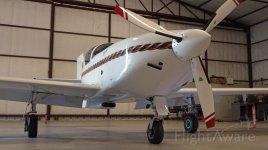
100 hours on engine; going strong

I have not posted much only because I have been busy with non-aviation life. (Moving across the country and building a new home sorta takes a bit of time.)

I just reached the 100 hours on the engine, with about 85 ish of it flight time. I have not had any issues with the engine or the PSRU. I typically run it at about 4500 RPM. I have only added one quart of oil in that time frame. Things seem to be going well with the set up.

Good flying to you all.

Charlie
Now, Magnolia KY.
 
I was just wondering yesterday how you've been getting on with the engine. Sounds like it's been treating you well. Congrats on the milestone!
 
Update and new variable pitch prol

It has been a while so I thought I would give an update and share some new changes coming.

In short the engine and installation are working well.

I'll describe some things that I need to work on at the end of this post, but off to the good stuff first.

After getting a bit more and more dissatisfied with 20 inches of MAP (Manifold Air Pressure) at 10k ft. and having a Turbo which is really not being used to its full advantage, I have plans to get a variable pitch prop. I know most of the "usual" candidates, MT, etc. but I am more intrigued by the variable pitch prop hub being offered by GR-Engines out of Rostov-on-Don Russia. Ill insert a pic of their hub with this post.

http://gr-engines.ru/en/catalog/propellers/vpp-3-20

For my set up, this seems to have a lot of features that I really like. I will be able to use my current spinner and spinner back plate and more importantly, the warp drive prop blades with their hub. The system has a 5 button dashboard controller that fits nicely in a 3-1/8 instrument hole that allows you to select minimum (climb) pitch, Maximum (Cruise) pitch as well as being able to select increases and decreases a degree at a time. Plus of course it displays the actual pitch at any given moment.

In case readers are wondering, I have spoken to the folks at Warp Drive and they (understandably) take no position on this.

There are a few older versions in the USA on Trikes but for the most are in use oversees. One unit has been sold to NASA for use in the ROAMX program.

I have a prop extension in use already and this will require me to have a new extension made to fit their hub.

It will be a couple of months before the system and extension are ready to ship and more time after that to install. I honestly have no expectations things will come together anytime before December. Which is actually good timing for me as I have more non-aviation obligations right now than I have time for.

More on other squawks in separate posts.
 

Attachments

  • 3 blade hub close up end view.png
    3 blade hub close up end view.png
    302.5 KB · Views: 200
  • 5 button dashboard controller.jpg
    5 button dashboard controller.jpg
    246 KB · Views: 198
It has been 3 years... any update??? I see you have flown it from videos

Update, Empty weight, top speed sea level, cruise at 8500 msl WOT speed and FF?
 
It has been 3 years... any update??? I see you have flown it from videos

Update, Empty weight, top speed sea level, cruise at 8500 msl WOT speed and FF?


George,

At first I thought you were kidding. Yes, there have been about 200 posts with updates since I first flew last October. Tons of details there for the curious....

My empty weight was 1036. As far as speed goes, I always want to put some context around "speed". As I am sure many want to see if the "Honda" produces enough power. As you know there is much more to speed than the HP the engine produces. The main limited factor to my top speed is really not related to the engine. They are:

1) A 2.33 ratio reduction drive. With my self imposed top RPM of 5000 this limits my top propeller speed to 2150. So....imagine comparing a top speed of a plane that is turning a prop at 2700 rpm compared to one turning 2145.

2) I have 6 x 6.00 tires.
3) No leg or gear fairings.
4) A fixed pitch prop.

Which is why I am ordering a variable pitch prop. I also hope to soon be able to get some flight time with other RV6A and do some more flight comparisons where we can match prop rpms.......

I would have to check some notes but I think I see 150 mph at sea level at 2060 prop RPM.....
 
Big tires

Charlie
How did you put the big tires on? What did youdo to the nosewheel? I would love to call you about that whole process and how you like it. You cam pm me or call me at 303-772-2202 or email me at [email protected]

Thanks
Dave
 
George,

At first I thought you were kidding. Yes, there have been about 200 posts with updates since I first flew last October. .

Sorry did not see the other post. Thanks for update. From video sounded good. Thanks for quantifying speed... The CS PROP will be a great change. Good luck.
 
Sorry did not see the other post. Thanks for update. From video sounded good. Thanks for quantifying speed... The CS PROP will be a great change. Good luck.

Thanks.

Yes overall I am very happy with the project. I am optimistic that the variable pitch hub will give me gains on the top end at higher altitudes especially since I have a turbo to normalize MAP, but how much increase, time will tell. Speed has never been a high priority for me as you can tell by the fact of my unfaired 6 x 6.00 tires, but the Variable pitch prop will allow me to utilize the power that I do have.

I continue to struggle with high gearbox temps on hot days if I do repeated touch and goes, so I need to work on some ideas on how to improve cooling to that PSRU. I have one 3" direct blast tube on the box, but I need to do something more. May be a oil cooler....but the manufacturer is not keen on that idea.....
 
A 3 inch blast tube is huge for the gearbox. If that doesn't keep it cool, it would indicate some pretty high losses in the gearset which should only be around 1-2% per mesh.

Less than ideal tooth finish, profile, alignment or high shaft deflection could be causes.

I'd highly recommend a magnetic drain plug if you don't already have one fitted.
 
It's probably buried in this thread, but

1. What kind of gear oil?
2. Oil cooler for gear box?
3. Is it splash or pumped gearbox oil?
 
A 3 inch blast tube is huge for the gearbox. If that doesn't keep it cool, it would indicate some pretty high losses in the gearset which should only be around 1-2% per mesh.

Less than ideal tooth finish, profile, alignment or high shaft deflection could be causes.

I'd highly recommend a magnetic drain plug if you don't already have one fitted.

Ross,

I had thought of that, it is 1/8 NPT so that may be a slight challenge but it is something I need to pursue.

I also am going to have the oil sent to blackstone soon. The oil has stayed relatively clear for the past 40 hours. I would think that if it was something like a gear mesh issue the oil would darken. I also sent it back to the manufacturer at about 40 hours and they looked the gears over and said they were in fine shape.

From my limited experience, I just think only having 8 oz of oil in there it just cant be expected to have much capacity to cool a 3 gear - box running at 4500+ rpm. But may be it should?

At this point it seems to warm up too much (past 220F) when I run it past 4200 rpm on a hot day. I can run it at 4200 rpm at 30" MAP down low for hours on a cool day.and it stays below 220F. But if I run it at 4800 rpm on a hot day, even at 25" MAP it gets hot. That seems to bode well for being able to increase pitch to produce power at lower RPM.
 
Last edited:
It's probably buried in this thread, but

1. What kind of gear oil?
2. Oil cooler for gear box?
3. Is it splash or pumped gearbox oil?

It has 8 pz of mobil 1 full synthetic 75w-90. It does not have an oil cooler. It is splash only, not pumped sprayed. I asked the manufacturer about an oil cooler and he was not supportive of that and said it does not need it and that i just needed to increase more airflow to it.

I will be making some mods to cool it more. I plan to add another blast tube to the top gearset - mainly because it is very easy to add one with my set up. I don't have high expectations it will matter much, especially on repeated take off and landings on a hot day - which is really when I need it.

If that does not work, I can only envision an oil cooler having the capacity to remove heat. But I am not an engineer nor a gear manufacture.
 
My Marcotte also uses 8 oz of synthetic gear oil (bath type also) and temps never exceed 160F, so that amount of oil does the job with a good design.

Exact gear tooth profile and finish has a huge effect on friction generated.

You could drill and embed a 3/16 long and 1/8 diameter magnet into your 1/8 NPT plug as an start until the GB is apart again and then re-tap the hole for a larger OTS magnetic plug.
 
Ross,

That is a good idea. I probably have some of those trigger magnets left over from the project that I could epoxy in a 1/8 plug.

When I flew across country in mid December I never saw temps above 200. But on these hot summer days it shoots up quickly.


What rpm do you cruise at? Is your marcotte a 2 gear set up or planetary? I would really like to have about a 2.0 to 1 radio box instead of the 2.33 to 1...

Also have you ever sent your gearbox oil in for analysis to someplace like Blackstone?

I cruise at around 4200-4400 rpm. Ratio is 2.2 to 1. It's a 2 gear system but with a pinion inside a ring shaped output gear, both helical- fairly unique.

Never done an oil analysis. Nothing much on the plug and the backlash at the prop tip is the same as it was 18 years ago.
 
6 x 6.00 tires and wheels

I have received several inquires on the 6x6.00 tires and wheels.

The swap was fairly easily to do. The 6 x 6.00 are the same as used on the -7A. I decided to keep the stock 5x5.00 front tire. The 6x6.00 mains made my -6A sit more level like the -9A and -7A. I never liked how squatty many of the -6A sit on ground. It also increases forward visibility while on take off and taxiing.

Ken Kreuger from Sky Designs (who worked at Vans for years) helped me get the right Matco wheels and Brakes. He also got me a better price that the retail price Matco would charges. If you want to get it right I highly suggest you call Ken for help on the Matco order. Ken also makes killer wheel pants that are the best you can buy.....You can reach him at:

Ken Krueger
Sky Designs Engineering
skydesigns.aero
+1 360 812 6458

My notes from Ken state the Matco set up:
WHLWI60 - WHEEL & BRAKE ASSY 6", 1.25 TRB, "I" Series Caliper BPAE 1.38S, D5 . These have the required angled valve stem. NOTE: The do have a "L" version as well but this is a lighter version and does NOT have as much braking capacity.

As far as tires go I took Rocket Bobs advice and bought Wilkerson retreads. They are bullet proof. I love them. $75 ea. I have landed in snow and ice and they plowed through it like it was powder. But they ARE heavy compared to a standard to conventional 5 x 5.00 tires. Their website is Wilkersonaircrafttires.com
 
"The 6 x 6.00 are the same as used on the -7A. I decided to keep the stock 5x5.00 front tire. "

Are you sure about this? The tires on a stock 7A should be the same as the 6A, 8A, and 9A.
 
"The 6 x 6.00 are the same as used on the -7A. I decided to keep the stock 5x5.00 front tire. "

Are you sure about this? The tires on a stock 7A should be the same as the 6A, 8A, and 9A.

You are right, I said that wrong. I should have said this 6.00 matco set up is the same that is used when switching out the -7A too....

Thanks for catching that!
 
Update

Just wanted to provide an update. Basically all is well. The engine and PSRU seem to be running strong. But my nemesis of course is heat. I can see too high of temps (sometimes engine, sometimes inlet air, some times PSRU) in demanding use. I.E. climb-outs on warm days. Or cruise above 35" MAP. But at cruise on "normal" days temps are all good. The high temps on demanding ops are all fixable with some time.

Also one issue that I am beginning to notice is the cowl is creeping up and out at the firewall, which tells me there is not enough outlet for the air trapped in the cowl at higher speeds. I am not surprised by this. I figured this was not ideal and it is something on my radar to improve. I could/should incorporate a high air flow exit for both the intercooler and the cowl. One thought is to incorporate a 3" aluminum 90 degree that would exit the cowl with the opening in a negative pressure area i.e. have the exit facing the rear either at the bottom or the side of the cowl. I suspect this would have a noticeable reduction in cowl air pressure as well as increased flow across the intercooler.

I have sent oil samples to blackstone for both the PSRU and the engine and there is some indication of wear but until I send in several samples for comparison I can't say that there is a whole lot that can be derived from the numbers. One odd note is that there is some fuel noticed in the oil test and that has got me real curious. I do run it rich which might be a cause but at this point it is a mystery.
 
Last edited:
Fuel noticed in the oil test - I wonder how common that is? And at what percentages? Timed-EFI with FADEC should prevent raw fuel from washing down cylinder walls. This peaks my interest...
 
Fuel noticed in the oil test - I wonder how common that is? And at what percentages? Timed-EFI with FADEC should prevent raw fuel from washing down cylinder walls. This peaks my interest...

- Me too. I emailed Blackstone back to see if they had any thoughts on the cause but I have not heard back. I think the proof in concern will be if it stays high or of course increases after the next oil change. It was something like 2.2%. The standard so-to-speak is that it should be below 2%. And it was like 0.8% last change....

I plan to do a compression check too when I get some time to tinker....
 
Fuel in oil is pretty common. As injectors age they bleed down at shutdown and some raw fuel ends up in the oil. Some cars like my Porsche 996 the fuel leaking out of the injectors when the engine is off will cause dilution of the oil on the lower part of the cylinder and results in bore scoring. Its a horizontally opposed engine.
 
Fuel in oil is pretty common. As injectors age they bleed down at shutdown and some raw fuel ends up in the oil. Some cars like my Porsche 996 the fuel leaking out of the injectors when the engine is off will cause dilution of the oil on the lower part of the cylinder and results in bore scoring. Its a horizontally opposed engine.

Rbob,

That is fascinating. I did increase the size of the injectors over stock, due to the increase in long periods of high output ops. Probably a bit bigger than necessary. If the percentage of fuel goes up, and the compression stays in check, I might test new injectors.

I have almost done this anyway as with the new injectors my Air/Fuel Ratio mixture control changes the ratio quicker (with the same amount of rotation of the knob) than with smaller injectors. This is not really bad, but I like ability to have finer changes. But of course new/different injectors would require a reconfigure of the fuel map curve....(might have to dig out some old fuel maps....)

Thanks for the insight.

C
 
follow up on heat issues

I mentioned in post 773 that I need to relieve what I believe is a build up of air pressure in the cowl at higher speeds. "higher" for me (with my fixed pitch climb prop and 6 in wheels with no leg fairings) means over 150 MPH.

The good news is that I cruised at 5000rpm today at about 28" of MAP and never saw gearbox temps over 210F. That is because it was 50F OAT, unlike most of the summer here what it was 80F plus.

I saw my inlet air temps creep up over 140F when I pushed it past 30" of MAP, so I need to work on my intercooler system. I currently have a terrible outlet flow, so I know that is where I need to do some duct work.

My engine today stayed at 198F on the hot side of the radiator with the cool side staying about 168F. I am good with that. But that is at or close to 30" MAP with an OAT of 50F....

My immediate plan is to add "exhaust" outlet tubes on the bottom of the cowl. (I know what I have now is not sufficient). The plan is to install one 3 inch 90 tube to exit in to negative pressure airstream below the cowl. If that is not enough I will add a second one. I hope to set up a temp air pressure gauge inside the cowl to not only see what the pressure is, but also to see what the results are of the pending outlets. This will be a repurposed MAP gauge.....

I am confident that this will help the IAT, the PSRU temp both....
 
Last edited:
I finally got around to installing a MAP gauge in my cowl plenum, to test the air pressure. I did this because I saw the cowling start to show signs of slight expansion as if it was experiencing pressure. To my surprise I did not see any positive pressure in the MAP gauge. While I know it is not super sensitive like a water column device, I suspect that if it was really a high enough pressure to be problematic, I would have seen at least a few in/hg. I did not - even diving to increase speed close to VNE. None-the-less I am going to install the 3" 90 degree aluminum duct in to negative pressure air on at least the right side where the turbo is located, if nothing else it will likely reduce the temp in the cowl and probably increase airflow through the intercooler. I share some pics of the 3 inch duct soon.

Other than that, all is well...
 
The MAP gauge won't show anything very useful below 150 knots or so. You need something that measures 0-10 inches H2O.

1 inch Hg is 13.6 inches H2O.
 
Having high pressure inside the cowl is a really good thing. The trick is to take that pressure and get thrust from it by designing the cowl exit properly to convert that pressure into momentum.

I mentioned in post 773 that I need to relieve what I believe is a build up of air pressure in the cowl at higher speeds. "higher" for me (with my fixed pitch climb prop and 6 in wheels with no leg fairings) means over 150 MPH.

The good news is that I cruised at 5000rpm today at about 28" of MAP and never saw gearbox temps over 210F. That is because it was 50F OAT, unlike most of the summer here what it was 80F plus.

I saw my inlet air temps creep up over 140F when I pushed it past 30" of MAP, so I need to work on my intercooler system. I currently have a terrible outlet flow, so I know that is where I need to do some duct work.

My engine today stayed at 198F on the hot side of the radiator with the cool side staying about 168F. I am good with that. But that is at or close to 30" MAP with an OAT of 50F....

My immediate plan is to add "exhaust" outlet tubes on the bottom of the cowl. (I know what I have now is not sufficient). The plan is to install one 3 inch 90 tube to exit in to negative pressure airstream below the cowl. If that is not enough I will add a second one. I hope to set up a temp air pressure gauge inside the cowl to not only see what the pressure is, but also to see what the results are of the pending outlets. This will be a repurposed MAP gauge.....

I am confident that this will help the IAT, the PSRU temp both....
 
As I wrote last year in this thread, I had good success with Bluetooth manometers to measure deltaP of my engine baffling as well as oil cooler ducting. Yes, it's cheaper to drill some holes in the firewall to install Tygon tubing for a Magnehelic manometer, but the BT probes are more convenient.

They are sensitive to heat soak and drift a bit when hot, so get your data in the first 15 min of flight and you'll be good.

20200905_100504.jpg
 
Heinrich, how much drift with temperature rise are you seeing with those particular manometers?
 
I mentioned in post 773 that I need to relieve what I believe is a build up of air pressure in the cowl at higher speeds.

As Steve said, high pressure is good.

Cooling capacity is a function of mass flow through the heat exchanger(s), and that flow is a closely related to deltaP across those exchangers.

Let's assume you need a deltaP of 5" H2O (I have no idea what you actually need in your current configuration; 5" is roughly the minimum requirement for a Lyc in cruise).

At 130 KTAS (150 mph), available dynamic pressure is 9.5" H2O. If you convert 80% of it to static pressure upstream of the heat exchanger, you have 7.6 to work with. Drop 5" across the exchangers and you're left with 2.6 to generate velocity at the exit.

Same 130 KTAS, but only convert 60%, so 5.7 upstream, open the exit to get 5" drop, and only have 0.7 remaining for exit velocity. Same cooling, slower aircraft. Is it a huge difference? Generally no, but all efficiency is a collection of small improvements.

Now to cooling capacity. Since forever, experimenters insist on enlarging the exits in an attempt to increase deltaP, when the real problem is crappy inlets, i.e. poor pressure recovery. Note the effect of a large exit area in the case of 0.6 Cp. A huge exit would only increase the exchanger deltaP by 0.7", maximum. An aircraft with better recovery of dynamic pressure (we have folks here well above 0.85 Cp) can install a variable exit, opening it only when necessary to maintain required deltaP at lower aircraft velocity, higher OAT, and a higher power setting. It's only possible because the builder maximized upper cowl pressure.
 
Last edited:
Follow up. The illustrations are measured Cp from CR3405, defined on page 5 as:

Cp = (upper cowl static pressure - freestream static pressure) / freestream dynamic pressure

It's unclear as to why someone labeled the figures "total pressure", the sum of static and dynamic. No matter, as the point is comparison of inlet types.

The standard inlet is a stock Piper cowl. The 0.3F and 0.6F inlets are 0.3 velocity ratio (velocity through the inlet ring / freestream velocity, i.e. low Vi/Vo) and 0.6 (i.e. higher Vi/Vo), both moved forward to a location just behind the plane of the propeller.
.
 

Attachments

  • CR3405 06F Inlet.jpg
    CR3405 06F Inlet.jpg
    52.1 KB · Views: 142
  • CR3405 03F Inlet.jpg
    CR3405 03F Inlet.jpg
    51.2 KB · Views: 129
  • CR3405 Std Inlet.jpg
    CR3405 Std Inlet.jpg
    52.1 KB · Views: 131
Heinrich, how much drift with temperature rise are you seeing with those particular manometers?

IIRC less than 1" H2O, but not the same amount of drift between the two, which of course contaminates the deltaP measurement as well as the two static pressures.

But, 15 minutes is plenty of time to go fly and get data.
 
cowl pressure

Ross, Steve, Dan, Heinrich,

I appreciate the information. My main focus has been to investigate if the slight bulging of my cowl is an indication of a problem that needs addressed. I decided to install a in/hg gauge, but as Ross and others noted it is not sensitive enough. I have a manometer on a shelf somewhere. It would still be good to use it for additional testing. I was glad to see that it was not significantly too high.

Another reader PM me and suggested a thought that also crossed my mind. The bulging may be a result of the negative pressure area on top of the cowl that may actually be "pulling" it up. A tuff test may be interesting.

On that side note, my radiator is underneath the airframe and not part of the engine cowl area. So it is sort of "out of play" in relation of what I was discussing. I generally do see in excess of a 25 degree deltaT drop across my radiator.

Here is a pic of the cowl outlet that I plan to install. At the bottom of the cowl just forward of the firewall off to the side to avoid "feediing" the cowl air in to my radiator inlet.
 

Attachments

  • 3 inch cowl outlet pipe.jpg
    3 inch cowl outlet pipe.jpg
    168.2 KB · Views: 138
Ahhh, forgot about the belly heat exchanger. That makes mass flow through the cowl a very inefficient way to meet the cooling requirement. In effect, you're accepting the drag of a water cooling system and the drag of an air cooling system on the same airframe.

Do you really need the cowl flow? Can it be eliminated? If not, what is it cooling, and how does that component transfer heat to the air? The system is doubly inefficient if heat transfer is low.

With no other change, adding cowl outlet area will simply increase the mass flow, making heat transfer worse and increasing drag.

Dan,

Good points. I have thought the very same myself. I built the cowl with the thought of locating the radiators there. That did not turn out as practical as the belly mount that I learned from Ross (albeit his is MUCH nicer). So yes they (large cowl inlets) are a hinderance for the most part for sure. Pressure recovery is non-existent. I do use the left inlet to run scat to the intercooler. I did think about inserting a torpedo shaped obstruction in the right cowl inlet but I do not want to increase heat around the turbo as it (right side inlet) adds free flow air over the turbo, which provide much needed cooling to keep the turbo exhaust side from cooking the cowl. But it is terrible airflow as far as air resistance goes. As you know I am the odd man out in that I am not really interested in going super fast, but I am interested in avoiding stress on the cowl and or increasing the flow of the intercooler (by adding an outlet in to negative pressure area. The intercooler does a surprisingly good job in keeping my IAT down in all but the hottest days, but I know the intercooler and cowl air exhaust route is terrible.
 
Last edited:
I do use the left inlet to run scat to the intercooler.

There is the first place to improve. Pressure loss in the SCAT will be very high, so although the cowl may be flowing a lot of mass, mass flow through the intercooler itself will be poor. You're a good fabricator, so if physically possible, build a smooth duct with steadily diverging walls from one inlet to the face of the intercooler. Seal it at both ends so it can't leak. If the existing inlet is in an awkward location for ducting, glass it closed and put a new inlet where it is needed.

I did think about inserting a torpedo shaped obstruction in the right cowl inlet but I do not want to increase heat around the turbo as it (right side inlet) adds free flow air over the turbo, which provide much needed cooling to keep the turbo exhaust side from cooking the cowl.

Let's re-think. Remember all heat transfer is conductive, convective, or radiated. There is no conductive path from turbo to cowl. Convective requires airflow between hot turbo and cool cowl. You're supplying plenty of that, so random flow in the big space isn't really a plus; you're cooling the turbo and heating the cowl. That leaves radiated, which is likely to be the primary energy path.

So, shield the turbo and plumbing so it cannot broadcast radiant energy to other components, and then close off the remaining inlet.

A good radiant shield has reflector facing the hot parts, backed with an insulator, so energy not reflected initially is limited in its ability to re-radiate from the "cold" side. Some kind of radiant shield is pretty common in turbo applications.
 
You'll need some air for the alternator, redrive, oil, intercooler as a minimum. If you're not using a liquid cooled center section on the turbo, it's a bad idea to starve that area of cooling air too as bearing life will suffer.

Directing cooling air individually to these components is more efficient than just letting it flow into the cowl willy nilly.

You simply won't be able to close off the front inlets completely.

As far as drag reduction at the rad duct, that will need careful shaping of the diffuser, probable installation of guide vanes, (given the length available), no leaks between the rad and duct and a variable exit outlet.

With the big tires, and being unfaired, most of your big drag is here and changes to the cooling system layout will have minimal effect. May not be worth the effort for drag reduction but could result in better cooling of various components which may justify the efforts.
 
Russell Sherwood's water cooled Glasair...which apparently requires very little in-cowl airflow.
.
 

Attachments

  • 4469d589d5fe55953d6068a35f90804b2da31da4.jpg
    4469d589d5fe55953d6068a35f90804b2da31da4.jpg
    106.9 KB · Views: 146
  • 40e367a925bfaead803a9db140a03fe9e65d6539.jpg
    40e367a925bfaead803a9db140a03fe9e65d6539.jpg
    80.3 KB · Views: 176
Not turbocharged and uses a liquid to oil heat exchanger as far as I know. Turbos have an intercooler and higher heat rejection to the oil. The Marcotte PSRUs we use have lower losses and require less cooling air too than what Charlie is using here. There is another NACA duct on the lower left of Russell's cowling as well.
 
Last edited:
Not turbocharged and uses a liquid to oil heat exchanger as far as I know. Turbos have an intercooler and higher heat rejection to the oil. The Marcotte PSRUs we use have lower losses and require less cooling air too than what Charlie is using here.

Yep.......
 
Returning to in-cowl mass flow, in addition to heat exchanger flow, I see three inlets on Russell's Glasair. One has to be a combustion air source. What are the other two? How are they ducted and terminated?
.
 

Attachments

  • ScreenHunter_997 Jan. 02 08.37.jpg
    ScreenHunter_997 Jan. 02 08.37.jpg
    29.3 KB · Views: 103
Here is a photo Russell sent to me a few years back now. Note he has had several configuration changes over the years and after some damage suffered when a hurricane dropped the hangar door on the plane and later with a brake failure and runway excursion.

I may be mistaken on the oil heat exchanger, that may have been long ago. I'd have to study some of the more recent photos I have with the cowling off to see what is current.

Russell has constantly worked at reducing both airframe and cooling drag with excellent results in the SARL races.


BTW, Russell passed 1000 hours on the aircraft late last year, making it one of the most successful auto powered aircraft that I'm aware of. Smart guy.
 

Attachments

  • sherwood3.jpg
    sherwood3.jpg
    77.9 KB · Views: 170
So apparently Russell's only blast cooling flow is via a tiny inlet for the PSRU.

In Charlie's case, the intercooler flow is drag accepted in trade for additional power. No argument here, assuming the net is positive. Quality ducting should reduce momentum loss, as well as drop intake temperature, both positive.

As for the rest, again, consider conductive, convective, and radiated.

I seem to recall a water cooled turbo center section. Charlie, is that true?
 
Most of the liquid cooled experimenters started out with something more than needed as far as inlet size went and if we cared about drag, we learned to improve the layouts and reduce those inlets areas as time went on. Others just left things alone because they worked ok. 20 years ago, there was little useful data on designing cooling systems for planes like ours. Now we've learned a lot more, mainly through flight testing with instrumentation. I've tried to share some the lessons learned in the YT videos in hopes of saving those following some of the wasted time on unproductive paths taken and give folks a place to start at least.

Russell has taken the design to a point through his experimentation, that seems pretty well optimized now, using no more air than required to feed everything. For SARL racing, he even has a removable inlet cap to place over the rad inlet to further reduce inlet area.

His layout is certainly more refined than mine.
 
Last edited:
Dan Ross,

Yes, those are all excellent ideas that would help improve the airflow in my set up. And I absolutely appreciate the help and advice.


I hate to sound like a whiner but my life is such that I am happy to just find an hour every few weeks just to fly! I had more time BEFORE I retired!!!

After moving and flying across country we are now approaching the end of the build of our new home and - yes - I keep thinking there will be time for boring holes in the sky. But truth be known, I am also itching to build a STOL. So who knows!

CR
 
Back
Top