Van's Air Force
You are using an out of date browser. It may not display this or other websites correctly.
You should upgrade or use an alternative browser.
You should upgrade or use an alternative browser.
Shawn's -4 re-build
- Thread starter ShawnR
- Start date

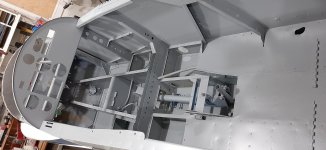
Thanks for the links to your firewall mod Jon. I noted in the photo of you draining the brake lines, the exact same dent in the shelf that I am referring to in mine. (attached)
That will need to be addressed but thinking more about the cut out,...my engine is essentially a zero time engine and has a solid crank. I won't be swapping it out for a constant speed prop. Since the mod will not solve my issue of the fuel pump conflict, probably not a worthwhile mod, for me. Any other reasons to do it?
Thank you
Attachments
YellerDaisy
Well Known Member
That will need to be addressed but thinking more about the cut out,...my engine is essentially a zero time engine and has a solid crank. I won't be swapping it out for a constant speed prop. Since the mod will not solve my issue of the fuel pump conflict, probably not a worthwhile mod, for me. Any other reasons to do it?
Given that info, probably no reason to do it. In spite of some people's opinion, there are valid and useful reasons and flight conditions where some additional power and/or a C/S prop are of value. It's often difficult for people to consider things from outside of their typical/familiar perspective but obviously one persons 'normal' may be very different than another's. Regardless of all that, if you ever decide to add a C/S prop, you will be pulling the engine (for a different engine/crank) so can make the firewall mod at that time. The mod does offer a little bit more space on the engine side of the firewall and a nice place for oil to collect when spilled (while changing the filter). Other than that, I cannot think of any tangible value to it.
Oil cooler
Another question that has come up as I work through renos....
When I picked up the engine, the rebuilder told me "You will need an oil cooler". My -4 has never had one. When I checked the application chart on Aircraft Spruce, it refers to aircraft models, ie, Piper PA18. How do I know what oil cooler to buy? I see they are rated by "rows".
I see in the builders manual that it states, essentially, any oil cooler will work. But with confined space, etc., I was hoping for some examples. I have the O-360 in a 1985 RV4 (not sure if cowlings changed since then). What else do I need to consider before choosing an oil cooler?
https://www.aircraftspruce.ca/categories/aircraft_parts/ap/menus/ep/oilcoolers.html
Thanks
Shawn
Attachments

YellerDaisy
Well Known Member
How do I know what oil cooler to buy? I see they are rated by "rows".
Generally, it comes down to what you can make fit in the available space. You will find wildly varying reports from -4 drivers about CHT and oil temps. My opinion is that this is due to so many variables with the cowling, inlets, baffling, engines, climate, and instrumentation (at least). With my old O-320 and 8 row oil cooler, my oil was always very hot. With my new O-360, 10-row oil cooler (AERO CLASSICS 8000081) and new cowl, baffles, etc... my oil temp rarely exceeds vernatherm temp. I would certainly NOT say that this is the only setup that will work - just the one working for me. I suspect mounting the oil cooler on the firewall would be ideal but I didn't have space for that. I would not recommend mounting it on the baffles behind #4. However; that does work for some folks.
Some photos here and more of the 3d printed oil cooler duct here.
panel and static port
First off, Merry Christmas everyone!
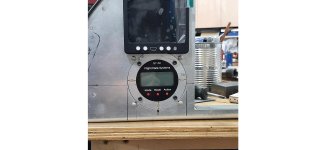
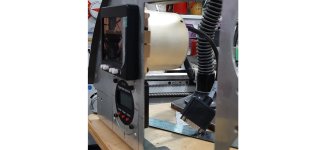
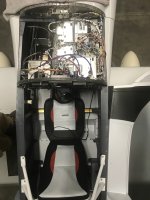
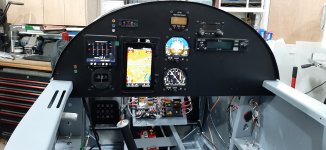
Happy to report I am back into the shop. My first project to tackle was the instrument conflict mentioned above. After replacing the bulkhead behind the panel (which had been severely modified in the past) with the original design, my carefully designed panel had an instrument conflict. Although not my favourite instrument layout now, the aluminum work turned out ok. And it was an interesting project. For anyone using an EDM350, the diameter of the case is actually around 3.000" so a regular instrument hole is sloppy. The mod allowed me to make the hole a better fit anyways.
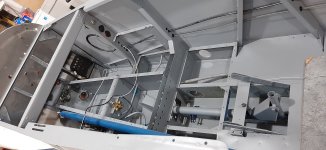
The next little project was to be the static ports. As it is, the only static port is on the right side and the tube runs directly to the panel. Someone was over and suggested that the tube should rise in the area of the port for moisture concerns. I also figured I would install one in the left side. Today, I removed a label on the fuselage in that area that read "No static port this side". When I removed the label it appears that a static port is indeed installed there already, but not connected inside. Both ports are of the flush style, installed on the interior of the skin. From doing a bit of research on this forum, it appears to me that a preferred port style is that of a normal rivet head? A bit of a convex shape.... not a flush style. I see Vans and Steinair sells kits for this domed style. Will mess around with rivets or go with one of those.
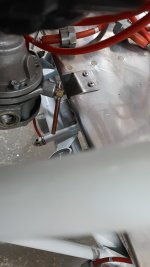
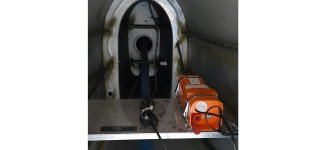
Edit Post 112 shows a photo of the tunnel and static port plumbing. I rotated the image here. That white fitting is just a termination point, so no rise for moisture, nor connection to the left side. Mmmmmmmm???
First off, Merry Christmas everyone!
Happy to report I am back into the shop. My first project to tackle was the instrument conflict mentioned above. After replacing the bulkhead behind the panel (which had been severely modified in the past) with the original design, my carefully designed panel had an instrument conflict.
Although not my favourite instrument layout now, the aluminum work turned out ok. And it was an interesting project. For anyone using an EDM350, the diameter of the case is actually around 3.000" so a regular instrument hole is sloppy. The mod allowed me to make the hole a better fit anyways. The next little project was to be the static ports. As it is, the only static port is on the right side and the tube runs directly to the panel. Someone was over and suggested that the tube should rise in the area of the port for moisture concerns. I also figured I would install one in the left side. Today, I removed a label on the fuselage in that area that read "No static port this side". When I removed the label it appears that a static port is indeed installed there already, but not connected inside. Both ports are of the flush style, installed on the interior of the skin. From doing a bit of research on this forum, it appears to me that a preferred port style is that of a normal rivet head? A bit of a convex shape.... not a flush style. I see Vans and Steinair sells kits for this domed style. Will mess around with rivets or go with one of those.
Edit Post 112 shows a photo of the tunnel and static port plumbing. I rotated the image here. That white fitting is just a termination point, so no rise for moisture, nor connection to the left side. Mmmmmmmm???
Attachments
Last edited:
Dan 57
Well Known Member
Yep, for any kind of precise instrument readings, you'll need a static left and right, linked by a Tee, their location being given on the plans.
Forget about the moisture loop or trap, your -4 is a taildragger and this alone prevents moisture accumulation in the lines.
As to the ports themselves, their shape is pretty important. The original Van's solution is the cheapest, lightest, and works pretty well: a large domed pulled rivet is applied, its stem then being driven out.
I helped on a -8 on which we had >15 knots speed errors caused by the original builder installing wrong ports the wrong way... we installed Stein's offering and all is good now.
Static ports
Thanks Dan
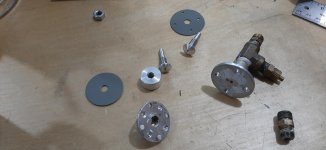
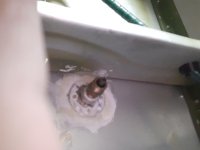
The builder of my -4 put some static ports behind the skin, then made a small hole in the skin. So, about as flush as one can get. I made up a couple of ports yesterday, removed the old hardware and am ready to install them next time someone drops in and can hold the bucking bar. I would just use a washer but there are holes in the skin from the old ports so want to fill those in. The functionality must be something to do with airflow against the skin, hence the rivet being so effective with the small dimple it creates. Guessing......
Moving on.....getting ready to paint the interior. Today, I stripped all of the wiring and things (rudder cables, static line, trim cable, etc) that might be in the way of spraying.
Thanks Dan
The builder of my -4 put some static ports behind the skin, then made a small hole in the skin. So, about as flush as one can get. I made up a couple of ports yesterday, removed the old hardware and am ready to install them next time someone drops in and can hold the bucking bar. I would just use a washer but there are holes in the skin from the old ports so want to fill those in. The functionality must be something to do with airflow against the skin, hence the rivet being so effective with the small dimple it creates. Guessing......
Moving on.....getting ready to paint the interior. Today, I stripped all of the wiring and things (rudder cables, static line, trim cable, etc) that might be in the way of spraying.
Attachments

Last edited:
Paint prep
from post #13
Flyhud
How did you prepare the interior before repainting? I visited our local automotive paint store. They suggested a fine 3M pad to scuff the surface. It does seem to work well for the general areas in good shape. I have areas with scratches and the old paint peeling that I would like to smooth the edges of, but I don't want to use a "too" aggressive sandpaper for fear of scratching the aluminum. What grit sandpaper is good to use for this application? I don't want to use paint stripper for fear of getting it between pieces of aluminum. My other thought was wiping with a lacquer thinner. That might soften the edges of the chipped area.
At the end of the day, anything I do will be better than what it is. I don't want to cause other issues.
from post #13
I own a 94 -4 that I completely refurbed and modernized. My interior was painted that same hideous blue, It kept me up at night…I was never so happy when I repainted it. Used a flat gray epoxy primer, turned out great and is very durable. My apologies in advance if you are partial to the blue.
Flyhud
How did you prepare the interior before repainting? I visited our local automotive paint store. They suggested a fine 3M pad to scuff the surface. It does seem to work well for the general areas in good shape. I have areas with scratches and the old paint peeling that I would like to smooth the edges of, but I don't want to use a "too" aggressive sandpaper for fear of scratching the aluminum. What grit sandpaper is good to use for this application? I don't want to use paint stripper for fear of getting it between pieces of aluminum. My other thought was wiping with a lacquer thinner. That might soften the edges of the chipped area.
At the end of the day, anything I do will be better than what it is. I don't want to cause other issues.
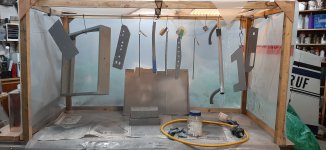
The fun continues. (Not sarcastically...it is way more fun putting things back together than taking them apart!) I assembled a small paint booth to try to control some of the overspray in the shop. It helps a lot.
While doing this, I am looking ahead to the panel and wiring. As much as I have skimmed through some of Robert Nuckoll's aero wiring book (It is loaded with info, but quite a read) I cannot find a guide for choosing the size of wire to feed the fuse panel/cct breakers. There is a lot of information of cross area of wires, etc. but for choosing this main wire, is it as simple as adding up all of the possible electric draws and choosing the wire accordingly? Each fuse is not the actual draw of the instrument/light/radio etc so it would lead to overkill. But short of finding a "rule of thumb", that would be a logical conclusion. Any suggestions/references on choosing this wire size? It will be relatively short (~ 2 feet) so not a lot of loss going on in my installation. I am guessing a 6 gauge would be more than enough, but hoping for some input.
While doing this, I am looking ahead to the panel and wiring. As much as I have skimmed through some of Robert Nuckoll's aero wiring book (It is loaded with info, but quite a read) I cannot find a guide for choosing the size of wire to feed the fuse panel/cct breakers. There is a lot of information of cross area of wires, etc. but for choosing this main wire, is it as simple as adding up all of the possible electric draws and choosing the wire accordingly? Each fuse is not the actual draw of the instrument/light/radio etc so it would lead to overkill. But short of finding a "rule of thumb", that would be a logical conclusion. Any suggestions/references on choosing this wire size? It will be relatively short (~ 2 feet) so not a lot of loss going on in my installation. I am guessing a 6 gauge would be more than enough, but hoping for some input.
Attachments
I realized last night that I was looking at the fuse values and not actual instrument current values. So going through all of the electrical (spec sheets) needs in the aircraft, I came up with a worst case scenario of about 42 amps. 43.13 says a #8 wire would do that but I will probably go with a #6, as mentioned above. I just did it more systematically this time. . It seems #4 is common from what I could find on line.
. It seems #4 is common from what I could find on line.YellerDaisy
Well Known Member
Looking great!!
42 amps is a lot of juice for a modern, day VFR machine. I would expect that in an older IFR ship and/or fuel injected (redudant pumps and such). I may have your mission mixed up with someone else, apologies if so. These days, with LED lights and EFIS, our machines don't consume much electricity. I can't seem to put my fingers on my electrical spreadsheet at the moment but I have a 40 amp alternator that has a lot of overhead. My electrical bus feed wire is #8.
42 amps is a lot of juice for a modern, day VFR machine. I would expect that in an older IFR ship and/or fuel injected (redudant pumps and such). I may have your mission mixed up with someone else, apologies if so. These days, with LED lights and EFIS, our machines don't consume much electricity. I can't seem to put my fingers on my electrical spreadsheet at the moment but I have a 40 amp alternator that has a lot of overhead. My electrical bus feed wire is #8.
Last edited:
Thanks JD. I gave my self 5 amps each for the aux power outlet, dual USB, field circuit, and then radio. So, after that, it just added up. Pretty basic machine as you say. I am surprised too but I went to each spec sheet for each instrument, light, etc. , I found the actual draw or something I could average it out. I did not consider the alternator output. I will need to look to see what size mine is. I had planned on replacing it and have also been reading a bit on overvoltage protection, external regulators, etc. It seems the more I get done, the more I need to learn about!
To wrap up some of the previous posts....
Static ports are done
Rudder pedals are reinstalled (waiting on a few pieces of hardware )
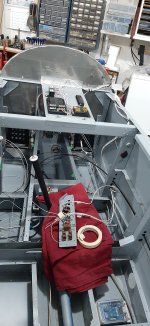
Master brake cylinder is plumbed on inlet side. I replaced the plastic plumbing fittings with some hydraulic fittings. When the shop made my lines up, they put those fittings on so I had to change over. I like them much better though. You can see them in one of the photos. Local shop so nice.
I assembled the FlyLED's control module for the Strobe/Nav lights. I will give them a kudos. Nice PC board to work with. Well documented kit. Good support.
I decided to take the advice and sentiment expressed in previous posts and ditched the little rocker switches for more robust toggle switches. Thanks for the input there.
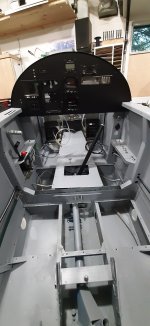
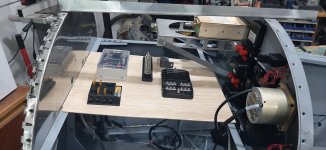
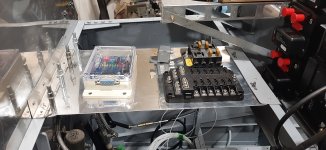
I am starting to work on the wiring. I will be putting a shelf behind the instrument panel to support the fuse blocks, grounding blocks, light control module, etc. I looked at options like on the floor for the control module, firewall for the fuse blocks, etc. but I like the shelf, and it be will be nice to install and for maintenance.
But, thinking about the wiring, how does one make the actual physical connections for the communications pins? I don't have much to connect, but the engine monitor can connect to the GPS RS232 lines to calculate fuel necessary, and the AV30's connect to the GPS for course information. The pins don't look large enough to put two wires into them. I think my system is too simple for the junction boxes I see in larger systems. So is it a matter of stripping the wire back from the pin and joining it there? I think Stein calls it "window stripping"? That is about the best video that I have found but hoping someone can confirm this is what I need to do for the communications lines. Or do I use a terminal block outside of any connector? I would be concerned about losing shielding but maybe those lines are not sensitive to interference? Any suggestions?
Static ports are done
Rudder pedals are reinstalled (waiting on a few pieces of hardware )
Master brake cylinder is plumbed on inlet side. I replaced the plastic plumbing fittings with some hydraulic fittings. When the shop made my lines up, they put those fittings on so I had to change over. I like them much better though. You can see them in one of the photos. Local shop so nice.
I assembled the FlyLED's control module for the Strobe/Nav lights. I will give them a kudos. Nice PC board to work with. Well documented kit. Good support.
I decided to take the advice and sentiment expressed in previous posts and ditched the little rocker switches for more robust toggle switches. Thanks for the input there.
I am starting to work on the wiring. I will be putting a shelf behind the instrument panel to support the fuse blocks, grounding blocks, light control module, etc. I looked at options like on the floor for the control module, firewall for the fuse blocks, etc. but I like the shelf, and it be will be nice to install and for maintenance.
But, thinking about the wiring, how does one make the actual physical connections for the communications pins? I don't have much to connect, but the engine monitor can connect to the GPS RS232 lines to calculate fuel necessary, and the AV30's connect to the GPS for course information. The pins don't look large enough to put two wires into them. I think my system is too simple for the junction boxes I see in larger systems. So is it a matter of stripping the wire back from the pin and joining it there? I think Stein calls it "window stripping"? That is about the best video that I have found but hoping someone can confirm this is what I need to do for the communications lines. Or do I use a terminal block outside of any connector? I would be concerned about losing shielding but maybe those lines are not sensitive to interference? Any suggestions?
Attachments
I would at least place the fuse blocks in a position where you can get at them to change a fuse Without removing the top skin. Maybe up side down on the bottom of the shelf so you can at least reach under the panel to get at them.To wrap up some of the previous posts....
Static ports are done
Rudder pedals are reinstalled (waiting on a few pieces of hardware )
Master brake cylinder is plumbed on inlet side. I replaced the plastic plumbing fittings with some hydraulic fittings. When the shop made my lines up, they put those fittings on so I had to change over. I like them much better though. You can see them in one of the photos. Local shop so nice.
I assembled the FlyLED's control module for the Strobe/Nav lights. I will give them a kudos. Nice PC board to work with. Well documented kit. Good support.
I decided to take the advice and sentiment expressed in previous posts and ditched the little rocker switches for more robust toggle switches. Thanks for the input there.
I am starting to work on the wiring. I will be putting a shelf behind the instrument panel to support the fuse blocks, grounding blocks, light control module, etc. I looked at options like on the floor for the control module, firewall for the fuse blocks, etc. but I like the shelf, and it be will be nice to install and for maintenance.
But, thinking about the wiring, how does one make the actual physical connections for the communications pins? I don't have much to connect, but the engine monitor can connect to the GPS RS232 lines to calculate fuel necessary, and the AV30's connect to the GPS for course information. The pins don't look large enough to put two wires into them. I think my system is too simple for the junction boxes I see in larger systems. So is it a matter of stripping the wire back from the pin and joining it there? I think Stein calls it "window stripping"? That is about the best video that I have found but hoping someone can confirm this is what I need to do for the communications lines. Or do I use a terminal block outside of any connector? I would be concerned about losing shielding but maybe those lines are not sensitive to interference? Any suggestions?
I have been toying with this, as well as putting the shelf on a hinge of some sort. But my reasoning for it being as shown is that, at 60 years of age, I would rather undo the screws and lift the cover off than contort myself under the panel and work upside down. Not sure if I will regret this or not. Depends on how many times I have to take the skin off or not.
Roadjunkie1
Well Known Member
Well, I, for one would not put it under the top forward skin. There are a TON of screws that would have to be removed every time you had a fuse issue. PITA. Looks like there is plenty of room under your starboard switch panel. That said, in all the flying I have done, I have never had to rest a breaker. I would still think about putting it in a more accessible place. If you do blow a fuse, you know it's going to be somewhere that isn't near your home base. There you are, out on the ramp in the rain.........I have been toying with this, as well as putting the shelf on a hinge of some sort. But my reasoning for it being as shown is that, at 60 years of age, I would rather undo the screws and lift the cover off than contort myself under the panel and work upside down. Not sure if I will regret this or not. Depends on how many times I have to take the skin off or not.
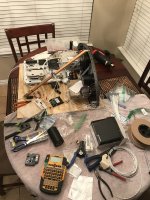
Just a thought.Your airplane is looking MUCH better than the pictures you posted after you acquired her.....Keep up the good work!
Well, I, for one would not put it under the top forward skin. There are a TON of screws that would have to be removed every time you had a fuse issue. PITA. Looks like there is plenty of room under your starboard switch panel. That said, in all the flying I have done, I have never had to rest a breaker. I would still think about putting it in a more accessible place. If you do blow a fuse, you know it's going to be somewhere that isn't near your home base. There you are, out on the ramp in the rain.........
Your airplane is looking MUCH better than the pictures you posted after you acquired her.....Keep up the good work!
I have been toying with this, as well as putting the shelf on a hinge of some sort. But my reasoning for it being as shown is that, at 60 years of age, I would rather undo the screws and lift the cover off than contort myself under the panel and work upside down. Not sure if I will regret this or not. Depends on how many times I have to take the skin off or not.
I placed mine on the front of the electronics tray angled down. It’s easy to reach under the panel and change them by feel. I keep a diagram of which fuse is in each slot so I can remember which is which.Well, I, for one would not put it under the top forward skin. There are a TON of screws that would have to be removed every time you had a fuse issue. PITA. Looks like there is plenty of room under your starboard switch panel. That said, in all the flying I have done, I have never had to rest a breaker. I would still think about putting it in a more accessible place. If you do blow a fuse, you know it's going to be somewhere that isn't near your home base. There you are, out on the ramp in the rain.........
Your airplane is looking MUCH better than the pictures you posted after you acquired her.....Keep up the good work!

Flyhud
Well Known Member
Great progress! I would keep the eqipment shelf as small as possible, the larger it is the more you will inhibit access to the center tunnel and the rudder pedals, brake cylinders etc. I also placed a row of breakers (non essential equipment) on the shelf facing down so they can be accessed simply by reaching underneath the panel. I’ve attached a few photos of my installation that may help with ideas. To make wiring easier, I built a jig which replicated the position of the panel and the equipment shelf in the airplane so I could do a majority of the wiring on the workbench.
Attachments
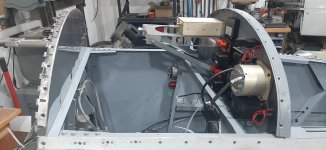
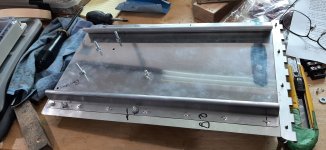
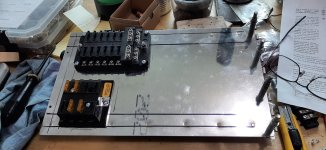
I decided to consolidate suggestions with my initial thoughts. I made the shelf that swings down with just 2 screws, should I need/want to get at the panel via the pilot seat. Or access it from the top which will make initial wiring much easier. Removing the hinge pin also allows me to slide it left or right for maintenance issues, but the pedals and brake components are pretty accessible without moving it anyways.
Thanks for the input!
Thanks for the input!
Attachments
jull_under
Active Member
I decided to consolidate suggestions with my initial thoughts. I made the shelf that swings down with just 2 screws, should I need/want to get at the panel via the pilot seat. Or access it from the top which will make initial wiring much easier. Removing the hinge pin also allows me to slide it left or right for maintenance issues, but the pedals and brake components are pretty accessible without moving it anyways.
Thanks for the input!
Shawn-
This is a great idea.
Any concerns about vibration. I'm wondering if the additional vibration (if any) using a piano hinge will affect the any electronics where they require you to install on a "solid" structure.
Dan 57
Well Known Member
Thought the same... 2 stiffening angles, or other idea, will help. Still, I like that hinge idea, wish my whole panel was hinged...concerns about vibration
I have been moving along with the wiring. Which prompts a question....
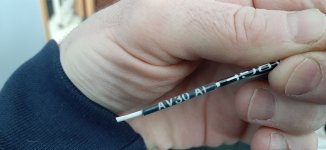
The wiring to the strobes in the wings is a shielded wire. To make the connections at the wing roots and maintain the shielding, what connectors are you all using? The DB series? I have some DB15's coming from Steinair that I ordered on speculation so that does work out well. Or does a slight break in the shielding for the purpose of a connection not cause an issue? It will be continued through the connector (Molex maybe?) to the wing wiring. Wings won't be going on for a while, so I have time, but I would rather have connectors in place before I head to the airport. Suggestions? FlyLED's lights.
Thanks
PaulvS
Well Known Member
I didn't use pluggable connectors in the wing roots for the flyleds and instead ran the wiring from the wings into the fuselage to be spliced under the seat floor. Once the wings are on there is no intention to ever remove them and if becomes necessary to do so then the lighting wires would just be cut.I have been moving along with the wiring. Which prompts a question....
The wiring to the strobes in the wings is a shielded wire. To make the connections at the wing roots and maintain the shielding, what connectors are you all using? The DB series? I have some DB15's coming from Steinair that I ordered on speculation so that does work out well. Or does a slight break in the shielding for the purpose of a connection not cause an issue? It will be continued through the connector (Molex maybe?) to the wing wiring. Wings won't be going on for a while, so I have time, but I would rather have connectors in place before I head to the airport. Suggestions? FlyLED's lights.
Thanks
I don't believe that a DB type connector is ideal for a reliable connection in the wing root, which is somewhat exposed to the environment. A sealed Deutsche type connector would be a better option, if you really want to have a connector there.
Thanks Paul. I would rather not be doing those connections to the controller board at the airport, but you make good points. I don't ever plan on pulling the wings again, and if I do, the wing lighting wires will be a small concern.
Panel wiring (or rather, general wiring) is moving along. But moving, so that is a good thing....
Panel wiring (or rather, general wiring) is moving along. But moving, so that is a good thing....
Attachments
steve murray
Well Known Member
Hey Shawn
I am in the process (long process) of building a 30+ year old RV4 kit. I am currently working on the fuselage structure.
Would you be willing to take a bunch of your fuselage structure from all different angles, inside and out?
There are very few RV4 build logs with pictures still available and I found these pictures are hugely helpful in understanding the "less than detailed" plans. I would like pictures of everything but definitely would especially like to see where panels have been added for storage, avionics shelves , pass throughs around or through spar (404) bulkhead, routing for fuel lines, etc... If you could temporarily upload a bunch of photos to a google album and I could download them I would appreciate it immensely.
Thanks for your consideration.
Last edited:
Roadjunkie1
Well Known Member
If it hasn't been said already, label ALL your wires, both at the beginning and the end. It will make things MUCH easier when trying to chase down an electrical problem!Thanks Paul. I would rather not be doing those connections to the controller board at the airport, but you make good points. I don't ever plan on pulling the wings again, and if I do, the wing lighting wires will be a small concern.
Panel wiring (or rather, general wiring) is moving along. But moving, so that is a good thing....
PaulvS
Well Known Member
Hi ShawnThanks Paul. I would rather not be doing those connections to the controller board at the airport, but you make good points. I don't ever plan on pulling the wings again, and if I do, the wing lighting wires will be a small concern.
Panel wiring (or rather, general wiring) is moving along. But moving, so that is a good thing....
The location of your flyleds controller presents another option, which is to use a crimp Dsub connector at the controller instead of the solder connector that comes in the kit. The wires in the wings would be made long enough and with a service loop so as to reach the controller. The wires can be terminated with the crimped-on pins before going to the airport. At the airport the remaining step would be to push the pins into the Dsub connector.
If it hasn't been said already, label ALL your wires, both at the beginning and the end
Thanks Mike. Yes, I have been trying to label them all. I had a label maker so I am using it and putting clear heat shrink over it. It does not do the heat shrink labels. If I had a lot more to do, I think I would go with the Rhino series of printers and heat shrink tubing. That makes labeling look pretty easy!
Attachments
Hi Shawn
The location of your flyleds controller presents another option, which is to use a crimp Dsub connector at the controller instead of the solder connector that comes in the kit. The wires in the wings would be made long enough and with a service loop so as to reach the controller. The wires can be terminated with the crimped-on pins before going to the airport. At the airport the remaining step would be to push the pins into the Dsub connector.
I think that is the answer! Thanks for pointing that option out. I had not considered that one but will make the task at the airport much better than soldering.
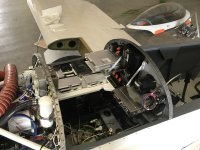
I have been working away on the wiring. As suggested earlier, I built a fixture to hold the panel on the workbench, and did most of the instrument wiring on that. This worked out well. But then the panel went into the plane for the next phase. The swing down panel did complicate things a bit, but I think it will be worth it long term. I will probably switch the screws holding it up for some quarter turn fasteners of some sort. Almost done though. Next will be putting the engine mount back on and getting it back on its gear. I had to change the battery mounting. The battery that came with the plane (Odyssey 925) did not fit the original brackets. I was convinced to change batteries to save more than 10 lbs and now have an Odyssey 680, much more reasonable. It is the same as the one in the 9A too so I have consistency. This meant changing the hold down method and my buddy came up with a nice bracket for that. Will post a photo of that later. Another feat this past month was the updating of the AV30's firmware. In doing that, I found one internal battery showed as a "Failure", from being discharged while waiting for installation for the last year. But after cycling a few times (connecting and removing power), the battery started taking a charge and passed the subsequent endurance tests. uAvionics support was good through this process.
I should be able to remove the panel from the plane by disconnecting just connectors when I am done...should I want to make changes in the future......if I did things right.....
I should be able to remove the panel from the plane by disconnecting just connectors when I am done...should I want to make changes in the future......if I did things right.....
Attachments
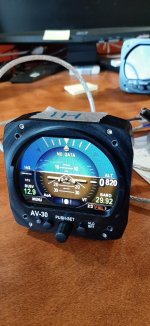
I arrived at the point where I started applying power to circuits. Woo Woo! I also did some configurations on the AV30's but have a lot to do. Being very customizable leads to time spent with the manual and after flying to set up all the fields and where you want them. The biggest things were getting the lower one to power up as a heading indicator and talking to the GPS. Relatively easy to do with the manual in hand. Kind of cool to punch a new waypoint into the little portable Garmin, and have the HI spin around to the new heading with course indicator. (Little things in life make me happy... )
Moving on. We had a very mild winter, as most did, but after 3 days of snow, we are back into serious shop time! Just when one thought we might be flying early this year, Mrs Nature said don't think so!
) Moving on. We had a very mild winter, as most did, but after 3 days of snow, we are back into serious shop time! Just when one thought we might be flying early this year, Mrs Nature said don't think so!
Attachments
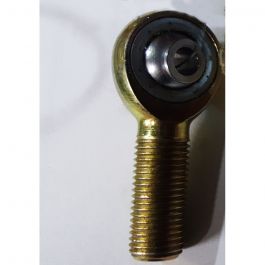
I noticed today that the rod bearings that form the hinge for the rudder do not appear to go as far into the nutplate as I would like. Does anyone know the thread length on this part?
 store.vansaircraft.com
The specs give the diameter but not the thread length. The drawing (30-4) shows several threads showing past the nut plate, as would be expected. Perhaps if the rod end gets bottomed out, I might have enough threads. As I type, maybe that will be the resolve. I see on a thread regarding a 14? I think ...that someone mentions a longer version of that rod end. My plans do not comment on this. Anyone recall issues in this area?
BEARING MD3614M
The specs give the diameter but not the thread length. The drawing (30-4) shows several threads showing past the nut plate, as would be expected. Perhaps if the rod end gets bottomed out, I might have enough threads. As I type, maybe that will be the resolve. I see on a thread regarding a 14? I think ...that someone mentions a longer version of that rod end. My plans do not comment on this. Anyone recall issues in this area?
fixnflyguy
Well Known Member
Any amount of threads beyond the nutplate are just along for the ride. 1 thread past gives you assurance of 100% engagement. Is your hinge line correct, or is the rudder/ vertical fin too far apart? I'd take a look at it all. As long as it's able to have a functional jam nut and 1 thread you should be fine.I noticed today that the rod bearings that form the hinge for the rudder do not appear to go as far into the nutplate as I would like. Does anyone know the thread length on this part?
BEARING MD3614M
The specs give the diameter but not the thread length. The drawing (30-4) shows several threads showing past the nut plate, as would be expected. Perhaps if the rod end gets bottomed out, I might have enough threads. As I type, maybe that will be the resolve. I see on a thread regarding a 14? I think ...that someone mentions a longer version of that rod end. My plans do not comment on this. Anyone recall issues in this area?
Thanks Bill. From the pic and the specs on vans site, it looks like that thread is only about 7/8" long so it probably just needs to be seated a little further moving the rudder in. Interestingly, I looked in the manual about installing the rudder, and I could not find much. A very short paragraph to attach it but no mention of distance to Vertical Stabilizer. As I have read, this era of the plans left a lot up to the builder. I have threads showing behind the jam nut. Not sure how that will affect anything else though, ie, clearances/interference. Will see. I noted it as I was trying to fish the tail light wire through to the tail cone. I guess the rudder will need to come off anyways to do that and to fit the new bottom for the light. That might become next winters project now. If I can get this plane in the air this year, I certainly will have no need for lighting.
Last edited:
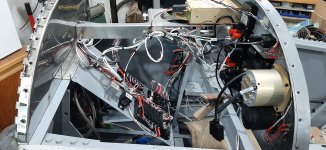
I don't have any decent photos in my phone but we are still making progress on this project. Fuselage wiring is done, engine mount is on, landing gear back on, brakes relined and reinstalled, new brake lines installed. The rudder will need to come off to address the fasteners discussed above. Deferred for now. Engine should be going on this week. Then all of the engine wiring, baffles, new oil cooler install (never had one so finding a place for it, etc)........the more I get done and closer I get, the farther completion seems to be....