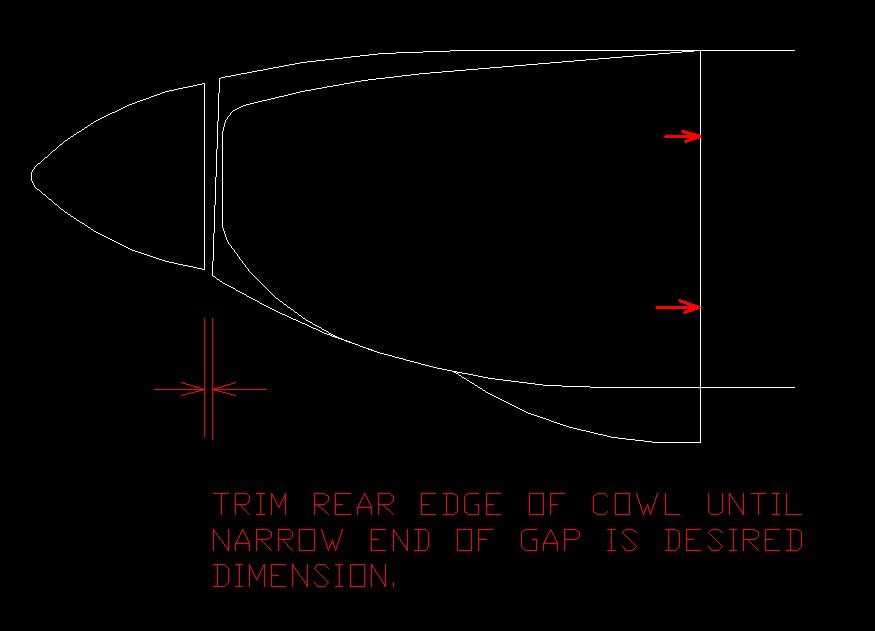
-POSTING RULES

-Advertise in here!
-
Today's Posts
|
Insert Pics
Keep VAF
Going
Donate methods

Point your
camera app here
to donate fast.
VAF on Twitter:
@VansAirForceNet
|

08-08-2022, 11:50 AM
|
 |
|
|
Join Date: May 2020
Location: Fort Collins, CO
Posts: 813
|
|
Hate to be High Maintenance, but....
I've almost got the top cowl fitted thanks to all the help here.
Now, I have another issue.
The top cowl fits pretty well all the way round the firewall except on the port side near the top where it makes the curve down the side of the firewall. I can push the cowl down against the Skybolts so the elevations of both cowl and firewall match, but it takes quite a bit of effort, ie, the cowl does not fit nicely by gravity. If I construct it this way there will be upward tension on the Skybolts in this location. I am concerned the stresses will cause trouble down the line especially considering the pressures inside the cowl as DanH has pointed out.
Two solutions I can think of:
1. Change the shape of the firewall to match the cowl 
2. Add material to the underside of the cowl in a thickness sufficient to match the elevation difference then grind the top down to match the firewall elevation.
I hope there is a third option because neither of these, especially #1, seem questionable.
The starboard side fits pretty well with little effort required
The port side, not so much

__________________
14A-EXP119 Thunderbolt
Begun 07-23-20
Emp Completed 11-12-20
Slo Fuse Completed 3-2-21
QB Wings 99% Complete 7-30-22
Wiring and Avionics 85%
Cowl Completed sans paint 10-30-22!
2023 Dues Paid
Reserved: N52XL
|

08-08-2022, 12:16 PM
|
 |
|
|
Join Date: Oct 2005
Location: 08A
Posts: 11,244
|
|
Quote:
Originally Posted by rockitdoc
The top cowl fits pretty well all the way round the firewall except on the port side near the top where it makes the curve down the side of the firewall. I can push the cowl down against the Skybolts so the elevations of both cowl and firewall match, but it takes quite a bit of effort, ie, the cowl does not fit nicely by gravity.
|
Glass/epoxy will creep given warm temperatures and time. Before making any big moves, just put a cinch strap around the cowl and pull it tight. Check for good fit at the seams with the gap pulled down, adjust as required. Cinch it tight again, and put a heat source in the cowl, something to push air temperature up around 200F. Hold it there overnight, then let it cool before removing the strap.
__________________
Dan Horton
RV-8 SS
Barrett IO-390
|

08-08-2022, 12:21 PM
|
 |
|
|
Join Date: Oct 2005
Location: Estes Park, CO
Posts: 5,888
|
|
Reshape
Quote:
Originally Posted by DanH
Glass/epoxy will creep given warm temperatures and time. Before making any big moves, just put a cinch strap around the cowl and pull it tight. Check for good fit at the seams with the gap pulled down, adjust as required. Cinch it tight again, and put a heat source in the cowl, something to push air temperature up around 200F. Hold it there overnight, then let it cool before removing the strap.
|
I've had good results heating and reshaping like this. Just don't go too hot.
__________________
Larry Larson
Estes Park, CO
E-mail: wirejock at yahoo dot com
Builder Blog: http://wirejockrv7a.blogspot.com
Donated 12/2022, plus a little extra.
RV-7A #73391, N511RV reserved
Disclaimer
I cannot be, nor will I be, held responsible if you try to do the same things I do and it does not work and/or causes you loss, injury, or even death in the process.
|

08-08-2022, 02:59 PM
|
 |
|
|
Join Date: May 2020
Location: Fort Collins, CO
Posts: 813
|
|
Thanks Guys! Progressing Rapidly
Quote:
Originally Posted by wirejock
I've had good results heating and reshaping like this. Just don't go too hot.
|
I put a 25w bulb in one of my lead lights and hung it inside cowl port side where cowl fit was marginal. I will let you know what the temp gets to.
Fitment is pretty good thanks to you guys. Once the heat treating is complete I will trim the bottom cowl to fit and start the process of getting the spinner clearance spot on.
Is bodywork recommended between top and bottom on the longitudinal seam so there is no 'step'? Or, do the two halves fit better when Skylocks/hinges are in place? I know there is a recess in the bottom cowl that should accommodate the top.

__________________
14A-EXP119 Thunderbolt
Begun 07-23-20
Emp Completed 11-12-20
Slo Fuse Completed 3-2-21
QB Wings 99% Complete 7-30-22
Wiring and Avionics 85%
Cowl Completed sans paint 10-30-22!
2023 Dues Paid
Reserved: N52XL
Last edited by rockitdoc : 08-08-2022 at 03:02 PM.
|

08-08-2022, 03:55 PM
|
 |
|
|
Join Date: May 2020
Location: Fort Collins, CO
Posts: 813
|
|
Quote:
Originally Posted by rockitdoc
Is bodywork recommended between top and bottom on the longitudinal seam so there is no 'step'? Or, do the two halves fit better when Skylocks/hinges are in place? I know there is a recess in the bottom cowl that should accommodate the top.
|
Duh. The bottom is trimmed to butt up against the top. The 'step' only occurs because the top overlaps the bottom until trimmed. I'm catching on slowwwwly
__________________
14A-EXP119 Thunderbolt
Begun 07-23-20
Emp Completed 11-12-20
Slo Fuse Completed 3-2-21
QB Wings 99% Complete 7-30-22
Wiring and Avionics 85%
Cowl Completed sans paint 10-30-22!
2023 Dues Paid
Reserved: N52XL
|

08-08-2022, 07:50 PM
|
|
|
Join Date: Apr 2010
Location: Clinton, Indiana
Posts: 1,292
|
|
Cowl to spinner gap
Don’t forget the Dave Anders approach to capturing lower cowl airflow with a felt seal on the crank extension. This gives some flexibility to the spinner/cowl gap options. Your sense of aesthetics becomes the defining dimension and it could make it a lot easier to get the lower cowl half off .
__________________
Larry DeCamp
RV3B sold
RV-4 fastback in process w/ Superior roller 360/AFP/G3X/CPI/Catto3b
Clinton, IN
|

08-09-2022, 07:54 AM
|
 |
|
|
Join Date: May 2020
Location: Fort Collins, CO
Posts: 813
|
|
Quote:
Originally Posted by Larry DeCamp
Don’t forget the Dave Anders approach to capturing lower cowl airflow with a felt seal on the crank extension. This gives some flexibility to the spinner/cowl gap options. Your sense of aesthetics becomes the defining dimension and it could make it a lot easier to get the lower cowl half off .
|
Hmm. Not familiar with this approach. Where can I find the writeup?
__________________
14A-EXP119 Thunderbolt
Begun 07-23-20
Emp Completed 11-12-20
Slo Fuse Completed 3-2-21
QB Wings 99% Complete 7-30-22
Wiring and Avionics 85%
Cowl Completed sans paint 10-30-22!
2023 Dues Paid
Reserved: N52XL
|

08-09-2022, 07:59 AM
|
 |
|
|
Join Date: May 2020
Location: Fort Collins, CO
Posts: 813
|
|
Lightbulb Cowl Heating
The cowl on the port side upper did not fit quite right. At DanH and Wirejock's suggestions I put a 25w bulb in a trouble light and hung it under the cowl on the port side to heat up the cowl. Temperature of the upper cowl got to 80F, just 3F over ambient. I replaced the 25w with a 100w and left it over night with a blanket on top the cowl to hold temp in. This morning I measured 105F on the top cowl at 74F. Not sure if I should try to go to higher temps.
__________________
14A-EXP119 Thunderbolt
Begun 07-23-20
Emp Completed 11-12-20
Slo Fuse Completed 3-2-21
QB Wings 99% Complete 7-30-22
Wiring and Avionics 85%
Cowl Completed sans paint 10-30-22!
2023 Dues Paid
Reserved: N52XL
|

08-09-2022, 08:45 AM
|
 |
|
|
Join Date: Oct 2005
Location: Estes Park, CO
Posts: 5,888
|
|
Quote:
Originally Posted by rockitdoc
The cowl on the port side upper did not fit quite right. At DanH and Wirejock's suggestions I put a 25w bulb in a trouble light and hung it under the cowl on the port side to heat up the cowl. Temperature of the upper cowl got to 80F, just 3F over ambient. I replaced the 25w with a 100w and left it over night with a blanket on top the cowl to hold temp in. This morning I measured 105F on the top cowl at 74F. Not sure if I should try to go to higher temps.
|
Use a heat gun and temp gun. Heat it to 200 and let cool.
__________________
Larry Larson
Estes Park, CO
E-mail: wirejock at yahoo dot com
Builder Blog: http://wirejockrv7a.blogspot.com
Donated 12/2022, plus a little extra.
RV-7A #73391, N511RV reserved
Disclaimer
I cannot be, nor will I be, held responsible if you try to do the same things I do and it does not work and/or causes you loss, injury, or even death in the process.
|

08-09-2022, 09:48 AM
|
 |
|
|
Join Date: Oct 2005
Location: 08A
Posts: 11,244
|
|
Quote:
Originally Posted by rockitdoc
This morning I measured 105F on the top cowl at 74F. Not sure if I should try to go to higher temps.
|
Yes, higher temperature, held for some period of time. No guarantee, but it should work.
The experience basis is the behavior of cowlings subjected to normal engine compartment heating. I have removed hot cowls and set them on floors and benches, then during reinstallation days later, found they had changed shape slightly...they had cooled while slightly deformed, although not enough to prevent installation. Come back and R&R them later, after a few flights (i.e. heat and cool cycles in place), and they fit just as they did originally.
200F is roughly the air temp in the cowl after shutdown on a hot day. You won't hurt it with the same in the shop.
Heat gun is fine if the plan is to aim it into an inlet as a space heater. Aiming it at a surface tends to result in uneven heating, with little dwell time.
__________________
Dan Horton
RV-8 SS
Barrett IO-390
|
Thread Tools |
Search this Thread |
|
|
Display Modes |
Linear Mode
|
Posting Rules
|
You may not post new threads
You may not post replies
You may not post attachments
You may not edit your posts
HTML code is Off
|
|
|
All times are GMT -6. The time now is 12:15 PM.
|