What's new
Van's Air Force

Don't miss anything! Register now for full access to the definitive RV support community.

Fixing Tank Leaks: N617AR

DeltaRomeo

doug reeves: unfluencer
Staff member
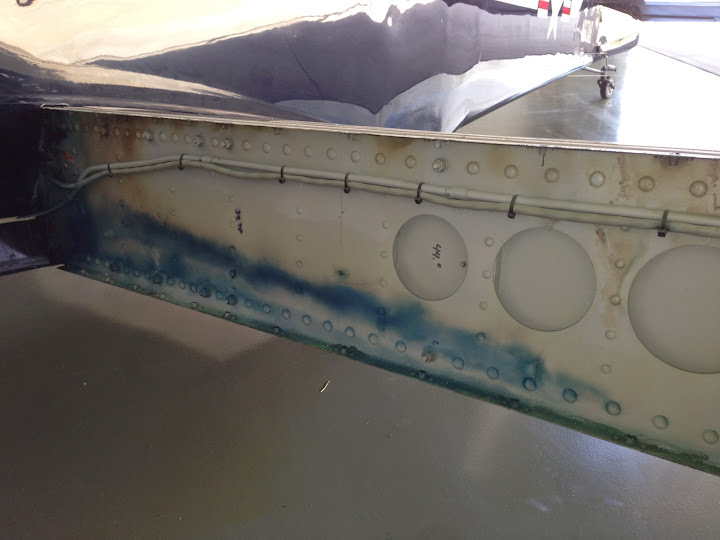
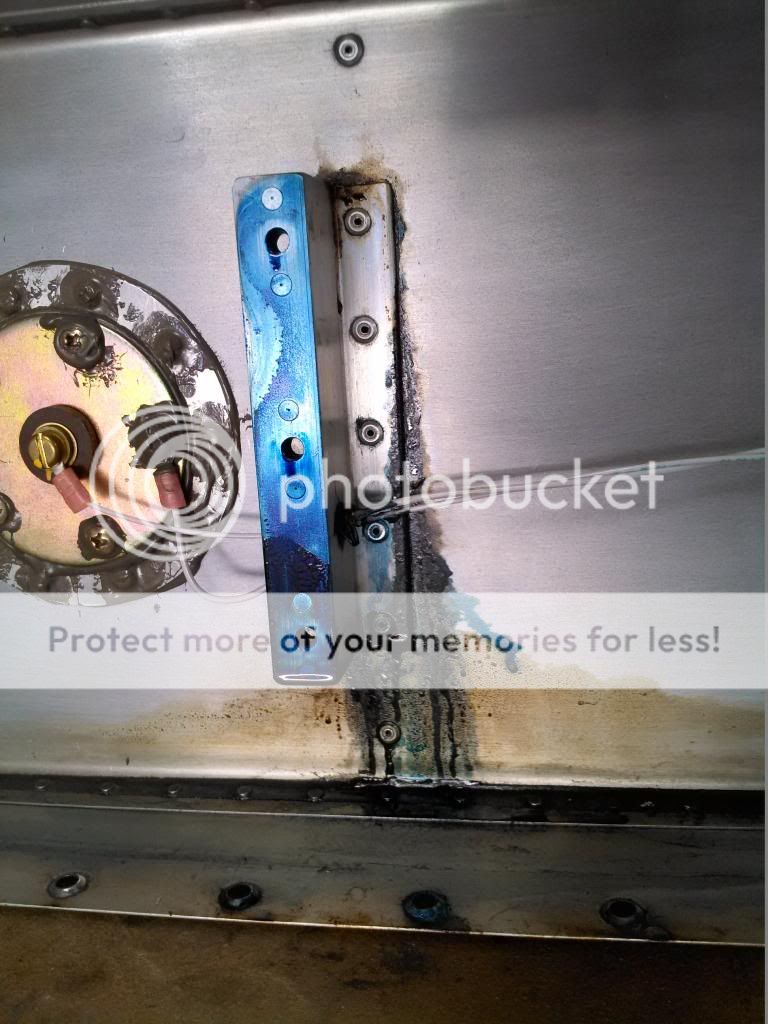
I built the tanks of my slow build RV-6 in 1999. The plane has been flying since September of 2002, and that’s about how long the top of the left fuel tank has been leaking. Just a little blue around one screw when I top the tank off to the very, very top and leave it overnight. Nothing to lose sleep over. Then about two months ago the right tank started leaking on the bottom when it had more than four gallons or so in it. ‘Head pressure leak’ one of my petrochemical engineer friends called it….

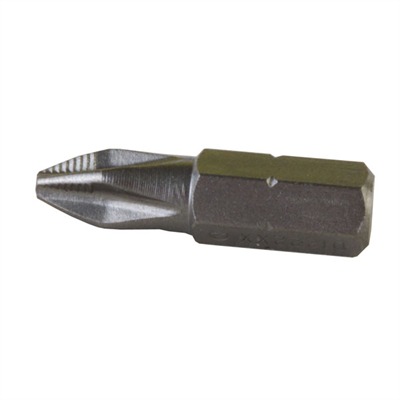
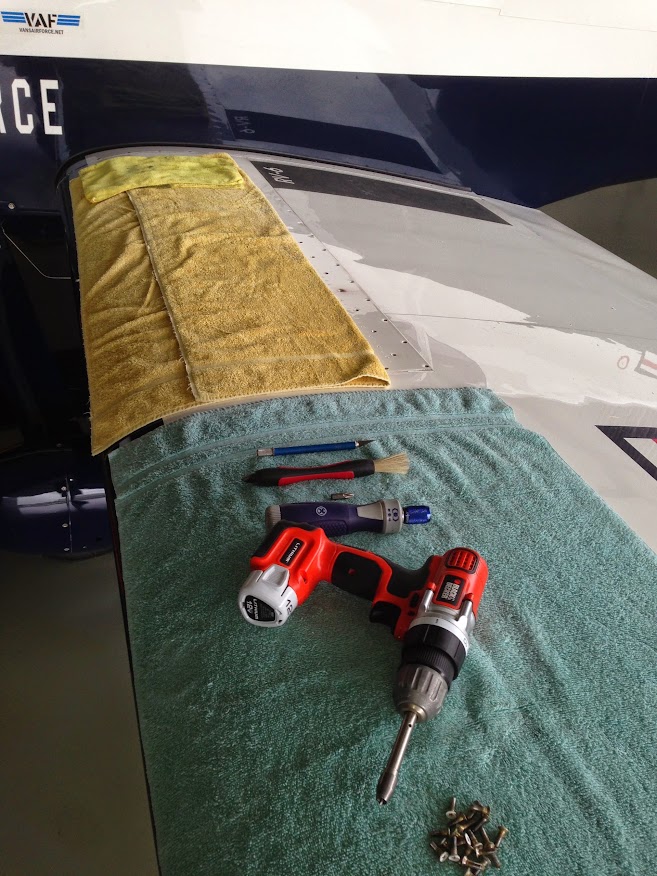
About eight years ago I bought the #8 ‘paint cutting’ bit (link) from Avery that helps you get painted-over screws out a little cleaner – the screws that hold on my tank were painted in place. Thick, way too thick, car paint. Yesterday I used the bit it for the first time.

You can’t say I rush into things <g>.

Anywho, I took some pictures with the iPhone, then uploaded them later to a folder online.

I’ll add updated pics periodically if you’re completely bored at work. Ordering ‘Tank Repair Kits’ from the mothership shortly.

v/r,
dr

Link to pics: https://picasaweb.google.com/103898861220286871615/TankRepair

IMG_4179.JPG
 
Last edited:
Hi Doug

With the thick paint did you have any issues separating the tank skin from the rear wing skins or was the gap there enough to stop the paint trying to bridge the gap?

Cheers
 
Hi Eddie,

So far the gap was enough to self-separate. I have an x-acto blade and ruler for a spot on the other tank where it spreads the gap.

I've been toying w/the idea of painting a red line around the edges of the tanks when all this is done to clean up the edges a bit and help hide some of the discoloration of the white paint from the blue dye.

v/r,
dr

Hi Doug

With the thick paint did you have any issues separating the tank skin from the rear wing skins or was the gap there enough to stop the paint trying to bridge the gap?

Cheers
 
Doug, just be careful when using the exacto knife up against the spar taking care not to score the metal. You may be already aware of this.
 
Doug, just be careful when using the exacto knife up against the spar taking care not to score the metal. You may be already aware of this.

Be careful not to score your fingers either...X-acto blades LOVE fingers!
(ask me how I know... :D)
 
Update #1

So you know that leak I had a decade and a half ago on the top side of my left tank?

Should have fixed it back then…. Turns out a light coating of fuel, fuel vapor will do, that touches external proseal (say, from a leak) mixed with oxygen in the atmosphere can turn it soft over time, leading obviously to more leaks. On the back of my left tank, on the low side near the fuse, the proseal can be pushed around with a finger all chewing gum like. On the other end where there were no leaks it’s how you would expect it. That might explain why I started with (1) leak on the top, which turned into three more on the bottom.

It's looking like it is going to be more work than initially planned, but that’s OK. I ordered (8) of the fuel tank repair kits today, one for each bay. Scrape out everything that I can, and put in new, fresh pro seal.

I'm going to go ahead and start pulling screws on the right tank Wednesday. Where’d I put that fly-cutter?

It looks like the RV is going to get some serious, and much-needed, love. It’ll end up better than it was.

Additional photos pick up at:
https://picasaweb.google.com/103898861220286871615/TankRepair?noredirect=1#6023367580861334546


…or you can go back to the beginning: https://picasaweb.google.com/103898861220286871615/TankRepair?noredirect=1#

IMG_4189.JPG
 
Last edited:
I too am beginning this very distasteful repair of my starboard tank. Doug you indicated that the screw heads were filled with paint, so are mine. I am having a difficult time getting enough of the paint removed from the Phillips head to allow the screwdriver a good "bite". Even after using the special paint cutter tool around the perimeter and carefully scraping paint from the screw with an exacto knife I have stripped the screw head. Is there a magical method you have used to remove the thick paint?
 
I too am beginning this very distasteful repair of my starboard tank. Doug you indicated that the screw heads were filled with paint, so are mine. I am having a difficult time getting enough of the paint removed from the Phillips head to allow the screwdriver a good "bite". Even after using the special paint cutter tool around the perimeter and carefully scraping paint from the screw with an exacto knife I have stripped the screw head. Is there a magical method you have used to remove the thick paint?

Good evening, Hawk (and welcome to VAF)!

I?ve been using a very small screwdriver to get the paint out of the ?+? part of the head ? my Leatherman has one of the ultra tiny screwdriver bits. That and the paint cutter seems to be working OK.

I?m using a new box of phillips head bits and change the bit about every ten screws. You know, those plastic things full of bits that looks like a box of Tic Tac breath fresheners? The bits have little ?grabbers? out on the tip. Like this:

p_080441000_1.jpg


On a couple of the screws that were proving difficult, I used a hammer to lightly tap the bit. Then used the cordless drill with the clutch set on tight to TIGHTEN (all the while the clutch slipping), then loosen. Believe it or not?.that worked.

I hope some of this is helpful, and again?.welcome!
v/r,
dr
 
Last edited:
right there with you...

I've had my right tank off and in my garage for the last couple of months and have been going through the "reseal" process.

I'm going to re-cover the back bay holes with the tank cover plates from Vans... with new holes drilled between the existing ones to fit the closed end rivets. Hopefully I'll be finishing this up in the next couple of weeks.

I still have a pint of pro-seal dissolver gel that will REALLY help you when it is time to remove all that goopy old proseal. It is yours.

I also have a fly cutter you can borrow if you want.

-Clay
 
Doug,

I was wondering if you considered removing the rear baffle since you need access to every bay. I had to cut two holes in my right tank which worked fine but full access would be nice.

[ed. The thought has crossed my mind! I'm only two days in, so I'm still forming a plan. dr]

I just replaced two leaky rivet a on the bottom of the right tank with blind rivets which seems to work fine. Don't remember which tank I built first but all the problems were on the right side.

John
 
Last edited by a moderator:
I thought I was the only one that managed to break a screwdriver bit! And of course after 7 plus years of using them during the build, it only demonstrates that it can break AFTER the plane is painted:mad:
 
... removing #2 Phillips screws

A few years ago the wife gifted me a diminutive little 12v cordless impact driver, which I greeted with a veiled measure of disdain. I have seen power drivers ruin phillips screws for years. Well, one afternoon when the carpal tunnel was acting up I pulled the little impact driver out of the box, and in short order was really impressed at how efficiently it removes stubborn Phillips drive screws without ruining the screw. The impact driver works much better than just putting a #2 Phillips bit in a drill or a driver, can't explain the physics of it. New favorite power tool!
 
When I removed my tanks to get the slosh out, several phillips head screws stripped so that the screw driver wouldn't grip them. I used a removal tool that has a drill on one end to drill a shallow hole into the screw, then you use the other end in a very slow turning ccw drill to back the screw out. It worked perfectly! Now at annual, I give each screw a little turn to keep them from seizing. Also that paint cutter tool worked better for me screwed into a countersink thing to control the depth and avoid cutting into the skin. Still didn't work all that well, I think it is best to not paint over the screws.
 
Last edited:
This is not a timely thread for a guy just starting to seal his first tank...:eek:


-John
Houston
RV-7A (Wings, Tanks)
 
This is not a timely thread for a guy just starting to seal his first tank...:eek:
-John
Houston
RV-7A (Wings, Tanks)

Just do it correctly and carefully the first time and you won't have worries.
My -6 has been flying for over 21 years with no leaks, as have many, many others.
 
Talk to your dental hygenist...

Twice a year I have me teeth cleaned. I always ask my hygienist if she has any of her torture tools that she wants to get rid of. I always get a few tooth scrapers. They are great for cleaning plugs. And I found, since I had to remove both tanks for the RV-4 I purchased, that they are also great for removing the paint in the screws.

Also, use a very small amount of valve grinding compound on the screwdriver bit. You will be amazed at how much that helps the bit grip the screw....
 
library


I'll be watching this thread with interest since I found this during this years CI. Looking for suggestions on the best way to go about a fix.

KIMG0004_zpsfbd8c564.jpg
 
Last edited:
Back
Top