What's new
Van's Air Force

Don't miss anything! Register now for full access to the definitive RV support community.

Repair advice: Trailing edge wedge countersunk hole too deep

gotyoke

Well Known Member
I over-countersunk the tapered hole on the RV-14 right elevator trailing edge wedge. Hole size seems fine but the dimpled test coupon slides around. I can't imagine this is a critical structural area, so tell me the quickest/simplest/cheapest way to repair this so I can move on. Possible solutions I've learned about:


1. Get a new wedge ($100 with shipping and a 1-month wait, no thanks)
2. Go up to a AD4 (there would be edge distance issues)
3. Fill with epoxy and re-countersink (I don't have any epoxy and don't know what kind to get)
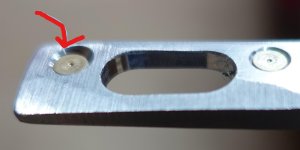
D2B93CC9-6F3B-459B-B3A1-B24E9C59CAD8.jpg

Thanks!

UPDATE: See post #6 for Van's reply.
 
Last edited:
I over-countersunk the tapered hole on the RV-14 right elevator trailing edge wedge. Hole size seems fine but the dimpled test coupon slides around. I can't imagine this is a critical structural area, so tell me the quickest/simplest/cheapest way to repair this so I can move on. Possible solutions I've learned about:


1. Get a new wedge ($100 with shipping and a 1-month wait, no thanks)
2. Go up to a AD4 (there would be edge distance issues)
3. Fill with epoxy and re-countersink (I don't have any epoxy and don't know what kind to get)

Thanks!

Is it all the holes or just one? Also take a picture for us to see and send it in an email to tech support and see what they say.
 
I use proseal for the trailing edges. As option you can apply the proseal and just cleko. Let it set a day or so and the excess hole should have enough cured pro-seal to go ahead and set the rivet.

Carl
 
Is it all the holes or just one? Also take a picture for us to see and send it in an email to tech support and see what they say.

Picture added to original post. Just the one hole, both sides though. Email to support pending.
 
Last edited:
Picture added to original post. Just the one hole, both sides though.

Just the one hole, I’d say proseal as normal rivet and build on buuuut I’m no structural engineer. It wouldn’t hurt to shoot a quick email to tech with that picture.
 
Answer from the home base:

One bad hole at the very end is certainly not reason for replacing the part. You could just drive the rivet and accept this as it is or you could add some JB weld. It would be best to drive the rivet wet by squeezing some compound into the joint just before you set the rivets. You could also add this when you insert the wedge to fill any voids then cleco and clamp the skin tight to the wedge while it cures.

Good deal! Build on brother
 
Cut the head off of a AD4 rivet. Bond rivet head with Pro-seal into the discrepant countersink and shave head flush. Drill hole through head and countersink as required per KIA. Assemble per KIA.
 
Last edited:
That's an easy place to have a countersink go wrong. Take a small piece of Al material (0.016" - 0.032"), drill a #40 hole and dimple it. Then carefully cut out the dimple and glue it with superglue in the deep countersink. Once glue sets, sand down the surface of the hole where the dimple is sitting proud and then countersink manually using a deburring tool until you're at the appropriate depth. The superglue only has to hold the dimple in place until you rivet.
 
Here is the hardware made just for the job in question...

Their website is a challenge to navigate. Phone them. 877-434-6889. They have been very helpful to me. Tell them you are building an RV and ask for a catalog while you are at it.


Joe

GAHCO.jpg
 
Not an Engineering Answer

I played around with various epoxy pastes and thickeners in my case the experiments were to determine whether a modified epoxy could provide desired shimming in cosmetic areas. My conclusion was no. Just too brittle to handle the strain even when squeezing slowly.

My view after playing around with extra room is that the proseal filler and careful back riveting might allow for a good drive without crumbling or smashing the filler material.

I like the idea of a conical shim of matching material suggested above.
 
Last edited:
Rivet

My experience when a rivet sits too deep in a hole is it doesn’t get proper expansion when squeezed or driven . I’d put a small shim on top of the rivet head ….say a 4-40 nut so the squeezer die sets the rivet before the die hits the material. You can address the cosmetic imperfection at paint time .
 
Following.

That is a dimple for the skin. Wonder what and upsized skin dimple and rivet would look like? Given the location and only one, I bet Vans replies w/ Keep building. ;)
 
Last edited:
Back
Top