What's new
Van's Air Force

Don't miss anything! Register now for full access to the definitive RV support community.

Horizontal stab aft edge pillowing

rthur

Member
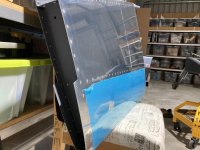
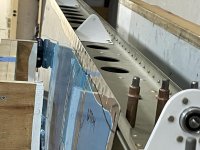
When I riveted the rear spar (HS-00903-1) into the horizontal stabilizer today, the skins (HS-00901-1) ended up pillowing a bit between the rivets. It's not super obvious, I only noticed it when looking at reflections in the skin.

Is this inevitable? We checked the countersinks before riveting and a piece of dimpled skin seemed to sit flush.
 

Attachments

  • IMG_7319.jpg
    IMG_7319.jpg
    314.7 KB · Views: 387
Really hate to ruin your day but review section 5.5 regarding countersinking for dimpled skins. The countersink should be .007 below flush. If you used a piece of dimpled skin as a depth gauge then your countersinks are likely double digits. I know. My first spar is leaning in the corner of my shop. Mine were around .015 below flush +-. I was advised by vans to replace.
 
Thanks for the heads up, I missed that in section 5. I'll measure one tomorrow to see how far off we are.
 
I used the tail end of callipers on top of the rivet head when setting my countersink cage. It was pretty easy to dial in .007".
 
Thanks Glenn! The countersinks in my horizontal stabilizer aren't accessible so I can't measure them, but I measured a few others that were done at the same time with the cage at the same setting using your method. They were all 9-10 thou over flush. Van's' tech support was ok with this - phew!
 
I think the waviness is likely more related to your dimpling technique than it is to the countersink depth.
Let us know what you measure.
 
Really hate to ruin your day but review section 5.5 regarding countersinking for dimpled skins. The countersink should be .007 below flush. If you used a piece of dimpled skin as a depth gauge then your countersinks are likely double digits. I know. My first spar is leaning in the corner of my shop. Mine were around .015 below flush +-. I was advised by vans to replace.

7 mils are not enough (even section 5.5 says that) What I personally did - I did 3 different samples. One 0.007 - 0.010 -0.015. Then I used a belt grinder to remove the half of the riveted sandwich and just locked at the edge. The best fit was around 0.012-0.015. when you set a rivet in a dimple to 0.007 - there is a large gab between the skin and the spar exist. Just use a flashlight. The gap between the skin and a spar (rib or another surface) shouldn't be visible. the skin between rivets should lay flat on the spar and have full contact
 
Last edited:
7 mils are not enough (even section 5.5 says that) What I personally did - I did 3 different samples. One 0.007 - 0.010 -0.015. Then I used a belt grinder to remove the half of the riveted sandwich and just locked at the edge. The best fit was around 0.012-0.015. when you set a rivet in a dimple to 0.007 - there is a large gab between the skin and the spar exist. Just use a flashlight. The gap between the skin and a spar (rib or another surface) shouldn't be visible. the skin between rivets should lay flat on the spar and have full contact

https://vansairforce.net/community/showthread.php?t=159343&page=3

See Post #24

I'd be much less worried about a gap between the skin and spar than a gap between the dimple and the inner bore of the countersink (as Scott points out started to show up beyond the .007" mark).
 
I think the waviness is likely more related to your dimpling technique than it is to the countersink depth.
Let us know what you measure.

Did you dimple the skin with a DRDT or a C-frame?

The countersinks measured 0.009 - 0.010 below flush. I'll stick to 0.007 in the future - thanks for your post describing how 0.007 was determined Scott.

The dimples could explain it, they were done with a DRDT and not a C-frame :(. I'm building the empennage at Synergy Air and that's mostly what they use.
 
7 mils are not enough (even section 5.5 says that) What I personally did - I did 3 different samples. One 0.007 - 0.010 -0.015. Then I used a belt grinder to remove the half of the riveted sandwich and just locked at the edge. The best fit was around 0.012-0.015. when you set a rivet in a dimple to 0.007 - there is a large gab between the skin and the spar exist. Just use a flashlight. The gap between the skin and a spar (rib or another surface) shouldn't be visible. the skin between rivets should lay flat on the spar and have full contact

It is experimental after all so everyone of course has the freedom to do what they think is right, but I would not recommend this plan. There has been so many expensive mistakes over the years as a result of builders trying to fit check dimples for a proper fit. That is one of the reasons for the specific recommendation of .007” deeper (which actually has been specified in Section 5 for many years).
 
The countersinks measured 0.009 - 0.010 below flush. I'll stick to 0.007 in the future - thanks for your post describing how 0.007 was determined Scott.

The dimples could explain it, they were done with a DRDT and not a C-frame :(. I'm building the empennage at Synergy Air and that's mostly what they use.

I doubt that small deviation caused it.
Good Dimpling on an .032 skin requires quite a lot of pressure. Such that it doesn’t seem like the DRDT always does the best job depending on how it is adjusted.
 
I doubt that small deviation caused it.
Good Dimpling on an .032 skin requires quite a lot of pressure. Such that it doesn’t seem like the DRDT always does the best job depending on how it is adjusted.

I use the DRDT and love it...but as scott points out adjustment is critical. I have a heavier frame than stock (6mm instead of the US 3/16...4.76 mm) I also ensure i get deflection on the frame when using and know when there is enough pressure when checking the dimples under a light source. you can easily under dimple with the DRDT as with the c frame. I mainly dimple flanges with the squeezer. here is my VS with the skin dimpled with the DRDT and riveted. the DRDT works just practice with it and adjust it correctly depending on the thickness you are dimpling.
 

Attachments

  • IMG_3719 2.jpg
    IMG_3719 2.jpg
    326.2 KB · Views: 82
I don't recall seeing the following mentioned in other posts.

This "pillowing" or skin separation was an issue in constructing T-18 Ailerons, Flap and Stabilator trailing edges -with both 470 and 426 rivets.

I suspect rivet shank swelling has something to do with it. During riveting it stretches the skin radially, increasing the "length" of the skin between rivet holes causing the separation.

"Back in the Day" with the huge Aerospace industry, it was easy to obtain rivets made the day before. After a few years, delivery day was Thursdays, so you planned your riveting for Fridays and weekends. Gun pressure increased daily from (if really fresh 40 psi to 80-90 by Sunday.

Thursday rivets were fresh enough to not cause pillowing, By Sunday it almost couldn't be avoided.

I dealt with the problem by annealing. 2017 has strict requirements to achieve proper annealing, which were hard to satisfy with the analog temp guages of the day. The temp drift of the oven was often greater than the permissible temperature window for annealing 2017.

I had to toss more than one batch.

Today's digital temp controllers are more than adequate for the task.

Freshly annealed rivets, kept on dry ice will drive at 40 psi, by lightly tickling the rivet gun trigger, plop, plop, plop, plop.

Maybe this Spring I'll run some batches and check post riveting shank diameters to verify my theory/experience
 
Back
Top