What's new
Van's Air Force

Don't miss anything! Register now for full access to the definitive RV support community.

Stupid Fuel Tanks!

danielhv

Well Known Member
Man, I dunno what it is... I have really enjoyed the building process thus far. Im working on the tanks... and I am really having trouble building up the motivation to go out into that cold garage and play with some more proseal. :( They have been sitting for almost 2 weeks now. :eek: I try to go out there... take a few steps in, and then im like... "its cold, I'm clean for a change, and I DO NOT want to mess with any proseal today". Man, these tanks are the first motivational/emotional rollercoaster portion of the build that I have encountered. Surely I'm not the only one that has gone through this? Just feels good to come here and vent my guilt. :D
 
Hi Daniel,
I'm at the same point as you and with exactly the same emotional status. It's the first time I think maybe I had to go with the QB!!!

Hope that @#!!#@ tank will be finished as soon as possible!!
 
They are a tedious process but once they are done, you will think that they were not that bad.

Just get in there and get them done. I put off my tanks for weeks because of all the hype about them.

I built mine at separate times and the second one went tons faster.

Just wear an old long sleeved shirt, buy a big box of gloves and always wear two layers, keep the MEK handy, drop the clecos in a jar of MEK when you pull them, occassionally wipe the excess off of the bucking bar and rivet set.

Keep moving even if you only do a rib or two at a time.

The main thing is be prepared for what your going to do before you start the session.
 
Whenever I got tangled up in similar roadblocks, I would just say to myself, "Its not going to get built just looking at it."

Dive in.
 
These were my first tanks. I just planned out what I was going to do each day, not having too much wet to get messed up in. I would let that cure overnight, and the next day do a little clean up and move on to the next step. Heard all these horror stories but never minded it at all. I did have whatever help I needed, as in someone with clean hands nearby to help if needed and that helped a lot.
Would not give it another thought if I had to do it again, unless these start leaking then I'll have another opinion.
Definitly not an expert, not even a novis, but shouldn't your shop be warm for good bonding of the pro-seal?
Ron
 
It may be the cold more than the proseal. I know when I moved to the hangar, working during the winter months was very de-motivating. Either I had to put up with the cold or with a very loud kerosene heater; either way I tended to find excuses to avoid going there. A cold hangar multiplies other de-motivational factors and divides motivational factors. Maybe set aside finishing the tanks until it warms up and work on something else?
 
AMEN TO THAT BROTHER !!!!!! I am right in the middle of "Fuel Tank ****"...but I am still glad I am doing the tanks myself. I am thinking it is a "right of passage"....
I have found proseal where noone should ever find it....no,no,no...
"poor dog".
 
I must be a freak...the smell/aroma of Proseal makes my mouth water. I can't explain why, but it does...
Proseal...yummm
 
Time for some heat dude!

Man, I dunno what it is... I have really enjoyed the building process thus far. Im working on the tanks... and I am really having trouble building up the motivation to go out into that cold garage and play with some more proseal. :( They have been sitting for almost 2 weeks now. :eek: I try to go out there... take a few steps in, and then im like... "its cold, I'm clean for a change, and I DO NOT want to mess with any proseal today". Man, these tanks are the first motivational/emotional rollercoaster portion of the build that I have encountered. Surely I'm not the only one that has gone through this? Just feels good to come here and vent my guilt. :D

If the shop ain't comfortable, you won't ever want to go out there. I just finished installing my heater. Not that it gets that cold around here, but when you are part lizzard, 60 is cold;)
I bought a small propane unit heater, it hangs from the ceiling and makes the shop nice and cozy. The thing was only 350 bucks plus install parts. All done for less than $500. I didn't want to screw around with kerosene heaters, electric, etc. Go big or stay at home:)
 
Tanks

I must be a freak...the smell/aroma of Proseal makes my mouth water. I can't explain why, but it does...
Proseal...yummm
Don, you are a freak. LOL! Anyone who likes messing in that goo likes mud baths also. Not fun at all. A mess. But it has to be done. Heat your work area. Until I heated mine I had the same issues. I just didn't want to go out there. Even 10 degrees + is better than nothing. You are going to find other emotional roller coasters during the build. I just hit another one-windshield and fiberglass. I dropped off the grid for one whole summer after I retired-just didn't want to work on the plane. Bottom line, desire buys kits, perseverance builds airplanes.
Mike H 9A/8A
 
You are still fairly early in the project. If you let the cold stop you, then you won't get much done any winter. So figure out a way to deal with the cold.

You can buy insulated coveralls. You can buy insulated shoes/boots, which are nice since the concrete cold soaks and never warms up and your feet will always be cold. You can get a heater for the garage. Maybe you can insulate the garage. Lastly, you aren't in that cold a location--most builders have colder winters than you, so you can deal with the cold somehow--others have done it.

If it's just the thought of the Proseal stopping you, once you get past it, you can move on, so you just have to get to work & get thru it. It isn't really that bad.

Lastly, the fuel tanks go together much easier if you have another person or two to help. We riveted the ribs into one of mine in a little over a couple hours (but the first one took several hours).
 
RE;Don't ya just love the smell of proseal!!!!

Hi Daniel

I am now doing my fourth winter in a somewhat cold garage.....Painting....

If I knew 4 years ago what I know now (that the project would take 4 plus years instead of the estimated 18 months) I would have heated the garage/more insulation in the doors and ceiling area.

I did the tanks in the hot summer months so my problem was a sweaty 100 plus degree garage....(desert southwest gets real hot in the summer)....Some one asked me if I would do the tanks a second time. I said yes. The learning curve is complete and I do know a few tricks that worked for me.

Finally, and please forgive my preaching here, but this 61 year old used up retired school teacher would always tell my student, "Do the hard stuff first.....and the easy stuff will take care of it's self". So get out in that garage and get that lovely smell of proseal in the air and before ya know it the Tanks will be but a distant memory!:)

Good luck and keep us informed of your progress.

Frank @ 1L8 ...RV7A... Painted the cowl today...looks great!!!!:D
 
I started my tanks thinking the stuff was very hazardous because of things I've heard here. After a short work with it, first 5 minutes, I pulled the gloves off and the mask and dove in like I do with silicone. When I was done I grabbed the MEK and washed my hands off. That was about a year and a half ago. I'm still alive. Oh and those cleko's I never cleaned em. I grabbed a cleko the other day with some proseal on it and laughed, mainly about guys that take all their time to clean em.

I did get another shot at prosealing the other day. Yup, I left a vent line loose. Funny thing I always felt I did, so when I was able to get to the wings again to install the Dynon servo for AP, I reached inside the fuel cap area and checked the vent, yup right wing vent line loose, moved back and forth about an 1/8th inch. Ripped off the cover, of course prosealed, and found the line loose, but wait I even prosealed the connection shut, had to brake the seal on that also. THe other wing was just fine.

Don't ever doubt your feelings, make sure you always research whatever makes you feel uneasy.
 
Small tip

One of the better tips I learned was to take those blue paper shop towels and cut up a bunch of two inch squares out of them to use for clean up while your working. Every time you get proseal where you don't want it grab a little square, clean and toss it in the trash. It does make the job less messy. Use lots of disposable gloves too, I used a whole box of them on two tanks and it was well worth it. Good luck and find a heat source if you can. Good loud tunes helped me too and maybe a little cold beverage but go easy on the beverage's.:D
 
Actually, the cold temperature can be an asset...

...I was quite apprehensive sealing the first tank based on all the negative hype I had read about the proseal process.
In reality, it is only messy, but it cleans up fine.

The cold temperatures will help delay any set-up tendencies. I found that I had 48 hours to clean up the mess on the tank skins and tools using MEK and clean rags. Just accept the fact that it is messy, but it does clean up...and you have quite a bit of time to get everything clean. By the end of the third day, the stuff had cured and was ready to be poked and prodded.

Use masking tape to cover your rivet gun and squeezer, have a generous amount of latex gloves handy for yourself and any helpers. If you can talk someone into being the "glove guy", his (her) only task will be to carry the box of gloves and assist in the removal of the slipery ones and aiding in the recovering of your hands with clean ones.
 
I agree with Noelf - I hurriedly pushed myself through my two right-wing tanks (main and auxiliary) while we had a cold-front pushing through, taking advantage of the low temps to slow the proseal. I got a good 3 to 3.5 hours of working time at 40 degrees with a straight 10:1 mix before it started to set up - just enough time for a solo worker to close up the rear baffle and set all those rivets. I did both baffles in 2 days, then put the tanks in the house to cure up in warmer temps. I haven't had a chance to pressure test them yet, here's hoping!
 
I agree with everyone. The fuel tanks suck, but I am on #2 and it is going much faster. #1 pressure tested good so I was happy! It will be a relief when all the prosealing is finished.
 
Take your time

The first time I mixed a bunch tank sealer and thought I could do a lot of riveting it got a little overwhelming. This is what worked for me. I would rivet one rib a day. In a couple of weeks it was done.
1. get a can with with some MEK
2. As Jim Wright said, cut up some blue paper towels into 2 inch squares.
3. Clean all surfaces with Coleman lantern fluid.
4. Mix up some sealant and coat the flange about 1/16 inch thick.
5. Cleco together and Put a cleco in every hole.
6. Pull 1 cleco, drop into the MEK and put rivet in hole.
7. Push the rivet in with a philips screwdriver and let the sealer ooze out.
This way the rivet will not hydraulic and the rivet will be flush.
8. Grab one of the 2 inch paper towels and dip into the MEK.
9. Wipe the head and the tail of the rivet and throw out the paper towel.
This keeps the rivet set and the bucking bar from wandering around.
10. Set the rivet.
11. Repeat.
Oh ya, don't forget the respirator so you don't fall over.
Aaron
 
Last edited:
Daniel,

I'm a long way from being at the same point in the process you are, but you gotta get it figured out....'cause I was planning on bringing my tanks over to your place when I started building them :D

Seriously, if you need an extra hand, gimme a call (360-471-5906); I still owe ya one. Plus, I'm sure I can benefit from your misery...I mean experience :p
 
tanks

Dan, good note. I thought you had finished your tanks because the notes stop coming in. I wondered what was up. I just put on the first baffle. I did only one rib per day. I have only one baffle to go. The baffles are the worst but they are last. Took me 5 hours for one baffle. I have one shirt with Proseal all over it. Soon I'll through it away. Soon you'll be done also. Just do it.

Check out hydronic heaters. I got one that takes a feed off my hot water tank and blows warm air into the garage. Cold garages are no good.
 
Oh, I would like to point out, the worse thing in any of this building process is the use of MEK. With that, what I do is. I don't use a resperator with it, but I hold my breath and use it, as soon as I'm done I throw the rag that has it on it outside and walk away from the project for a few minutes. Opening the window away from where I throw the rag is helpful also.
 
Not quite sure why you guys drag this out.

I did only one rib per day. Took me 5 hours for one baffle.
The first time I ever worked with proseal, a friend and I did 4 RV-6 tanks in about 1/2 day excluding the baffles. Did the baffles the next day.
What is it that takes so long?
 
Sometimes one rib is all you have time for

Mel,

I can't answer for everybody, but working on my RV is usually dead last on anyone else's "to do" list in my house. Sometimes an hour is all the time I have to go work on the RV. The rest of the time is running the kids all over town, tending to a very extensive "to do" list in my house.

Some sessions I could actually do two ribs at a time before it was time to finish up for the day because of something else on the calendar. Granted, the more ribs you could do at one session, the more efficient it is with regards to cleanup and so forth. I think it also helps taking a day (if you can), and just doing it. I'm sure it helps having a friend help also, because it keeps you motivated to keep going.

Others, with regards to the baffle, would it help to dilute the 10:1 mixture a bit to get a little longer working time with the proseal? I'm just about to do my baffles, and wondering how I can get through it all without the proseal getting too hard to work with. Unlike others who have posted here and are lucky enough to have cold garages to work in for the longer set up times, my work space is a nice comfortably warm walkout basement, and so proseal set up times are shorter:D
 
I don't know if the -8 are like the -6 baffles but here is what I did. Proseal enough for two tank baffles, apply to the tank in the area where the baffle will go. Put the baffle in and cleco every hole. Repeat for the other tank. Now, install all the self-sealing rivets and then dab over them with leftover proseal. You should be able to get to this point well within the working time of the proseal.

Next, I laid saran wrap (this came up in another thread and someone had difficulty with the wrap adhering to the proseal; use cling-free type or packing tape or other release agent) over the wing spar and clecoed the tank to the spar. I let my tanks sit for about three days before removing them and squeezing the rivets in the tank flange (if any proseal has oozed out the flange holes, clean it off with a hand countersink.) The flange rivets won't leak if you used enough proseal on the baffle because fuel should not seep into the flange/skin joint. The reason I set my tanks on the spar was because some people were finding that after prosealing and riveting their tanks, they didn't fit properly anymore. Excess proseal had to be cleaned away and sometimes riveting caused the skins to push away from the spar. Letting the proseal set while on the spar means that the excess has already oozed to accomodate the spar and the skin/flange joint is set tightly to the spar; squeezing rivets later won't move it with the proseal holding it. My tanks fit tight to the spar with no after-riveting nudging and no leaks, either.
 
Interesting...

That's an interesting way to do that. Did you apply proseal to the baffle flange before setting the tank on the spar and clecoing?

Has anybody else done it this way?
 
Man, I dunno what it is... I have really enjoyed the building process thus far. Im working on the tanks... and I am really having trouble building up the motivation to go out into that cold garage and play with some more proseal. :( They have been sitting for almost 2 weeks now. :eek: I try to go out there... take a few steps in, and then im like... "its cold, I'm clean for a change, and I DO NOT want to mess with any proseal today". Man, these tanks are the first motivational/emotional rollercoaster portion of the build that I have encountered. Surely I'm not the only one that has gone through this? Just feels good to come here and vent my guilt. :D

I found it alot easier to get started if I took a Friday off work.....Nothing better than working on your plane, while others are at work. It made Saturday alot easier to get started. (6 week project)

I suggest getting and extra quart of proseal, a gallon of MEK, about 150 cotton rags, and 4 boxes of latex gloves (changes every 2 minutes). I also put down a drop cloth, and duct taped it to the floor. Find a set of clothes that will be trashed when your done, and dig in and get it over. Nothing different in building, except you'll be covered in the stuff when your done. Be sure to use Eye protection and and a mask.

It also helps to have a few of your favorite beverage ready during the clean up process each day:D
 
Good grief! A pint was sufficient for my two tanks and the bottom skins on my fuselage. :eek: With proseal, unlike Sikaflex, more is not better.

Jeff, I put the proseal in the tank along where the baffle would go, skins and rear of the ribs. That way the baffle did not smear proseal along the skins as I inserted it. So, yes, the flanges were prosealed before I put the tank on the spar.
 
Soooooo Dan let us know

So Dan, a bunch of RV builders have shared 3 pages of their philosophies on the Stupid Tanks. Sooooooo what is your status? Let us know if you are getting them done.
 
The best part!

The best part or building my own plane will be flying it.

You want to fly?

Think of the best part of building the tanks as "being done with them."

The cold lets you work with the proseal a little longer(good), it also makes it stiffer(bad), so get a little bit of safe heat in your build shack and go for it. If you dedicate 2 hrs for each session, Most can be done in stages.

A) clean, clean, clean!

1) end ribs and center ribs.
2) Fillet Seal over edges and rivet tails of previous work
3) Seal and close back baffle.

While working with all this poo, remember the goal is to ride your own pony!
best wishes.
 
So Dan, a bunch of RV builders have shared 3 pages of their philosophies on the Stupid Tanks. Sooooooo what is your status? Let us know if you are getting them done.

lol, yea... slowly. I had to go back and add the reinforcing plate to the outboard rib... so I did that yesterday. Its curing now. Then I have a few rivets I drilled out in various places, and scraped away the proseal... Im going to replace those rivets, and start gooping all the shop heads and fillets. Then I need to get my hands on a flaring tool, and start plumbing the tank. :) I'll get 'em done. I may procrastinate now and then, but I'm not a quitter! :D
 
Right of Passage

Hey, I could've ordered the quickbuild wings, but where's the sport in that? Doing these tanks is just a right of passage, kind of like when Richard Harris got hoisted up in the air with ropes strapped to the bear claws that were sewn into his breasts in "A Man Called Horse". ...just not quite as painful!:eek:
 
Once you get them done, tested and stand them up in the corner a great feeling of accomplishment wipes out all the memories of ruined "favorite" T-shirts...or in your case sweatshirts. It's a milestone like so many others during this process. It was the first time I REALLY felt like I had finished a major part of the airframe, then came the fuselage/tailcone joining, then the gear, the engine and a month ago the windscreen and it happened all over again. Nothing but milestones...wonder what that first flight feels like:)
 
get back to work on those tanks dan!

dan, i have read your posts with interest over the past months and have just about caught up to you due to your recent slacking... get back to work on those tanks! for me proseal became much less of an issue when i started using a digital scale rather than a home made balance contraption.
 
It's really not so bad.

I've done lots and lots of sealing jobs. The 2" paper towel squares mentioned before is one of the best ideas. Keep the rivet tail and bucking bar clean, (keeps you from shooting"puppy feet"). If the rivet doesn't go in right, mark it by lightly drilling, then leave it until the sealant is cured to keep from getting chips between parts. I personally Do Not Wear Gloves while shooting. I put on some barrier cream (or hand lotion and baby powder). I wipe my hands clean as much as possible and re apply baby powder. No M.E.K. until I am finished shooting rivets then... A lot of Go-Jo hand cleaner on my hands, then vinal gloves, then work gloves. I let my hands sweat out the sealant for 10 or 15 minutes the wash using boraxo and scotch brite. Then it's time for good chemical gloves and fresh air to clean the project with M.E.K.

Andrew
-4 started and sold
dreaming again
 
dan, i have read your posts with interest over the past months and have just about caught up to you due to your recent slacking... get back to work on those tanks! for me proseal became much less of an issue when i started using a digital scale rather than a home made balance contraption.

Yea I know. :eek: I did some work yesterday, just haven't updated the site. I finally got around to sealing the rest of the ribs. Im ready to start plumbing the tank, and cutting the rear baffel for the fuel sender. Haven't decided if I'm going to get the other tank to this point before proceeding or continue with the first tank and get it finished. I'll probably just get the second tank caught up since I have yet to buy a flaring tool. :)
 
Tanks not that bad...

I'm just a little behind Dan. I was also dreading sealing the tanks, particularly after I discovered how difficult it was to get the tank skin clecoed to the ribs the first time. I thought how am I ever going to do this with pro-seal all over the place.

I finally figured out how to get the ribs in place. After all the match drilling, deburring and dimpling I put the tank back together again. I finally got up the courage to take out one rib and pro-seal and shot the rivets. It wasn't that bad, and by the second rib I was actually sort of enjoying working with the pro-seal. You can look at it as sort of an art form. Anyway, I didn't find it all that messy and the rib slid in place very easily with the pro-seal in place.

My technique is to apply a 1/16 inch coat of pro-seal to the tank skin, where the rib will mate. Then slide the rib in place. Cleco in place using a cleco in every hole. Then begin by taking out one cleco and replacing it with a rivet. Continue and pretty soon every rivet is installed. Then I clean up the skin, and fillet around the rib and put a swirl of pro-seal on each shop head. It takes about 2 hours per rib.

The only part that really bugs me is that I don't know if it will leak until I'm completely done!
 
My Tanks are Done

Finished my last tank three days ago. Took my time, used a ton of gloves and cleaned along the way with MEK. It seems like the hardest part was finished in the last two hours while I was cleaning those clecos one at a time. Soaked them in MEK for a few days and then used a brass wire brush. They came out just like a new. I wished I had read about those two inch square cleaning patches. Great idea. I used 12 inch square patches. It was easy though, they came on a big roll.
 
TIP: safe handcleaner

I wish I had known about this stuff back when I was doing the tanks. I bought this when I did the canopy. These hand cleaners work well for about anything sticky and gooey that I've used building the plane thus far. This bucket would probably last most of a project.

http://www.jamestowndistributors.co...duct.do?pid=6786&familyName=Sika+Hand+Cleaner

I'm guilty of using MEK on my hands during my tank build. I'm not dead yet, but that was unwise. Now I don't touch the MEK without chemical safe gloves.

Don
 
Put the rear baffle on today

I followed a previous poster's suggestion and after prosealing all applicable areas, installed the rear baffle on the left tank. I riveted all the Z brackets in place and all the baffle to tip rib flanges. I also clecoed the side flanges of the baffle to the skin and temporarily installed the tank on the main spar with screws. I have a nice tight fit just as before, and will let the proseal set up the next few days, before removing the tank in order to rivet the side flanges. So far so good...
 
These are all good ideas... I greared up to do just 2 ribs a night/session for my 6A.. With only a short goal in mind, it made it easier to forge on.. Eventually they were done in about a weeks time.. Plenty of sealant and no leaks in 8 years... Figure a method that works for you..and keep on keeping on... Yes, the cold doesn't help... Oh..now I have to do my condition inspection in my 20 deg hanger...yuck!
Sheldon
 
Vangrunsven did it for me

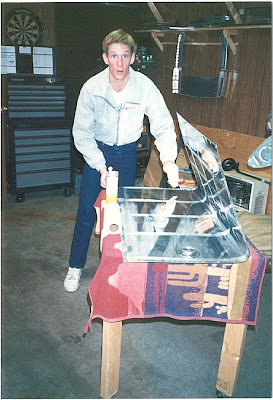
Why not let the family in on the really sweet project work? This is Mark Vangrunsven working on my RV4 tank skin, in my garage in Enid OK!

Mark was a student pilot in training at Vance AFB at the time, and I was a Tweet IP there at the time (1988). Incidentally, not only did Mark work on my plane, so did Jerry V (Dick's brother) and his wife Judy on a couple occasions.

Jerry would take me out for a ride in his really nice RV4 when he came to town and let me tell you, THAT was motivation to work!

Fuel_Tank2.jpg
 
Back
Top