What's new
Van's Air Force

Don't miss anything! Register now for full access to the definitive RV support community.

Show us the status of your 14/14A project

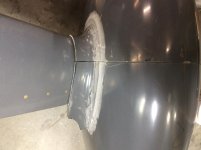
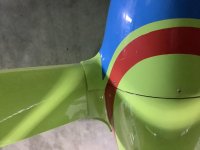
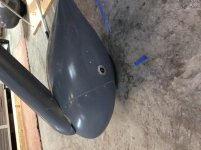
I permanently attached my wheel pant leg fairings to the wheelpants, splitting them along the separation line between the front and rear pieces. Makes it much easier to remove the wheel pants. Something to consider.

That's a great idea! Do you have photos?
Thanks,
S
 
Before and after. Note the little flap installed to close the gap before painting. :cool:
 

Attachments

  • E684086E-50C4-4B7F-84A6-F98582E0C77A.jpg
    E684086E-50C4-4B7F-84A6-F98582E0C77A.jpg
    239.3 KB · Views: 174
  • 136128E5-847C-4C9C-82A0-43AD523BC7C2.jpg
    136128E5-847C-4C9C-82A0-43AD523BC7C2.jpg
    355.1 KB · Views: 192
Another thing to consider.
 

Attachments

  • A66284D9-175C-4507-A497-67202042EA83.jpg
    A66284D9-175C-4507-A497-67202042EA83.jpg
    341.1 KB · Views: 182
Yes. That hole is needing closure. Im considering a complete cover.

You need to leave easy access for a towbar. I put the SS washer to protect the paint. I also extended the bolts to make it easier to align with the towbar. Inside, I permanently attached the aluminum pyramid things to the brackets with countersunk screws. This allows you to remove the rear portion of the nose wheel fairing by simply removing the bolts and sliding it aft - after removing the screws holding the front and rear pieces together, of course.
 
I was thinking of making the hole just big enough to access the hex key bolt by closing it in with glass and epoxy. Yes. No?

If you are going to paint the epoxy, you will likely damage the paint eventually. That is why I put the SS washers. Make sure to allow enough clearance for a towbar, too.
 
Epox primer on.

Laid on the SW epoxy primer surfacer today. Filling sand scratches and pinholes next, sanding, more epoxy, then PAINT!

A499BCAC-6998-4A31-A102-599E4AD4C43D.jpg
 
3M Putty Applied

The #80 sand scratches from shaping the epoxy/micro and pinholes in the factory fiberglass don't get filled with the SW epoxy primer surfacer very well, so I used some 3M putty from the body shop to fill those. Tomorrow, I will sand the putty off and shoot the second epoxy coat. #320 sanding of that coat should get the bits ready for paint....I hope.

Wheel Pants First Putty Coat.jpg
 
Wheel Pants Second Epox Primer Coat

Sanded the first epoxy primer and spot filler and applied the second, and last, epoxy primer coat. Tomorrow, sand the primer with P320 to smooth out the orange peel, finish sanding the oil door bodywork, prime the oil door cowl surround.

The gray SW primer looks just like the original fiberglass, so not real satisfying, but knowing how many hours went into the bodywork and what's under the primer, it feels pretty good. Since the paint will be white, I didn't want to use the SW white primer. I find it makes determining paint coverage easier if the primer and paint are not the same color.

Wheel Pants et al Second Primer.jpg
 
Build Time for Wheel Pants, et al

I added up the hours to complete the three wheel and leg fairings, to date. 200! Maybe I should've built a tail dragger! At least one piece of this build will be completely DONE in a couple more days. :D
 
14A project

Finishing fitting the cowl and wheel pants.
 

Attachments

  • F0B19694-2169-4104-AD8D-93764AAD6697.jpg
    F0B19694-2169-4104-AD8D-93764AAD6697.jpg
    356.2 KB · Views: 242
Oil Door First Prime Coat

Got the oil door primed, sanded, pinholes and deep scratches filled. Tomorrow, second and last prime coat.

Oil Door Cowl First Prime Sanded.jpg

Oil Door Cowl Sanded and Filled.jpg
 
Oil Door Cowl Last Prime/Pants Ready for Paint

Sanded all the pants bits with P320 prior to painting tomorrow. Some small pinholes and scratches still needed some putty. Light sanding tomorrow prior to paint. Getting the bits painted and back on the gear legs is gonna feel fantastic. Total wheel pants project is at 207 hrs, to date. Should be back on the fuse after another 4 hrs, so 211 hrs not including cutting and buffing once the SW epoxy paint has cured!

Wheel Pants Ready for Paint.jpg

Got the second coat of primer on the oil door cowl. Door fits flush with cowl (10kts extra, at least!) Feels really good. I am so glad I decided to customize the stock door with the 610 button latch. It is so easy to open with just a touch of the button. Nice, solid click when closing, too. Lots of build hours to get it right, but then, it's something used every flight. Besides, I come from C182's, so I'm familiar. Will wait to complete the painting after the cowl is on the fuse.

Oil Door Cowl Second Prime.jpg
 
Last edited:
Wheel Pants, et al PAINTED!

Painted, at last. Big job. Plan for a lot of time to get these right. But, in the end, worth the effort, I think. Hardest part was figuring out how to hang the little bits so they could be seen by the spray gun. Easiest part was positioning the 'Pope's Hats' on the 2x4 poles.

I am glad this is done. BTW, the SW Acryglo is super easy to shoot even for an amateur like me.

Wheel Pants, et al Painted.jpg
 
Moving My Build Progress to New Digs

I am going over to my own thread on build progress for the remainder of my build. Look for me at: Scott's RV14A: N52XL
 
Last edited by a moderator:
-14A
Started 03/12/2021
Getting close to wrapping up Section 29 - Forward Mid Fuse Side Structure
Looking forward to starting Section 30 - Aft Fuselage Attachment by 2/15/2022
Empennage - Complete
Wings QB - Started according to VANS website.
Finishing Kit - Audited (back in the crate)
Thunderbolt EXP119 arriving TE: March 2022
Wiring and avionics: Panel layout almost finalized. Parts order initiated due to long lead times.
Reserved: N103PL
#140947
 
Last edited:
14A
Emp kit ordered - deposit paid - builder number in hand...
now trying to convince myself that i have done the right thing
 
Last edited:
Aileron to Bellcrank Pushrod

The ST4130 0.35 x 1/2 powder coated tube used to fabricate the aileron to bell crank pushrod was BO'd when my wings came with no indication of when the material would be available. So, I got with Online Metals and ordered a 6' stick of 4130 steel alloy. After a 5 month wait, the material got here today and the pushrods are done! I powder coated them myself so all should be good.

Aileron to Bellcrank Pushrods.jpg
 
Delivery scare

b9MWaeHtJRn5c6Zz7


Had a bit of a scare. FedEx driver starts by saying he’s going to need my help because the pallet they shipped it on was ****. I looked in the truck and saw an engine covered in plastic with pieces of pallet laying on and around it. I remembered guys saying Lycoming had it encased in foam and cardboard, so I was confused. Looking further in the truck I saw this Lycoming box and told the guy that heap wasn’t mine, he looked and confirmed. My heart began beating again and color returned to my face. ALL GOOD!

https://photos.app.goo.gl/R8nSEm6dhQsHA7Hv5
 
Brian

Regardless of what your box and crate look like. You have on the side facing in the picture an indicator that lets you know if the box /pallet has been tipped or dropped. It is the little blue inverted V. made by Uline I believe.

Arnie
 
Sometimes I just sit in my shop and stare at my project with a big dumb grin on my face
 

Attachments

  • image.jpg
    image.jpg
    346.6 KB · Views: 241
First flight,

First flight in Jim’s 14A
Rock solid plane and Fast.
 

Attachments

  • VAFDR_ 980 Oct. 06 09.00.jpg
    VAFDR_ 980 Oct. 06 09.00.jpg
    116.2 KB · Views: 237
Last edited by a moderator:
Sometimes I just sit in my shop and stare at my project with a big dumb grin on my face

This is one of the pleasures of building and flying airplanes! I did that often. And after flying my 8 for 8 years, I still often just sit and stare at it after a flight! If I'm done for the day, I'll have a beer with that, but not required!
 
Exhausts Mounted

Got the exhausts mounted with the heater muffs today. Reamed out the EGT holes in each header before mounting just to make sure the filings didn't go anywhere they shouldn't. Attached the two rear EGT probes.

Exhausts w: Heat Muffs Starboard.jpg

Exhausts Port.jpg
 
Got the exhausts mounted with the heater muffs today. Reamed out the EGT holes in each header before mounting just to make sure the filings didn't go anywhere they shouldn't. Attached the two rear EGT probes.

View attachment 31931

View attachment 31930

I see you have the integral firesleeve hoses/lines - excellent (so do I). But because they are more rigid than stock, make sure to adel clamp to the engine mount the two that go to and from the oil cooler. Before I did that, I lost two oil coolers to excess vibration that cracked the coolers in the same place each time - and the resulting loss of quarts and quarts of oil mid-air was not fun to say the least. Others have had similar issues with their oil coolers (similar cracks) and most of those have the integral firesleeved hoses. This seems to be -14A related (not -14 since their oil cooler mouting is different).

Regards,
Alex
 
Got a Heater! Kinda...

No real issues with these scat tubes, except I recommend not cutting them to length according to the plans, instead cut to length based on the location of the muffs. I found that most are the lengths the plans specify, but not all. Some need to be longer and if they are cut too short, there's not enough extra to fix the problem.

Heater Scat Tubes Starboard.jpg
 
I see you have the integral firesleeve hoses/lines - excellent (so do I). But because they are more rigid than stock, make sure to adel clamp to the engine mount the two that go to and from the oil cooler. Before I did that, I lost two oil coolers to excess vibration that cracked the coolers in the same place each time - and the resulting loss of quarts and quarts of oil mid-air was not fun to say the least. Others have had similar issues with their oil coolers (similar cracks) and most of those have the integral firesleeved hoses. This seems to be -14A related (not -14 since their oil cooler mouting is different).

Regards,
Alex

You mean like at these locations?

Exhausts w: Heat Muffs Starboard pointers.jpg

Excellent tip, btw. Thanks a lot. Blowing these off in flight would have made for a sporty flight!
 
You mean like at these locations?

View attachment 31965

Excellent tip, btw. Thanks a lot. Blowing these off in flight would have made for a sporty flight!

Yes, those locations would work well (and are essentially the same on mine).

About 8 qts in total of my oil were sprayed over the greater Orlando area ... sporty flights, indeed! I found that the tell-tale sign of losing oil was the oil pressure would slowly but steadily creep downward; the last time it started in the mid 70s, and was in the mid-50s when I landed. So, I set an alarm on my G3X at 70psi - I usually run 74-76psi at cruise, so this would catch the problem early on.

_Alex
 
Last edited:
4 hours and two trips to Ace Hardware. Cradle built, left wing in cradle. Starting right wing this weekend.
 

Attachments

  • 8D53320B-FB30-4865-973D-9BEFF441587E.jpg
    8D53320B-FB30-4865-973D-9BEFF441587E.jpg
    410 KB · Views: 224
Started to work on panel while I wait for Wings and Fuselage.
View attachment 33712

Looks good. I've been playing around with avionics selection just for fun right now, but I'm a few years away from committing serious $$ towards them. I have been looking at my wiring diagrams to figure out what additions I'll need for ZipTips, heated pitot tube, etc.

Part of this was looking at switches, or more accurately switch bundling. By that I mean what switches should be grouped together and more importantly which switches shouldn't be close. I've looked at a lot of panels and one thing I see on some of them is placing the avionics master switch next to the fuel pump switch. This could create a situation where in the heat of an IFR approach you accidently turn off your avionics while trying to hit the fuel pump.

I saw this to be the case on the FlightChops RV-14. Hoping that scenario never occurs for anyone with this configuration.

Looking forward to seeing your final panel!
 
Started to work on panel while I wait for Wings and Fuselage.
View attachment 33712

We were caught in the worst of covid supply chain issues, so we proceeded like you are. We built a panel mockup and were able to craft our panel wiring harness while waiting for Vans to deliver kits. Edit: I should note that Stein provided the wiring diagram that we built from. It would have been a nightmare without that asset.
 

Attachments

  • 1.jpg
    1.jpg
    214.5 KB · Views: 214
  • 2.jpg
    2.jpg
    196.7 KB · Views: 215
Last edited:
Looks good. I've been playing around with avionics selection just for fun right now, but I'm a few years away from committing serious $$ towards them. I have been looking at my wiring diagrams to figure out what additions I'll need for ZipTips, heated pitot tube, etc.

Part of this was looking at switches, or more accurately switch bundling. By that I mean what switches should be grouped together and more importantly which switches shouldn't be close. I've looked at a lot of panels and one thing I see on some of them is placing the avionics master switch next to the fuel pump switch. This could create a situation where in the heat of an IFR approach you accidently turn off your avionics while trying to hit the fuel pump.

I saw this to be the case on the FlightChops RV-14. Hoping that scenario never occurs for anyone with this configuration.

Looking forward to seeing your final panel!

My Avionics is second from left (first on left is EFIS Battery Backup) of Switches. My fuel pump is right most switch near Throttle. Second from right is PITOT. Thought is Left to right is starting up (with exception of fuel pump). Oh S#^@! is near throttles so hand does not have to go far to get there, so R-->L Fuel Pump, Pitot, Defrost Fans, Lights..., Avionics, Master, Battery Backup.
 
Last edited:
Rv14a - Whakatane

Heading toward 200 hours, currently assembling the firewall so I can join it to the completed lower center section.
 

Attachments

  • 20221216_115508.jpg
    20221216_115508.jpg
    547.2 KB · Views: 110
  • IMG_20221202_112056.jpg
    IMG_20221202_112056.jpg
    747.4 KB · Views: 144
Had to store wings in Master Bedroom until wing cradle is ready. But at least I finally have wings!
Wings.jpg


A circuit board I designed and built that will sense when Fly LED The Works board Wig-Wags my Works lights in wing tips to drive light switches on GAD 27 to sync Wig-Wag on 7-Stars driven from GAD-27. I wanted manual control of Wig-Wag via switch and not speed controlled, my preference. Also have a fully digital version that will only need a single chip and a capacitor for decoupling that I have designed but not built. But will require external power (12V). This fully analog version will be driven from power to "The Works" lights so I am going to try first. Already did a SPICE simulation of the circuit should work fine without the need of external power.
wig-wag.jpg
 
Classic Aero interior is here

My interior is here:) Classic Aero does wonderful work.
Still building up my canopy frame so far no real issues.
I'm still trying to come up with a plan for the broken thread tap in my roll frame:( that I did while tapping threads:( I have multiple diamond tip dremel bits that just aren't making a dent in that frigging hard thread tap.
 
I hope you are happy with your throttle quadrant - I am. :) One thing you might find, though, at least for two of us, we found the prop lever would creep unless the friction lever was kept pretty tight. Hartzell provided a solution by reducing the spring tension at the prop governor. They discovered the issue with the aerobatic crowd. Fixed the problem for our planes. :cool:

Do you have details on your throttle quadrant physical install, cable part numbers, cable routings, gotchas/lessons learned, cable lengths, etc? Looking to do this myself if I can find a good example to follow. Thanks!
 
Do you have details on your throttle quadrant physical install, cable part numbers, cable routings, gotchas/lessons learned, cable lengths, etc? Looking to do this myself if I can find a good example to follow. Thanks!

Installation of the RV-10 quadrant Van’s sells is easy - I just installed nutplates in holes that mostly exist. I have an early Thunderbolt engine with an FM-150 fuel controller, which required installation of a plate under the engine to guide the throttle and mixture cables. Your installation may be different. I figured my cable lengths by running lengths of flexible tubing. I don’t recall the exact lengths, but precision is not required - there is room to store a little excess under the panel. I used the 2 existing firewall penetrations to route the cables. Overall, not a difficult installation and it has worked flawlessly.
 

Attachments

  • B4D702DC-C295-4CEC-8FBF-095FB5DBEA17.jpg
    B4D702DC-C295-4CEC-8FBF-095FB5DBEA17.jpg
    178.3 KB · Views: 295
Last edited:
Installation of the RV-10 quadrant Van’s sells is easy - I just installed nutplates in holes that mostly exist. I have an early Thunderbolt engine with an FM-150 fuel controller, which required installation of a plate under the engine to guide the throttle and mixture cables. Your installation may be different. I figured my cable lengths by running lengths of flexible tubing. I don’t recall the exact lengths, but precision is not required - there is room to store a little excess under the panel. I used the 2 existing firewall penetrations to route the cables. Overall, not a difficult installation and it has worked flawlessly.

Please show a picture from the pilot's side showing all the levers full forward so I can see how that impacts access and clearance on the dash in front of it. Thanks! The Van's RV-10 quadrant looks to be the DJM '3 Lever Center Mount Curved Top Quadrant Formation' but with more complete mounting arrangement plus comes with the clevises. Too bad the order of the levers can't be swapped so the ascend from left to right.
 
Please show a picture from the pilot's side showing all the levers full forward so I can see how that impacts access and clearance on the dash in front of it. Thanks! The Van's RV-10 quadrant looks to be the DJM '3 Lever Center Mount Curved Top Quadrant Formation' but with more complete mounting arrangement plus comes with the clevises. Too bad the order of the levers can't be swapped so the ascend from left to right.

I don’t know why you couldn’t disassemble the quadrant and arrange the levers anyway you want - although, it would not be per current standards. You might even be able to just switch the knobs. I don’t have a photo with everything full forward. Plenty of clearance, though. The only thing impacted in my panel configuration is the parking break knob is pushed in a little, but not enough to release.
 
My v3.6 Panel is FINAL......I think

It is also wired.....I think. At least I will apply power to it tomorrow and hopefully not see too much smoke. Wish me luck. Wiring this beast was a challenge! And I used premade harnesses where possible. Drawing the wiring diagrams for every electrical item took about ten days.


Panel v3.6.jpg

Subpanel Wiring Top View All v3.6 Panel.jpg
 
Completed the left flap last night. Starting the right one soon. None of my flap parts are laser cut so gives me something to work on while the dust settles.
 
Wing progress

I’ve got the small wing structures (leading edges, tanks, flaps, ailerons) done, so time to build the big parts. Got the top skin section finished up yesterday.
 

Attachments

  • IMG_1566.jpg
    IMG_1566.jpg
    457.4 KB · Views: 66
After 4 years of a slow build, it is finally airworthy. Thanks to Tony Kirk for the DAR services. He made it an enjoyable experience and passed on his knowledge to me.

https://photos.app.goo.gl/L71tiP1ZiYopKg9V9

https://photos.app.goo.gl/kx8YVpqnZY2h9Keu6

https://photos.app.goo.gl/5SD8QYnvwHWksHv9A

Brian,

Thank you for allowing me the privilege of inspecting your wonderfully built RV-14A!

It was my pleasure working with you today. Your attention to detail is evident throughout. I especially like how closely you "stuck to the plans". That is the quickest way to build a beautiful RV.

You have a fine example of a very well built and equipped RV-14A, and I'm sure it will take you places you have only dreamt of!

Be safe, perform a thorough Phase 1 and relish the satisfaction of completing an amazing aircraft.

Enjoy the RV Grin! You earned it!
 
Back
Top