tom kreiner
I'm New Here
I'm new to the Forums, and what I've learned may help new builders, so here goes.
During the last 9 months, several guys in my EAA Chapter - 302 in Conroe, TX - have engaged me to commission their A/C systems. There are three systems I've now been involved with to one degree or another, with additional efforts ongoing.
The first system is from Brazil, and is apparently somewhat of a knock-off, of a system which was said to be originally designed in California (please feel free to correct me.) The second system is from Flightline - div. of Kelly Aerospace - and the third is from Airflow systems. In the rest of these Notes, I'll refer to these as the "Cal" System, or the "Flightline” System.
The first two completed systems are blowing COLD AIR, while #3 is still under construction, but will have wings added this week, and is expected to fly in December.
Well you may ask, how cold is COLD AIR? How about 39.2 degrees F? This is the result of the Flightline system, after an exhaustive troubleshooting process, along with a completely redesigned wiring system. When we flew this plane last week, the OAT temps were in the mid low ‘80's, and the air was too cold! Air coming from the Brazilian system was a few degrees higher - around 42F. In case you haven't studied them, they're very different systems; with slightly differing thermodynamics, and more. My hope is that you'll glean what you need to know if you wish to add A/C to your project plane.
There are two principal designs being used; both of which have an engine driven compressor, along with a tailcone mounted evaporator. Both systems have condensers; the one on the Cal systems is mounted below the baggage compartment, while the Flightline is located to the rear of the tailcone / baggage bulkhead. Only the tailcone mounted condenser from Flightline has an integral fan.
When charging the Cal system, there is insufficient airflow from the propeller from the prop alone to cool the compressed gases in the condenser. With a pressurized charging system, the exact amount of refrigerant may be added to the system. That said, the question becomes, “what is the exact amount of refrigerant for a system?”
It turns out that for any system it is the sum of the volumes of all of the internal components, including compressor, condenser, dryer, evaporator, and lines. Since there is no single setup for lines, it’s hard to determine how much refrigerant will be required, so the empirical approach is used; charge until typical pressures are acquired, along with cooling.
In addition to refrigerant, there is the ABSOLUTE requirement to add oil to all of the components in the system. There are formulae for determining the amount of oil to be added. Too little oil, and the compressor life will be diminished; too much and cooling is reduced. Rules of thumb apply and will be very close, assuming the compressor is filled properly when received, and all other components are new.
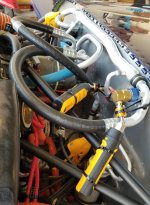
Without volumetric information for a new system, charging is done with a gage set. (If you apply significant forethought, along with a precise scale, you may weigh how much refrigerant the fully charged system required, and use that information should it need to be recharged in the future.) In my experience, I've never seen a $5000. charging system on or near an airport; however, I've been using a gage set for over 50 years, and I'm comfortable using it.
The Cal systems will need a strong (i.e. 200 mph) leaf blower propped up under the fuselage blowing air thru the condenser scoop in order to charge the system. The Flightline system will only need to be turned on and run because its integral fan - just like on your car - will move sufficient air thru the condenser to enable charging. Both types of systems will need to be charged with the engine producing between 1600 and 2000 rpm.
If you're unfamiliar with A/C systems, the compressor takes gas in the system, compresses it, and sends the hot gas to the condenser coil, where air flow extracts heat causing the gas to liquify, becoming a hot liquid. From there the refrigerant flows to the evaporator coil, where airflow releases heat as the hot liquid is exposed to a very low pressure, where it boils, thereby absorbing heat.
Just as in a car, during ground operations the continuously running condenser fan in the Flightline system outshines the Cal system. Both of the systems perform a credible job while flying, providing adequate comfort to the airplanes interior.
Because all of the current systems use the overhead console as a duct, the airflow is somewhat lower than many owners expect. There are new designs which, when ready, will address airflow, however.
This is a pretty involved subject, and I've condensed as much of it as possible, while attempting to give the prospective user of the systems some information they may not otherwise have access to. Feel free to comment or ask questions about the systems.
During the last 9 months, several guys in my EAA Chapter - 302 in Conroe, TX - have engaged me to commission their A/C systems. There are three systems I've now been involved with to one degree or another, with additional efforts ongoing.
The first system is from Brazil, and is apparently somewhat of a knock-off, of a system which was said to be originally designed in California (please feel free to correct me.) The second system is from Flightline - div. of Kelly Aerospace - and the third is from Airflow systems. In the rest of these Notes, I'll refer to these as the "Cal" System, or the "Flightline” System.
The first two completed systems are blowing COLD AIR, while #3 is still under construction, but will have wings added this week, and is expected to fly in December.
Well you may ask, how cold is COLD AIR? How about 39.2 degrees F? This is the result of the Flightline system, after an exhaustive troubleshooting process, along with a completely redesigned wiring system. When we flew this plane last week, the OAT temps were in the mid low ‘80's, and the air was too cold! Air coming from the Brazilian system was a few degrees higher - around 42F. In case you haven't studied them, they're very different systems; with slightly differing thermodynamics, and more. My hope is that you'll glean what you need to know if you wish to add A/C to your project plane.
There are two principal designs being used; both of which have an engine driven compressor, along with a tailcone mounted evaporator. Both systems have condensers; the one on the Cal systems is mounted below the baggage compartment, while the Flightline is located to the rear of the tailcone / baggage bulkhead. Only the tailcone mounted condenser from Flightline has an integral fan.
When charging the Cal system, there is insufficient airflow from the propeller from the prop alone to cool the compressed gases in the condenser. With a pressurized charging system, the exact amount of refrigerant may be added to the system. That said, the question becomes, “what is the exact amount of refrigerant for a system?”
It turns out that for any system it is the sum of the volumes of all of the internal components, including compressor, condenser, dryer, evaporator, and lines. Since there is no single setup for lines, it’s hard to determine how much refrigerant will be required, so the empirical approach is used; charge until typical pressures are acquired, along with cooling.
In addition to refrigerant, there is the ABSOLUTE requirement to add oil to all of the components in the system. There are formulae for determining the amount of oil to be added. Too little oil, and the compressor life will be diminished; too much and cooling is reduced. Rules of thumb apply and will be very close, assuming the compressor is filled properly when received, and all other components are new.
Without volumetric information for a new system, charging is done with a gage set. (If you apply significant forethought, along with a precise scale, you may weigh how much refrigerant the fully charged system required, and use that information should it need to be recharged in the future.) In my experience, I've never seen a $5000. charging system on or near an airport; however, I've been using a gage set for over 50 years, and I'm comfortable using it.
The Cal systems will need a strong (i.e. 200 mph) leaf blower propped up under the fuselage blowing air thru the condenser scoop in order to charge the system. The Flightline system will only need to be turned on and run because its integral fan - just like on your car - will move sufficient air thru the condenser to enable charging. Both types of systems will need to be charged with the engine producing between 1600 and 2000 rpm.
If you're unfamiliar with A/C systems, the compressor takes gas in the system, compresses it, and sends the hot gas to the condenser coil, where air flow extracts heat causing the gas to liquify, becoming a hot liquid. From there the refrigerant flows to the evaporator coil, where airflow releases heat as the hot liquid is exposed to a very low pressure, where it boils, thereby absorbing heat.
Just as in a car, during ground operations the continuously running condenser fan in the Flightline system outshines the Cal system. Both of the systems perform a credible job while flying, providing adequate comfort to the airplanes interior.
Because all of the current systems use the overhead console as a duct, the airflow is somewhat lower than many owners expect. There are new designs which, when ready, will address airflow, however.
This is a pretty involved subject, and I've condensed as much of it as possible, while attempting to give the prospective user of the systems some information they may not otherwise have access to. Feel free to comment or ask questions about the systems.
Last edited: