Has anyone encountered a twist on their trim tabs such that the outboard edge is at least 1/4 in off when the inboard edge is flat? I tried searching but could not find an answer easily. Like everyone says these have been extremely frustrating to deal with.

Van's Air Force
You are using an out of date browser. It may not display this or other websites correctly.
You should upgrade or use an alternative browser.
You should upgrade or use an alternative browser.
Elevator trim tab problem
- Thread starter UNCRV
- Start date

rzbill
Well Known Member
I have not had this specific issue but have fixed similar elsewhere.
The distance from trailing edge to rivet line varies incorrectly. You can try to fix by forcing it flat and drilling for oversized rivets or if you have not drilled yet, carefully drilling for original rivets. It does not take much corection to move the TE if both top and bottom spar flanges are included in the fix. Otherwise get a new skin. Root cause could be a very slight centerline misalignment in the press brake when it was bent.
Do you know that the trim tab is the problem or is it the elevator?
I live near Carrboro during the week if you are still in the area.
Last edited:
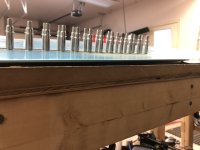
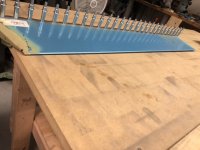
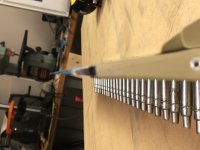
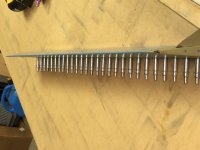
I’m pretty sure it is in the trim tab and not the elevator. Elevator is pretty flat on the workbench. You can actually look at the trim tab and see it isn’t flat when it’s not attached to the elevator I agree it appears I didn’t get it bent at the very center of the trailing edge in the brake which is a bit disappointing seeing as I don’t really know what went wrong and what to avoid next time.
The bottom of the spar is already riveted and I noticed it after I drilled the hinge and attached it. Would you drill out all those bottom rivets and try to oversize them or just try to flatten it and drill the top rivets oversize to #30?
I think at some point in the future I will end up redoing both trim tabs. The other is acceptable but has a small dent in it from bending the end tabs in. It seems like this one just needs to be redone now rather than after it’s flying.
I’m not in the triangle anymore. I went to UNC for undergrad and live in western NC now about 1.5 hours from Asheville.
KeithB
Well Known Member
When I built my 14, my trim tab came out with a twist even greater than yours. I decided to live with it and build on (perfection is the enemy of completion) and see how many other major goofs I might make. I found my skills improved quickly, and I was much more careful (less cavalier) with flaps and ailerons because of this “error”. Before first flight, I built a new trim tab with little difficulty that was excellent.
My trick was to use the granite countertop in the kitchen (all the clecos on one side of the tab with just the very trailing edge over the edge of the counter, check and recheck and recheck as riveting progressed with bracketing rivets - every tenth, then every fifth between, etc. The 14 method with double sided adhesive “tape” to hold alignment worked well for me.
My trick was to use the granite countertop in the kitchen (all the clecos on one side of the tab with just the very trailing edge over the edge of the counter, check and recheck and recheck as riveting progressed with bracketing rivets - every tenth, then every fifth between, etc. The 14 method with double sided adhesive “tape” to hold alignment worked well for me.
Last edited:
I was thinking of living with it for right now and rebuilding in the future. Doesn’t seem like there is a real easy way to fix it at this point. Have no idea what it would actually mean in flight. And I agree the enemy of good is perfection. Seems it usually results in at least a dent or worse in the parts.
Do you have a better picture? It looks like the tab is just a bit above the TE on the elevator but I don't see any twist.
My trim tabs are slightly thicker than the elevator and won't sit flush on the workbench. But if you pick it up you should get a decently straight line from the tip of the elevator to the tip of the trim tab.
My trim tabs are slightly thicker than the elevator and won't sit flush on the workbench. But if you pick it up you should get a decently straight line from the tip of the elevator to the tip of the trim tab.
I had this issue on my third set of tabs. Didn't notice until I put them on. I was angry and no amount of massage would make them straight. I did a forth set, and sure enough drilling everything and then priming, when I put them together if I used the holes I drilled there was a slight twist, not as bad but slight. I adjusted some of the holes in one end to shift the skin slightly to get them straight. The first two set I destroyed the closeout tabs, I am really good at closeout tabs now.
Here are a few more pics. I think at this point I am going to move on with the intent of drilling out the two end rivets and potentially enlarging some of the spar rivets to see if it will flatten out while also ordering parts to make a new tab down the road. Seems recently nothing has been straightforward and easy on whatever I touch. Lol.
Attachments
I’m coming up on this task...you guys are making it sound great!
There is a post on here somewhere as to how to do the closeout tabs, using some metal stock rather than wood blocks; it works. Also, I used a break made from some hardwood and piano hinge to squeeze the tabs to shape. Both of these methods are not what the plans called for, but discussed somewhere here. And as this post eludes too you might have to adjust some of the holes to make sure the TE is not warped.

