What's new
Van's Air Force

Don't miss anything! Register now for full access to the definitive RV support community.

VS-808 to VS-803 countersinking

ijustwannafly

Well Known Member
I know this topic has been discussed before and i was able to pull an old thread on it. However my issue is in the old thread all the pictures are gone and the previous solution did not fix my problem

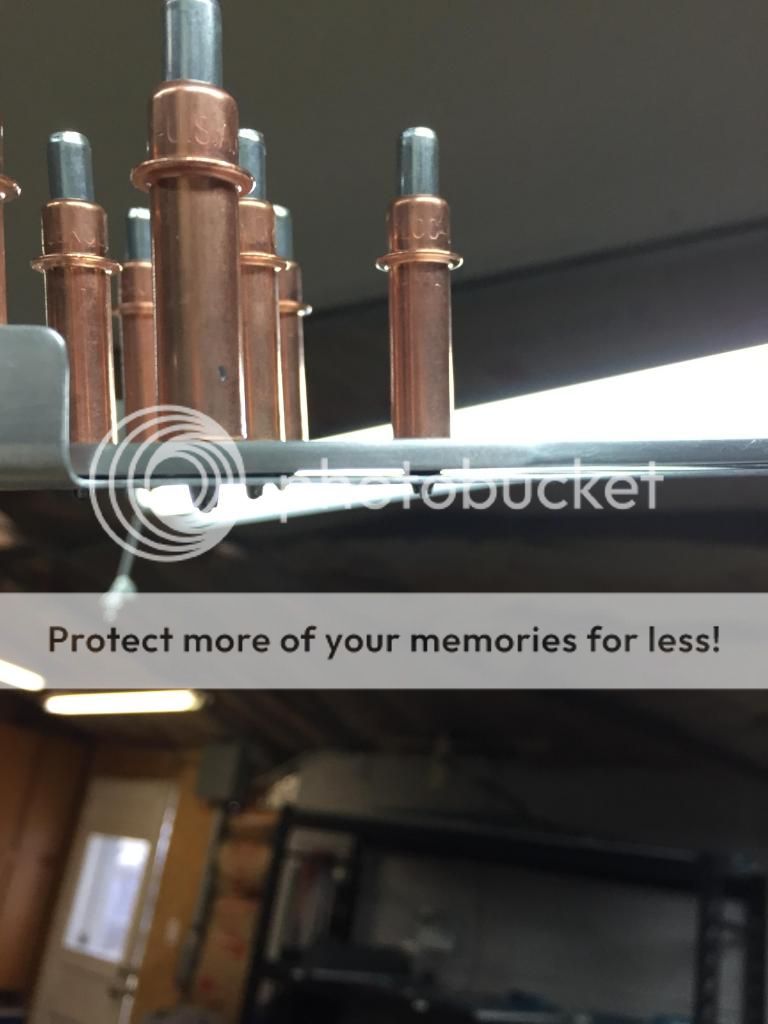
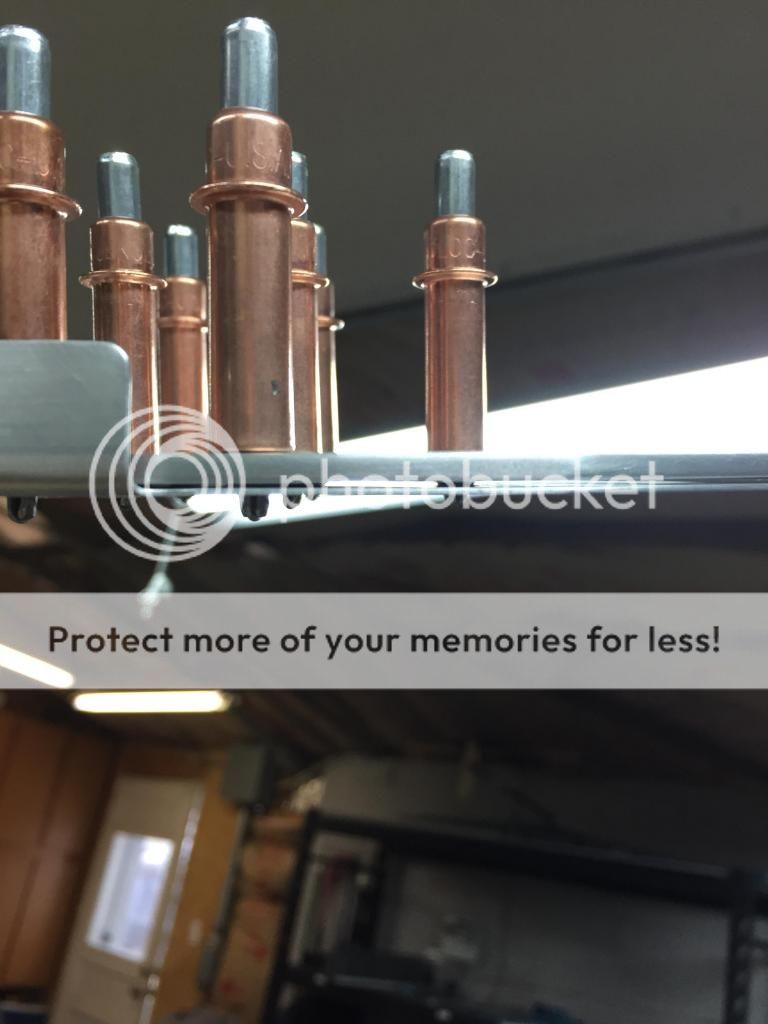
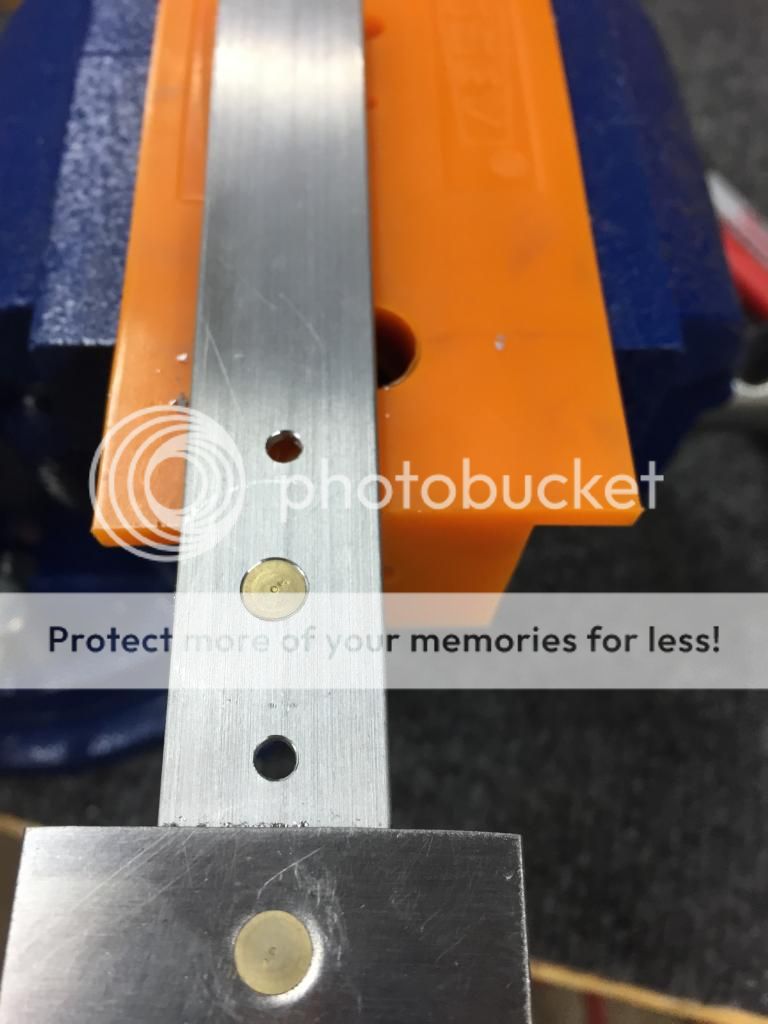
I have counter sunk the vs808 doubler as described in the plans.

This will receive the dimple from the rear spar.

The dimple was done on a DRDT2, its all been deburrred and looks really nice.

There are no burrs in the way

The countersink are about .007 or 7 clicks deeper then flush

When i mate the two pieces with clecos and and even try and clamp them when held up to a shop lite you can see atleast .010 of light coming through but like most im afraid to make the countersink to deep and continue on.

How important is it that it is perfectly flush. What have other 7 builders done?

The one other thing to note is in the picture the bottom cleco is seperated more because there is only one cleco in the bottom of the double. As im sure most of you know you drill the rest of the holes later on when you get to the fuse for the bottom hinge bracket. so i would say the douber is raised a few thousands less then what the bottom of the picture shows

Thanks in advance


IMG_2365_zps612cf80b.jpg


IMG_2366_zps76c54b7a.jpg
 
Last edited:
Just for good measure i did some further testing with this

These are the pictures from the tests

These two rivets pictured below are in the neighborhood of .010-.014 under flush

Using the same material and actually setting a rivet here are the results

The rivet on the end is roughly .010 under and still shows a fairly significant gap between the parts

The rivet inboard of the end is almost .014 under and is better but still shows a significant gap
The countersink is really starting to look enormous and even with actually setting the rivet i can't get the gap to close.

The separation between the two parts does actually create a moment on the rivet so I'm told from a friend. I know i can not be the first person with this issue.
Does anyone have some good advice on this

IMG_2368_zpsf83d3964.jpg


IMG_2373_zps35678915.jpg


IMG_2375_zpsec9e3207.jpg
 
Last edited:
Countersink just enough to get the parts to lay flat against each other. The .007 is a good rule of thumb to follow but doesn't always work out.
 
Countersink just enough to get the parts to lay flat against each other. The .007 is a good rule of thumb to follow but doesn't always work out.

Im more then twice .007 now and they are still not laying flush

i have double checked the dimpling, the deburring etc etc, there is nothing in the way of the part from laying down nicely. This being a completely structural piece I'm not in love with the idea on just keep countersinking until it sits flush
 
If it's the dimple preventing the parts from sitting flush there's nothing else you can do except to keep countersinking. You don't want any gap in those parts.

FWIW I don't even use the .007 value any more. I countersink just enough so that the parts sit flush, whatever that value may be.
 
A very slight gap is not going to cause a structural strength issue.

Countersinking enough to have no gap, but possibly being too much (there is no way to know), will cause a structural strength issue.
 
Thanks for the input

Im now .020 under flush which is starting to scare me

I can't possible fathom going deeper then that.
At .020 under There is still a gap of probably .002-.004 i would guess
 
Check the dimple size

Is it possible you used the wrong dimple die on the one that sits proud?
Take a piece of scrap and counter sink it deep enough to fit that one dimple. That will tell you how far you have to go to get it to sit flush.
 
First let me say you really stepped it up a few days back helping Don out. Good on you!
Now lets get to your countersink issue, and thanks for getting me back into my shop. So I just completed three test coupons, drilled # 40 holes countersunk so rivet was flush....couldnt catch edge with my nail and then went 7 clicks past that. Grabbed some 032. scrap, drilled holes, dimpled on my DRDT2 and riveted together. Zero gap! Nice tight fit.
I then went 13 clicks further to simulate what you are saying is still not deep enough and my test coupon could move laterally 3/16 of an inch.
One thing to look at is occassionally when you chuck your microstop into the drill, you install it too far and the cage bottoms out on the chuck when applying pressure. So you keep setting it deeper but the chuck prevents the cutter from going deeper.
The only other thing would be your dimple dies. I have the Avery spring back, not that I have used anything else just giving you a data point.
So start from scratch on some scrap.
1: Drill a #40 hole, drill a number of them.
2: Make sure your countersink cage has full travel and the set your holes so rivet is flush. Nail across edge.
3: Adj countersink cage 7 clicks, retighten and rivet those test holes with some 032. scrap. I have lots....hahah
4: Your parts should be tight together when final riveted.
5: Give all of the above a shot and maybe adj one or two additional clicks.
6: You might very well have a dimple die issue. Your picture of 014. looks exactly like my 007.

Good luck but practice on some scrap to get the depths set and then go to town on the real parts. Hope this helps.

Arnie
Huge hats off to you for ging to all that work. So far i have I have done several test pieces on some scrap. Good idea on the cage hitting the chuck. I wish it were that simple but it seems my cage is working just fine. Right now the spar is 7 clicks under and i have not touched it at all. Just been working scrap until i find a solution or figure out what im doing wrong.

I was all the way down at 20 clicks and still had no lateral movment. I was starting to wonder if something is wrong with my cage.....

Will continue to experiment and in a worse case call the mother ship tomorrow. I blew my whole day chasing my tail and making a mountain out of a mole hill with this so seeing as its 6:50 pm local i cant see me getting to prime tonight anyway.

Thanks again for all your hardwork and suggestions and will continue to post findings here in the hopes that my stupidity may help someone in the future
 
I am not an engineer but I would think you could get to a point in the countersink that the rivet is actually not holding enough metal in the countersink to consider it safe.

I think the response that the die's are off or not correct is probably the issue.
I could take .032 .025 metal and countersink both pieces of metal and I could squeeze it tight with my fingers. I used a DRT2 countersinker. there were areas that I had to use a machine countersink such as the spar and thicker metal. You need to get this resolved as all your wing building is dependent upon the skin laying flush with the ribs. If your holes are off a hair the dimples will not line up. On a lot of pieces you are better to match drill the pieces as it allows the holes to be in alignment.

check to see if the dimples are symmetrical and not lopsided. Or to state it another way make sure the die's are hitting flush. You should have a nice little ring around the dimple when it is right.

Doing the tanks Avery has a set of dies that are just for tanks to make allowance to proseal the rivets be a little deeper.

You will find an answer but I don't think going deeper with the countersink is the answer.

Jack
 
One more thing to check. Make sure your countersink cutter has a 100 degree
stamp on it. There are other sizes 82/120 degrees that are not common but just eliminate the possibility.
In addition check your dimple dies and they should be stamped #40 and not say tank dies.
Maybe a picture of your dies, male and female and #40 cutter and microstop.
Carry on:)

This is a very good point.
 
A very slight gap is not going to cause a structural strength issue.

Countersinking enough to have no gap, but possibly being too much (there is no way to know), will cause a structural strength issue.

I really believe this is the advice you should focus on. Countersinking for skin dimples was a frustrating learning curve for me and I believe a common error is for folks to believe that there has to be absolutely NO space between pieces while clecoed.

I see many posts about this and enjoy helping with this if able. I'm currently CSing my tank attach brackets, so I took a few pics for your comparison.

This first one shows a similar gap to yours, however, as you probably found out, the camera really exaggerates some of this stuff:
IMG_1787.jpg


This one shows the same test piece from another angle. As you can see it sits nicely against the underlying piece:
IMG_1784.jpg


This pic shows a rivet in the CS so you can gage the depth. I forgot to count clicks past flush - sorry. I don't count as every situation is slightly different and counting just tends to distract me from the work at hand. I eyeball the cage for flush (only eyeball for 3/32) and sneak up on the right depth using an appropriate test dimple. The scuffs are proseal prep;)
IMG_1792.jpg


Finally, the finished bracket clecoed to the tank skin with a nice fit:
IMG_1797.jpg


It is pretty clear when you don't CS enough - your test piece will sort of rock in the CS and you can feel the sheet flexing around the CS. You may have seen rivet lines that were not CS sufficiently - the skin around each rivet is slightly raised like a little mound. Too much, as a previous poster mentioned, and you get the lateral sliding movement of the pieces. Just right and the pieces sit flush (by feel) without sliding in the CSs. But - and this is the big but :D - you will not eliminate absolutely every ounce of space between when clecoed.
 
Last edited:
I really believe this is the advice you should focus on. Countersinking for skin dimples was a frustrating learning curve for me and I believe a common error is for folks to believe that there has to be absolutely NO space between pieces while clecoed.

I see many posts about this and enjoy helping with this if able. I'm currently CSing my tank attach brackets, so I took a few pics for your comparison.

This first one shows a similar gap to yours, however, as you probably found out, the camera really exaggerates some of this stuff:
IMG_1787.jpg


This one shows the same test piece from another angle. As you can see it sits nicely against the underlying piece:
IMG_1784.jpg


This pic shows a rivet in the CS so you can gage the depth. I forgot to count clicks past flush - sorry. I don't count as every situation is slightly different and counting just tends to distract me from the work at hand. I eyeball the cage for flush (only eyeball for 3/32) and sneak up on the right depth using an appropriate test dimple. The scuffs are proseal prep;)
IMG_1792.jpg


Finally, the finished bracket clecoed to the tank skin with a nice fit:
IMG_1797.jpg


It is pretty clear when you don't CS enough - your test piece will sort of rock in the CS and you can feel the sheet flexing around the CS. You may have seen rivet lines that were not CS sufficiently - the skin around each rivet is slightly raised like a little mound. Too much, as a previous poster mentioned, and you get the lateral sliding movement of the pieces. Just right and the pieces sit flush (by feel) without sliding in the CSs. But - and this is the big but :D - you will not eliminate absolutely every ounce of space between when clecoed.

Thanks Jon!
Whats that saying? Pictures worth a thousand words
 
ET phone home

Well i did decide to call the mother ship today just for my own sanity.
Spoke to Sterling

There opinion was a little less informative then i would of liked but none the less answered the question

There direct answer was
Counter sink .007 under flush, rivet it, forget about it.

They said that some gap was considered acceptable. I did ask explicitly what the maximum allowable gap between the parts was for my own future knowledge and he did decline to answer. Probably because he did not know and then went on to tell me that no one has ever asked that before. Which is fine i suppose, its not exactly a common question.

So the question was semi answered by Sterling stating exactly what was in section 5. .007 under and forget about it which is good enough for me i guess.

I would like to know what they would consider to much of gap for my own curiosity but none the less the question was answered.

.007 under flush, rivet it, forget about it.

Yet another classic example of a NoooooB making a mountain of a mole hill i suppose. Hopefully this thread may help another new guy in the future struggling to make a swiss watch out of pickup truck.
Thanks to everyone for their input
 
Take one of your .007 deep test coupons and actually rivet it.

I bet the gap lessens or is eliminated when the rivet gun put those blows on the work...:)
 
They said that some gap was considered acceptable. I did ask explicitly what the maximum allowable gap between the parts was for my own future knowledge and he did decline to answer. Probably because he did not know and then went on to tell me that no one has ever asked that before.

I would like to know what they would consider to much of gap for my own curiosity but none the less the question was answered.

From the document linked below:

"Sheet separation after riveting which allows a 0.002 inch feeler gage to be inserted between sheets from any direction far enough to touch rivet shank (see Figures 1G and 1H)."

https://www.vansaircraft.com/public/Specs.htm
 
I took a look at your second batch of pictures where you were doing test samples. One of those pictures showed the head of a rivet in a dimple. To me that dimple does not look very crisp.
This spar material is fairly thick, 0.040?. Is it possible that your dimpler is not giving the kind of dimple that is required in this situation?

Can you try a piece on a C frame, or even try to dimple some pieces by hand with a hammer and set?
 
Take one of your .007 deep test coupons and actually rivet it.

I bet the gap lessens or is eliminated when the rivet gun put those blows on the work...:)

I fussed with this very thing for a few hours. Countersinking on scrap and needing to go way too deep in order for clecoed or clamped parts to lay perfectly flat. Just wasn't working for me. UNTIL I took one of my rows of holes that were countersunk 7 clicks past flush and actually pounded some rivets. And that was what finally made the gap shrink to pretty much nothing.

I'm hardly experienced enough to provide advice, but I'd bet Gil has "hit the rivet on the head"...:)

Al
 
Last edited:
I took a look at your second batch of pictures where you were doing test samples. One of those pictures showed the head of a rivet in a dimple. To me that dimple does not look very crisp.
This spar material is fairly thick, 0.040?. Is it possible that your dimpler is not giving the kind of dimple that is required in this situation?

Can you try a piece on a C frame, or even try to dimple some pieces by hand with a hammer and set?

If the backside of the sheet dimple has edges that are too rounded, it won't sit well in the sharp-edged countersink.

That was part of the reason I suggested actually riveting your test coupons. The metal will deform/stretch somewhat during the riveting process.
 
Thank you everyone for all the suggestions.
I just primed all my parts finally. We will see what happens
The idea of a C frame over a DRDT2 is an interesting one. That could be possibly contributing to part of the issue.
According to vans like i said above, some gap is acceptable and just to CS .007 under and forget about it. Im going to let the primer set up a few days and then go to town and see how the gap closes up on the actual parts


If the backside of the sheet dimple has edges that are too rounded, it won't sit well in the sharp-edged countersink.

That was part of the reason I suggested actually riveting your test coupons. The metal will deform/stretch somewhat during the riveting process.

@az_gila
Thank you i appreciate everyones suggestions. I did see both your posts that instructed to rivet the coupon practice parts together.
If you will look at page 1 and 2 you will see 6 or 7 pictures of riveted practice coupons. I had done that long ago and posted pictures up.
Thanks for the idea though. It was an important step in the test process to actually rivet them.
I would be very interested in doing this testing with a C farm and a DRDT2
It would be cool to compare the results of the 2 dimples and see which produced a better result for this particular process of a CS receiving a dimple. Although i must say, i love my DRDT2 and i have used a C frame before.

Ill let you guys know how it rivets up here in the next few days probably on friday and will see if I'm screwed or not :D

Mack Truck not swiss watch. Gota keep telling myself that.
Its the engineer coming out of me
 
Back
Top