What's new
Van's Air Force

Don't miss anything! Register now for full access to the definitive RV support community.

Canopy Interior Fiberglass Prep Work

CharlieWaffles

Well Known Member
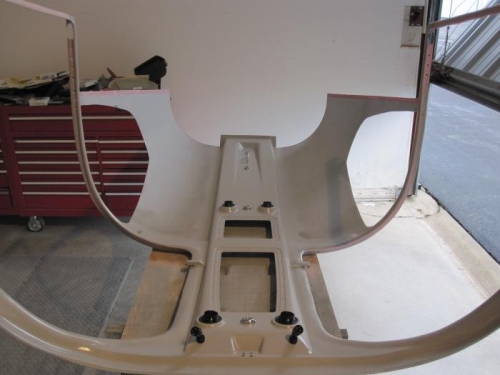
I am just about to be ready to prep my canopy for painting and the Aerosport Overhead console. I've done a lot of reading and research and there is some good fiberglass information but a lot of it pertains to fairings or making your own parts.

So what I am wondering is, what have other people done to prep their interior canopy? From what I can tell, here is what I need to do:

1) Corse sanding with 80 grit to knock down large bumps and shape general contour. This will be done WITHOUT a rubber block

2) Dust and wash surface

3) Epoxy and squeegee for warts, low areas and pinholes

4) Sand with rubber block and repeat epoxy as needed

5) Shoot with high build primer and sand to ensure all areas are smooth

6) Paint

Any comments or recommendations? Vans builder manual says to thin the epoxy when doing this, but everwhere else I've read doesnt mention thining it.
 
Sounds right. You may want to attack with a DA disc on the really lumpy areas. Saves on raw fingers. Probably have to use some filler too.
 
I'm using a power finger sander (a 1/2" wide belt) for the initial contouring. I assume the filler you are referring to is microballon type for the low areas?

Recommendations for sandpaper grit post epoxy layer?

What high build filler would anyone recommend?
 
You won't go wrong with micro. Even Bondo would be okay inside since its out of the weather. Post epoxy I'd try a 180 open cut and finish to like 220 before primer. If you do that and a nice smooth job to start, you will be able to minimize the primer thickness. If you're painting instead of upholstering that can minimize cracking later. Don't know what your planning up top, but if you PM me I can give you some ideas about window surrounds, antennas, etc.
 
I think that's got to be quite a bit easier. I guess then you only need to do good on the Knobby area aft of the doors and all the doorposts. I upholstered mine along with the console, so I really cheated. All I had to do was get smooth.
 
I installed the same console. I used a DA sander to do most of the rough sanding. It takes a long while to get it close before you can fit the overhead in. I used epoxy mixed with flox to "glue" the overhead on. I then used fairing filler/micor balloons to fill the front portion of the overhead intersection with the door. The area where the headliner comes against the console I did not use any filler since it is hidden. If you are using the Mcmaster Carr trim, now is also a good time to get the edges built up to accept the trim and to add reinforcement on the sides of the door pillars to take care of the material you removed for the seal. I used 6 0z cloth, seems about 4 layers, the followed with flox. I posted some photos of the process below. Yes, it's safe to sand them down.

IMG_1402.jpg


IMG_1409.jpg


IMG_1410.jpg


IMG_1412.jpg


IMG_1416.jpg


IMG_1459.jpg
 
Last edited:
Bill's nice work looks like what your going for. Especially up front there. I made my console detachable (I've got 4 antennas and some other wiring stashed up there).
 
Bill, I plan to use the Mcmaster seals. What did you use to determine how much to cut on the door opening? Just remove all the curve?
 
Bill, I plan to use the Mcmaster seals. What did you use to determine how much to cut on the door opening? Just remove all the curve?

If you sort through Ivan's Kristensen's phanfare phot site, he's got a great video in which he shows a ruler around the various parts of the rain gutter. You'll probably will take off more than you initial think, or at least that was the case for me.

If you don't already have them, get Sean's (planearound.com) replacement mounts for the struts. You'll want to mount these before you adhere Geoff's overhead panel to the cabin cover. It will make your life much easier with the McMaster seals.

I used a filler with fiberglass fibers to transition from the overhead to the cabin cover. It is much stronger than micro. In retrospect, I'm not sure it's better. It was significantly more difficult to sand smooth. I like using UCB auto body icing. It's easier to work with than micro in my opinion. But either will work.

As far as the overhead itself goes, I just used some Loehle Wonder-Fil. A little goes a very long way, especially since the pin holes aren't that bad on the carbon.

I wouldn't recommend the belt sander on the overhead. I did use mine quite a bit to sand down the gutter for the seals. You can use a DA on the larger areas, but there aren't many of those around the overhead. I ended up, or I should say, my wife ended up using sandpaper and a dense foam sponge to do most of the sanding around the door frame and overhead.

FP23052011A0001Q.jpg

I have more photos and details on mykitlog site. You'll notice that I didn't do anything with the rear of the overhead. Since I'm putting in Geoff's headliner, there is no use to finish that edge all the way to the back.

bob
 
I tried searching Ivan's site, but could not find the photos Bob was referring to. I know they are there, but did not see them right away. You will need approx. .5 to .75" of flat area for the seal to install over. All of the curve needs to be removed. Use multiple layers of 6 oz. cloth on the opposite side to reinforce the door frame since you remove the material from the other side. You can purchase these in precut strips from west marine. After the you get close, then fit the doors in place. You will need them there to finalize the depth of the door frame and also the thickness. The seal does not need to be completely flattened when the door is shut. I suggest you purchase the center door latch from Planearound.com. Sean's latch is great for this seal. I actually was able to install the latch prior to closing the doors halves. I posted below the only photo that I took regarding the door edge and also the door seal installed. If you want to discuss, call me 314 605 7744. I also used the PPG JH202 high build primer then followed with a PPG DP epoxy sealer, then the color. Install the console after you get the doors and seals fit. Like Bob said, make sure you have the hinges installed and use Seans hinges, they will not require a spacer like I have shown in my photo.

IMG_1393.jpg


IMG_1394.jpg


IMG_1396.jpg
 
Install the console after you get the doors and seals fit. Like Bob said, make sure you have the hinges installed and use Seans hinges, they will not require a spacer like I have shown in my photo.

So does that mean you would recommend not installing and painting the canopy until after the door stage?
 
That's what I'm doing.

Finish the doors and hinging them. Then fit the doors with the seals. Once everything has been fitted with the seals to the cabin top, remove them, finish the cabin top, install the vertical bar, install the overhead console, finish again, then paint.

That way you aren't disturbing a painted surface.

Phil

As Phil mentioned, cleco the cabin cover to the fuselage and install the bolts in the door openings to secure the cabin cover from moving.

Then fit your doors. You are going to make a mess with triming for the doors and seals. If the interior isn't finished, you can't screw it up.

Once your doors are fit (with all the appropriate latches), then disassemble and take the cabon cover off. With the cabin cover off and upside down on a work bench, then you can easily work on the overhead installation. It's a whole lot easier doing it this way.

I highly recommend both Sean's center door latch and hinge for the gas strut. Also check out the height of your hinges. Most folks find that they need to take off about 1/6" or so to not have them sit proud of the cabin top. Ivan also shows some photos of using a router to lower the hinge area a bit.

Once you have the interior side finished to your liking, put it back on the fuselage.

For those looking for Ivan's dimensions, if you look at his door section, on the second or third page of his photos, there is a video there in which he walks around with a ruler. It's fairly hidden and you have to look close to find it. I was include a link, but that site is filtered here at work. I'm sure it's listed on VAF too if you do a search. This subject seems to come up quarterly.
 
What Bob said! Paint last, after everything fits perfect, seals, doors, trim, overhead, trim front glass, trim the side glass. The cabin cover makes a real mess of everything everywhere.
Bill
 
Are you sanding the door posts by hand for the contour? A lot of things I read said not touse hands, but rubber blocks. Just not sure how to get a stiff block around that door shape.
 
Are you sanding the door posts by hand for the contour? A lot of things I read said not touse hands, but rubber blocks. Just not sure how to get a stiff block around that door shape.

You can't use a hard block on the doors. You need a sanding sponge or something extremely flexible. My wife used a sanding sponge, but used a piece of sandpaper underneath the sponge (in other words, she didn't using the built in grit of the sponge to do the sanding). She also used a plain piece of sandpaper. If you use the paper on the posts like you were sanding your shoes, it works just fine. What you want to avoid is situations in which you apply various pressure with your fingertips.

I don't know about yours, but my posts were in pretty bad shape. It took quite a bit of filler and sanding to get them mirror smooth.

bob
 
I used the DA just about everywhere. I also used rotory drums of various sizes. The good thing about the glass work is you can fix just about anything you screw up, so don't be afraid to try something new. I was amazed at how much I had to remove just to get the cover to fit the fuse! Keep a good stock of expoxy resin and both fast and slow cure activators, along with various types of glass cloth, and multiple diferent filler additives. There are structural additives such as flox and fiber strands, adhesive additives, and fairing (fine sanding) addititives. Don't be afraid to add additional layers on the outside of the door frames to reiforce where you have removed material from the inside. It seems like it took me around 6 weeks of full time work to complete this section including the doors. It is by far the most challenging part of the build in my opionion, and I have a background of composite construction and bodywork from my younger years.
Bill
 
You will need approx. .5 to .75" of flat area for the seal to install over. All of the curve needs to be removed. Use multiple layers of 6 oz. cloth on the opposite side to reinforce the door frame since you remove the material from the other side.

Are you referring to adding glass reinforcement on the inside of the door posts that cover the remaining lip in the door opening? Is the intent to get a specific thickness of the lip for the seal to attach to?
 
What Bob said! Paint last, after everything fits perfect, seals, doors, trim, overhead, trim front glass, trim the side glass. The cabin cover makes a real mess of everything everywhere.
Bill

With that said...paint with the cabin top on the fuselage or upside down on the bench?

Thx,

Jim
 
With that said...paint with the cabin top on the fuselage or upside down on the bench?

No question, upside down on the bench. Then you only need to touch up where you apply filler to join to the fuselage.

Now if you enjoy working as a contortionist in small space paint on the fuselage. Actually, my concern was more for overspray issues on the rest of the interior.

bob
 
First and foremost, do all of this on the bench, not it the fuse. After you are satisfied it fits perfect, then just temporarily bolt it in when you need to make a measurement. The final door fit needs to be done on the fuse.

The door seal needs a straight lip that protrudes 90 deg. from the door frame. The current lip is rounded/cupped to accomodate the seal which Vans provides, which is a circular tube seal. It also acts as a drip rail. that curve/drip rail needs to be completely removed and a new lip which is straight and 90 degrees and parallel to the DOOR inside surface. For the seal to fit properly it needs to protrude into the door frame to contact the door all the way around about 1/2" inside the actual door itself. For this to happen you will need the door frame lip to protrude out from the frame around 3/4". It will vary depending on how you fit the door and where in the door you measure. I will post some close ups today when I get in the shop.
Bill

seal.jpg
 
Last edited:
Thanks Bill. I looked on Ivan's site and it appears the remaining lip, once cut to about 1" - 3/4" inch is also sanded thinner (thickness wise, not size from frame to opening) in some parts. Is that correct for what I am seeing? I assume this is to allow the door to sit more closely to the opening. Is this where the extra fiber material is being added in the inside?

It's actually starting to make sense.
 
The seal can be ordered in different thicknesses. Some have gone with 3/16" and others with 1/4". I decided to go with the thicker version and added 3-4 layers of cloth on the inside of the cabin. Then I used a filler to blend into the the cabin cover frame. The thought was that the added glass would help compensate a little for the gutter being removed from a strengh perspective.
 
No, but when you cut off the gutter, you'll find that the thickness may vary. Additionally, depending on the size of the seal you order, you may want to build the thickness back up to about 1/4".

I don't recall any sanding on the exterior of the gutter once it was cut off, if that is the question you are asking.

bob
 
Perfect. I dont have my doors yet, but at least I know I can cut the lip off and leave it about 3/4" or so (or as shown on ivans site - he has a larger size on the top area) and test it with the seal until the door comes and beef it up as needed.

How many feet of seal do you figure you used to do both doors?
 
Doors

Just for reference I initially tried a 1/4 inch lip and 3/16 inch gap for the 3/8 bulb to squeeze into. After trying the door and planearound latch I though I was going to pull the door apart. I then took off 1/16 of the lip so it was now 3/16 inch thick and the gap was 1/4 inch. This worked a lot better. I changed out the seal to the 3/16 lip and it is very nice and tight without bending the door. Robin Marks gave me some really good input on the tool to use so I added a picture of what I used to get a consistent reveal around the opening.
2502joi.jpg
 
I used the A411. What Sean is saying is that you can not expect to compress the bulb much more that 1/4 Dia. There is just too much pressure on the door. I did not try the smaller bulb seal. I was able to get the larger one to work.
One additional note. You will need to fabricate hinge plates to cover the hinge cutouts in the door. The seal will run right over the top on that area and needs something to seal on. You can use a piece of the glass left over from the window cut out, glue it in with epoxy and micro balloons, then lay another layer over that and sand smooth.
IMG_1324.jpg
 
So did you have to thin/sand the exterior of the frame? Here is the picture from Ivan's site. you can see the edge appears to be filed down on the outside, but not sure if this is a fitment issue, or just from the cutting of the lip.

http://ivankristensen.phanfare.com/2292606_3334806#imageID=55424021

I believe this picture is of the door, not the cabin top frame. Is that the window hold on the right side?

The directions tell us to file that edge to a 45* angle so that it'll match with the 45* angle filed into the cabin top frame.

-Jim
 
The photo is of the door frame. Charlie, what I recommend is: Trim the door as called out in the manual along the trim lines. Fit the cabin cover on to the fuselage. Build the doors and get them fit on to the fuselage, then think about the seals. The door seals will make a lot more sense when all the pieces are in front of you. You are not saving any time trying to trim the door in advance of the above. Just my 2 cents.....
Bill
 
That's right charlie. The 3/16 lip is plenty strong but 1/4 is stronger. Just make sure you have at least 1/4" gap between the inner door skin and the cabin lip. I have been told this setup is noticeably a lot quieter than the Vans setup. Mostly because of the hinge covers Bill is mentioning. It takes quite a bit of time but definitely worth it.
 
Back
Top