What's new
Van's Air Force

Don't miss anything! Register now for full access to the definitive RV support community.

Rookie Question: Type/Size of Rivet for VS Hinge Assembly

Hi,

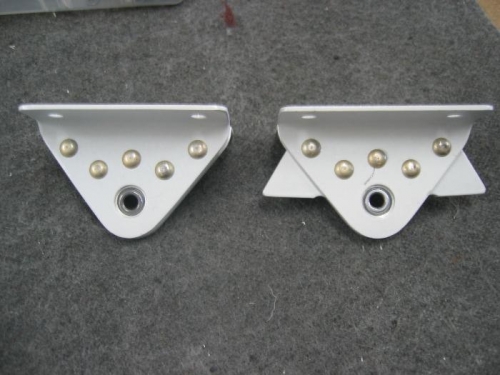
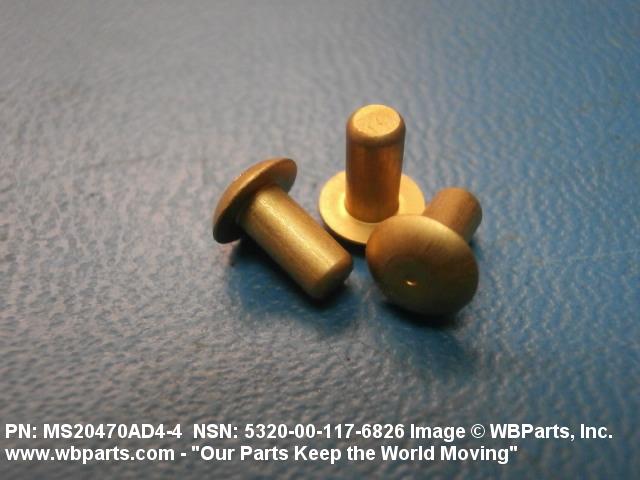
I'm a new builder with a stupid question... What size and type of rivet should I use for the vertical stabilizer upper and lower hinge assemblies?

More importantly, how do I figure this out from the plans?

This is the very first assembly in the empenage kit and I'm already stuck. This could be a long 900 hrs!

Thanks in advance,
Harry
 
All hardware is called out in the plans. Read section 5 of the plans to understand terminology. Rivets are called out in the plans by the rivet ID such as "LP-4-3 12 places" and usually has an arrow pointing to the area being referenced. Reading section 5 is very important along with the other book that came with the kit. I think it's called aircraft hardware and construction or something similar. It's a paperback book.
 
This could be 900 hrs off fun! (probably more and not always ;-) )

Page 06-02 figure 3 calls for AN470AD4-7 rivets

Read chapter 5, some airplane construction books or try to find help for the first steps. Enjoy it!

Btw I messed up two hinge sets and a vertical stab spar on the first day ;-)

Rivets explanation


MS20470AD4-4_5320-00-117-6826_316557.jpg
 
Last edited:
Might be worth assembling the Vans toolbox or practice kit before tackling the real thing. It's a good way to learn how to read the plans, prep parts, set rivets etc.
 
Might be worth assembling the Vans toolbox or practice kit before tackling the real thing. It's a good way to learn how to read the plans, prep parts, set rivets etc.

Very good advice, this.

Parts that you plan to install on your airplane should not be used for learning a process. Doing so induces a high probability of a lot of replacement parts being purchased.

In simple terms, if you pick up a tool to do a process that you have not done previously (and become somewhat skilled at doing it), you should be doing that process on something else first for practice.

I also echo reading Chapter 5.... multiple times. Particularly the first 10 pages with the point you are at in your build.
If after reading through it a few times and doing a bit of practicing on something other than your kit parts, you aren't clear about something, ask questions.
 
Harry,

Check out my previous Post, "Improvements to the Avery Rivet Squeezer".

This may help with setting the solid rivets.

Feel free to stop by my Hanger in Livermore and see my project.

See PM for contact information.

Joe
 
Harry,

Sounds like you are getting some good offers for hands-on help. I encourage you to hook up with these guys and any other experienced builders you can find in your area (EAA chapter maybe) and accept some mentoring. And take the suggestion to do some practicing on scrap, or build the toolbox project. This applies not only to riveting, but to each new skill you will need to learn. You will be amazed at how each task that looks insurmountable will become routine as you progress in learning and practicing your newfound skills.

John
 
My thanks to everyone for their insights and info! I managed to finish the two hinge assemblies. First, I went to sec 5 and did the calculation for rivet size. Just as I finished, a builder happened by and showed me where the rivet size was in the schematic all along. Then I took about an hour to figure out how to put together and use the Avery rivet squeezer. And with that I finished!

Thanks again, everyone!

Good work and thanks for reporting back. The information is usually on the plans. It's just hard to see the forest for the trees sometimes. It gets easier though.

Jim
 
You will learn fairly quickly as you work through the early stages, but make sure you read and understand each step before you even pick up a riveter or deburr a part for the next task. It will save you money and time and result in a better quality build. One day you and other people are going to fly this pile of parts, so make sure it gets done right. It gets easier as you progress, but the worst item to practice on is the next part in the kit.
 
Back
Top