-POSTING RULES

-Advertise in here!
-
Today's Posts
|
Insert Pics
Keep VAF
Going
Donate methods

Point your
camera app here
to donate fast.
|

01-21-2022, 10:06 PM
|
|
|
Join Date: Mar 2005
Location: Redmond, WA
Posts: 279
|
|
Quote:
Originally Posted by jcirelli
That's a great idea, Brandon! Would you be willing to share the file?
|
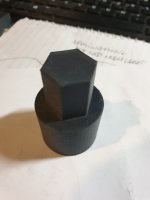
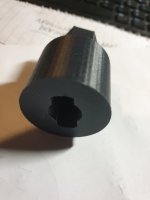
Happy to share the files. Let me play around with the different sizes first to make sure they’re accurate though. I haven’t had a chance to actually rivet with them yet. I’ll do that tomorrow and see what the verdict is.
I know most of the time these won’t be necessary to use because the timing method is plenty for riveting. Where I have struggled is in locations where it’s blind and you can’t get the same “standard” pressure on the bar, so the normal 3 seconds (or whatever it is for you) of the gun doesn’t equal the same shop head. That’s where I think having a backstop for the bar may come in handy for newbies like myself.
__________________
Brandon
RV-9A: Wings
Last edited by skelrad : 01-21-2022 at 10:12 PM.
|

01-22-2022, 06:57 AM
|
 |
|
|
Join Date: Aug 2006
Location: Aachen, Germany
Posts: 97
|
|
love the idea, that's an awesome use for 3d-printing
@skelrad:
Did you put a lip on the inside in order to define the height of the shop-head of the rivet?
That's one thing I'd be concerned about because once the bucking bar bottoms out on the lip the rivit gun might proceed to denting the skin because of lack of rivet-bar backpressure.
That said, I'd still like to see a test on some scrap, if the "lip" is close enough to the rivet it might actually work.
__________________
Mario from Aachen, Germany
RV-7, emp. done, wings close to being ready for inspection, canoe flipped and parts of the finish kit in just about every room of the house
2022 contribution sent - thanks for this awesome space DR
|

01-22-2022, 07:27 AM
|
|
|
Join Date: Feb 2021
Location: Louisville
Posts: 55
|
|
Great idea. Take my money.  Thanks in advance for the files. First time builder here so anything to help move things along is welcomed.
PD
__________________
PlaneDork
KLOU-RV14A N721PK
Dues Proudly Paid
|

01-22-2022, 09:16 AM
|
|
|
Join Date: Mar 2005
Location: Redmond, WA
Posts: 279
|
|
Quote:
Originally Posted by derLuigi
love the idea, that's an awesome use for 3d-printing
@skelrad:
Did you put a lip on the inside in order to define the height of the shop-head of the rivet?
That's one thing I'd be concerned about because once the bucking bar bottoms out on the lip the rivit gun might proceed to denting the skin because of lack of rivet-bar backpressure.
That said, I'd still like to see a test on some scrap, if the "lip" is close enough to the rivet it might actually work.
|
Yeah, I've thought about that and don't know the answer yet until I try it out. The "lip" is actually the entire bottom of the holder that the bar sets on. My intention was to have the bar and holder move as one, versus having the holder set on the surface of the material and then have the bucking bar slide down and stop as the rivet is formed. I don't have a huge problem with keeping things vertical, so I wasn't wanting a way to guide the bar down vertically, only wanting a gauge to help rivet head size.
I'll post back with the outcome.
__________________
Brandon
RV-9A: Wings
|

01-22-2022, 10:25 AM
|
|
|
Join Date: Mar 2005
Location: Redmond, WA
Posts: 279
|
|
Gave it a shot
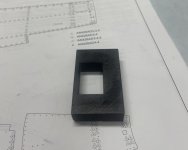
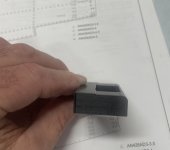
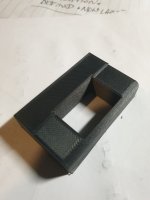
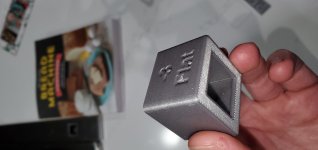
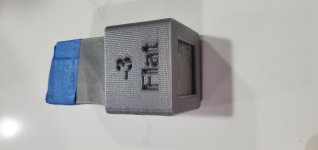
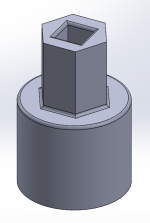
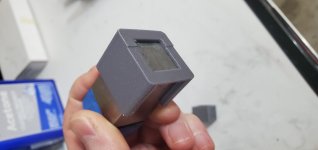
I ran out to the garage to drive a few rivets in scrap. Overall, the gauges, or whatever they are, worked pretty well. As with anything, there are some gotchas though. The ones for driving shop heads on flat surfaces (no dimple) are pretty dummy proof - the gauge/bar starts off at rivet shank height above the surface of the material and riveting goes normally, and then the sound of the riveting changes slightly once the gauge and bar hit the surface material, meaning the proper height of the rivet head has been reached. I honestly don't know how useful these really are for this type of material, since I have found that the areas without dimples have pretty decent access for riveting and aren't that problematic. I mostly wanted a guide for the -4 rivets on the wing spars, not because I couldn't see well, but because it would lower my blood pressure over worry of accidentally dinging the spar with the bucking bar. After trying it out on scrap, I think it will do that, so I'll give it a try on spar #2 when I am ready to build the second wing. For about $0.20 of plastic, why not?
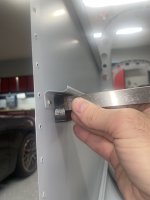
For the dimpled material, there are some considerations because of the fact it's always on thinner material, mostly skins. Again, the gauge actually worked pretty well on the scrap and gave consistent and reliable rivet head sizes without having to do any guesswork. That being said, just like with any other riveting, you can't keep pounding on the skin after the rivet is set. Once the rivet is set, now the surface area that is resting on the shop head side is the bar plus the square of the gauge plastic. If you keep hitting it with the rivet gun, you will inevitably start to create a nice square of deformed skin as the rivet set hits the perimeter of the gauge. This part I expected, but I didn't actually see any problems until I purposefully kept pounding on the rivet with pressure on the bar/gauge after the rivet was formed. If you don't pay attention, you could definitely cause some skin deformation though, just like with any riveting. I think this concern can actually be designed out though. I'm going to mock up a rib gauge that doesn't actually have an offset for the height of the rib flange. Instead, I'll make the platform of the gauge that would rest on the rib flange a little wider, like the OP did. As long as you use the rib web as a guide for the bar and don't angle it way down towards the skin, I don't see any reason why any part of the gauge needs to rest on the skin. Without that portion, the likelihood of causing any skin deformation from the rivet gun pounding on the gauge is significantly limited (I don't see it being a problem on the rib flange portion - that's more material thickness, so you'd really have to go nuts with the gun to outline the gauge square on the skin side).
One other thing I noticed was a "well duh" design flaw in the -3 gauge used for ribs. The measurements are pretty spot on in terms of shop head height and offset for the rib flange material, but I need to make the width of the gauge material on the rib web side smaller. As-is, it doesn't have enough room to slide over the rivet shank because it hits the rib web. I'll probably do a complete design change anyway though, so probably won't bother fixing this one. I also found that for whatever reason, even though the dimensions are the same for the dimple gauge, it fits too snuggly on my bar and is hard to remove it. Chalk that up to the accuracy of melting plastic and expecting size tolerances down to hundredths/thousandths of an inch.
__________________
Brandon
RV-9A: Wings
|

01-22-2022, 02:36 PM
|
 |
|
|
Join Date: Nov 2015
Location: Las Vegas NV
Posts: 355
|
|
Any Moderators out there, why not a 3D Tools and a 3D parts STL section.
__________________
Pete
RV14A Tail kit 95%
Wing kit 95%
Fuselage QB stuck in China virus corrosion purgatory
RV 14 WIKI in Drop Box
https://www.dropbox.com/sh/xu5p6f4l7...bU0ck0pJa?dl=0
---For Edit Access drop me a PM with your Email address.
EAA 1300
Donation Paid 18,19,20,21 Military exempt
|
Thread Tools |
Search this Thread |
|
|
Display Modes |
Linear Mode
|
Posting Rules
|
You may not post new threads
You may not post replies
You may not post attachments
You may not edit your posts
HTML code is Off
|
|
|
All times are GMT -6. The time now is 12:03 AM.
|