What's new
Van's Air Force

Don't miss anything! Register now for full access to the definitive RV support community.

RV-10 Nose Gear problem

Yup

I now have over 1000 hours on my RV-10, most of it flying off of a grass runway. It is a remarkable airplane and has proven to be EXTREMELY reliable, safe and trouble free. We routinely fly it between Portland and Sunriver Oregon across the Cascades with 4 people and two dogs. We will leave Sunriver (4163' Elev) in the afternoon at 90F at gross weight and it will still climb at over 800 Ft/min. About a month ago we landed following a Citation X at Sunriver and I swear we had more baggage + dogs in the plane.

I have a friend that owns a Cirrus G3 Turbo that I frequently pick up when he drops it off for service. He routinely spends more money on a single service visit than I have spent on total maintenance in the 1000 hours.


Rob Hickman
N402RH RV-10

Rob, those are remarkable stories. Of course, at only 600 hrs I haven't had as many stories (and I don't know anybody with a CJ or G3 Cirrus ;) ), but I've flown it enough to know that the RV-10 is indeed incredibly reliable, safe, and trouble free. And did I mention really fun to fly? Or that it's fun to watch the eyebrows go up on the guys with certificated airplanes when you tell them about the RV-10 performance? Or EVEN BETTER YET, when I show them what my AFS instrument panel can do? I better not, or pretty soon everybody will want one :)
 
Last edited:
I don't know what the exact percentage of grass vs hard surface time the company -10 has, but it has certainly operated off of Mike Seager's grass strip at Vernonia many hours, and with transition STUDENTS! That has got to put some stress on it above normal. I know that JackM really punished it during his training with Mike:D

This Bryan continues to bash me so it feel it is time to stand up for myself:) During training, Mike S was very direct about aft stick during taxi, T/O and landing to remove weight from nose wheel and keep it off the ground as long as able. Mike told me if I want to fail transition training and come back a second time, disregard his advise...I found out later Bryan did two shots of training so we all know why now:)
I can almost guarantee two things..
1. You will have a very hard time finding a RV10 owner that is NOT absolutely in love with his aircraft and Vans engineering.
2. Cirrus engineers look at the RV10 and are silently humbled by Vans clever engineering and the performance specs.
Our aircraft only has 175 hrs but shows no sign of wear. My thought is if we fly it like we are trained, the nose wheel spends very little time under the extreme stress load it was designed for. Obviously there has been some isolated failures for whatever reason and I feel for the guys like Vic that need to correct the problem. I have confidence Vans will come up with a SB that will solve future failures. No need for redesign.
 
HI Vic,

I'm sure glad you are out there checking this stuff!! I will gladly comply with the SB now that you have brought this to our attention

Good Job Vic!!

To all readers go check out Vic's website--WWW.Baselegaviation.com

Ted Chipps

RV-10 N498EC
 
Quick update

I finally got my RV-10 back together last night. This was a major job, really a complete re-engine job for the airplane, as the engine mount had to come off of the airplane. In order to do that, everything had to be disconnected from the engine. I think all told it was about a 40 hour job.
I did take the time to fabricate new oil line hoses and replaced the engine mounts (Lord). Fiver years and 750 hours are on the aircraft now. The new ones came with silicone-filled centers instead of the metal inserts. Same part number as I ordered last time, so don't know why. J-3804-28. But I was amazed at how noticeably smoother the engine is, and I was very pleased with it before. So at least I got some reward out of the work. :)
Van's will be putting out a service bulletin with both a proactive measure and a fix for those who have the cracks. For those who do not have the cracks, I would encourage you to comply with the service bulletin proactive steps, due to the amount of work required if cracks are discovered.

Please don't inundate Van's with questions right now. They are working on it and should have it soon.

All of you can inspect yours by looking at the top of the mount and looking for tell-tale signs of a crack as seen in the photos I posted at the beginning.

Vic
 
Vic,

We operate a -10 off grass and have about 1000 or so hours on it now. This weekend will be inspection time, so who knows what is next.

What did you do to yours in order to get it back home? Any photo's?

We also replaced the engine rubbers recently but I did not notice any difference in them. How can you tell if for no other reason than curiosity?
 
It was at home

Hi, David. I removed the nose wheel at home to inspect it, so I didn't need to travel anywhere. :) I was very lucky, especially after having a very long taxi in some rough grass at OSH this year.
As for the vibration feeling smoother, it certainly isn't by direct measurement. But with all of the time in this airplane, especially almost 70 hours in the last month, it was really noticeable to me.
Good luck on yours.

Vic
 
Seriously bad?

Gooday from down under.

I have bad news and it is even worse than Vic's report. So stand by for a long post.

I should qualify that there are only a few RV10's in the world at or over 1000 hours and we are one of them just. We operate of a fairly harsh grass strip, and we often operate into other grass/dirt/gravel and bush strips with perhaps only 40% being paved runways. This means we probably have more non-paved operational cycles than any other RV10 in the world.

WARNING: DO NOT USE VIC'S PHOTOS AS A GUIDE TO INSPECTION AND LIKELY FAILURE


When this thread was first launched I was in the Bayou's down around Bourg and Montegut LA fishing, crabbing, drinking, eating and repeat! :D So I immediately emailed my plane partner back home with a link to this thread. He did a visual inspection comparing to the photos that Vic kindly posted showing the cracks around the welds. WE HAD NONE! So Chris departed on a 22 hour trip to some of the most remote parts of Australia thinking all was well.

Today we had a chance to do a thorough inspection and a precautionary replacement of the lord mount rubbers. Well lets say we have not installed any rubbers just yet. All I can say is inspect and inspect often. It is an easy thing to do either annually or every 100 hours.

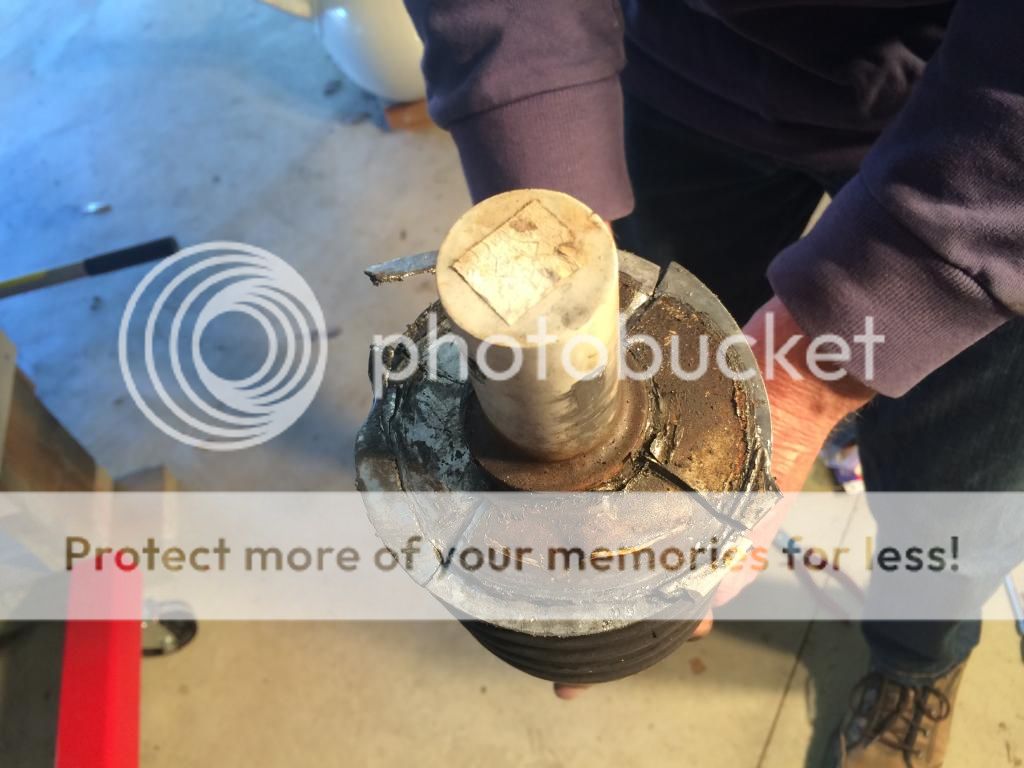
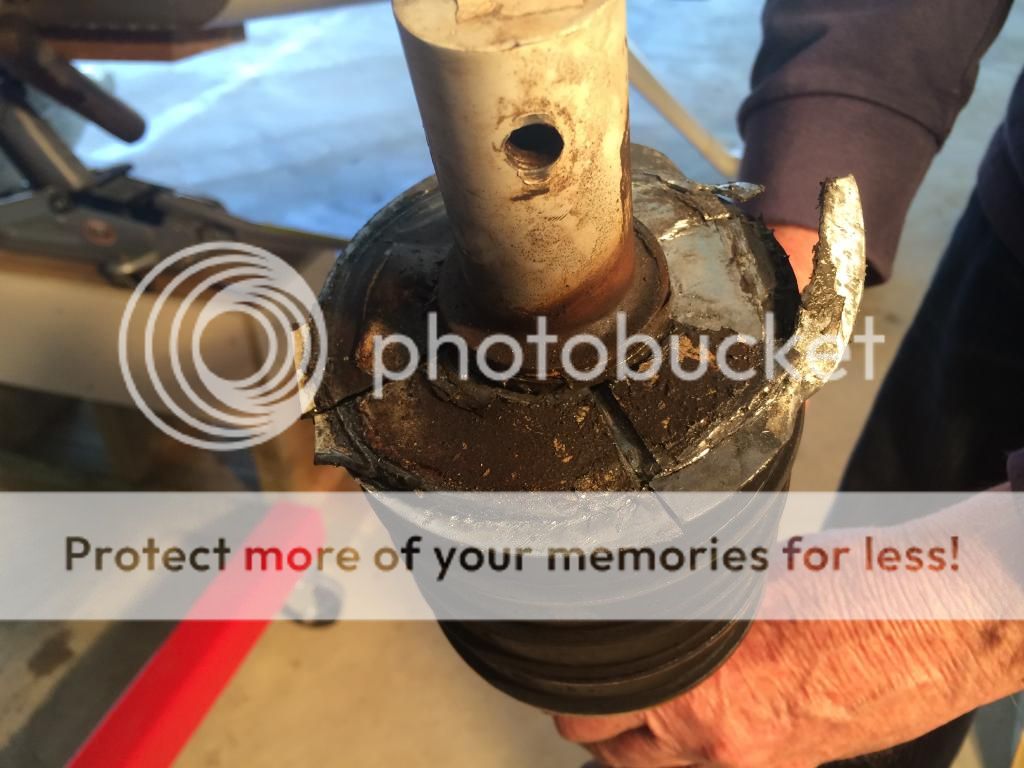
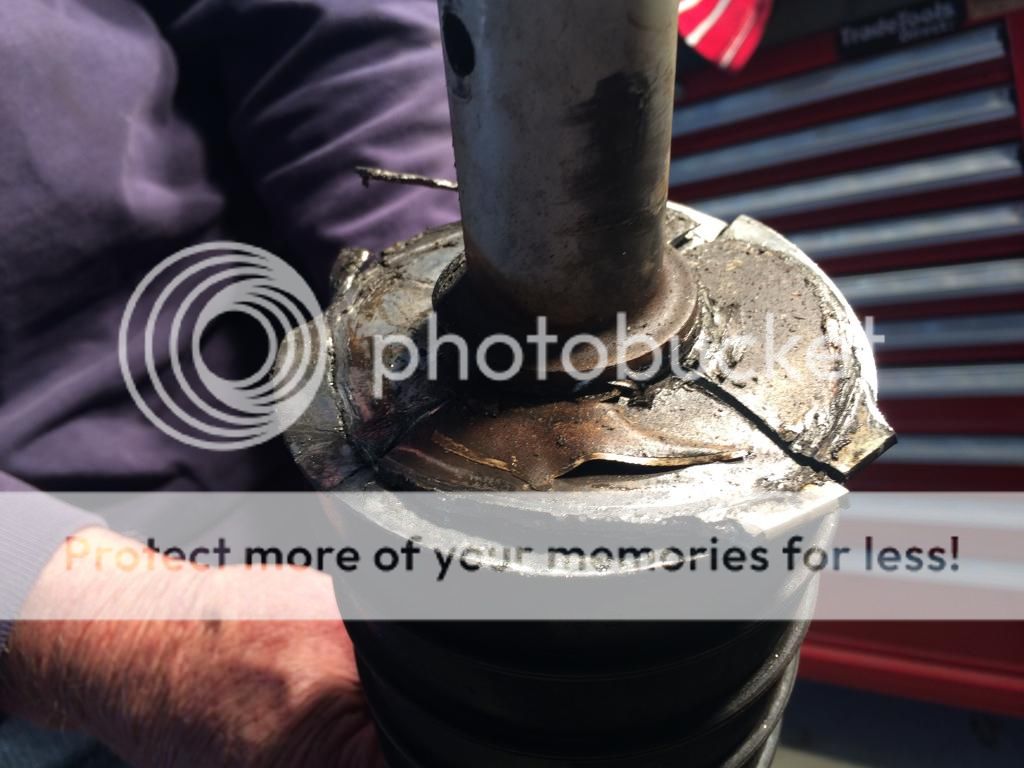
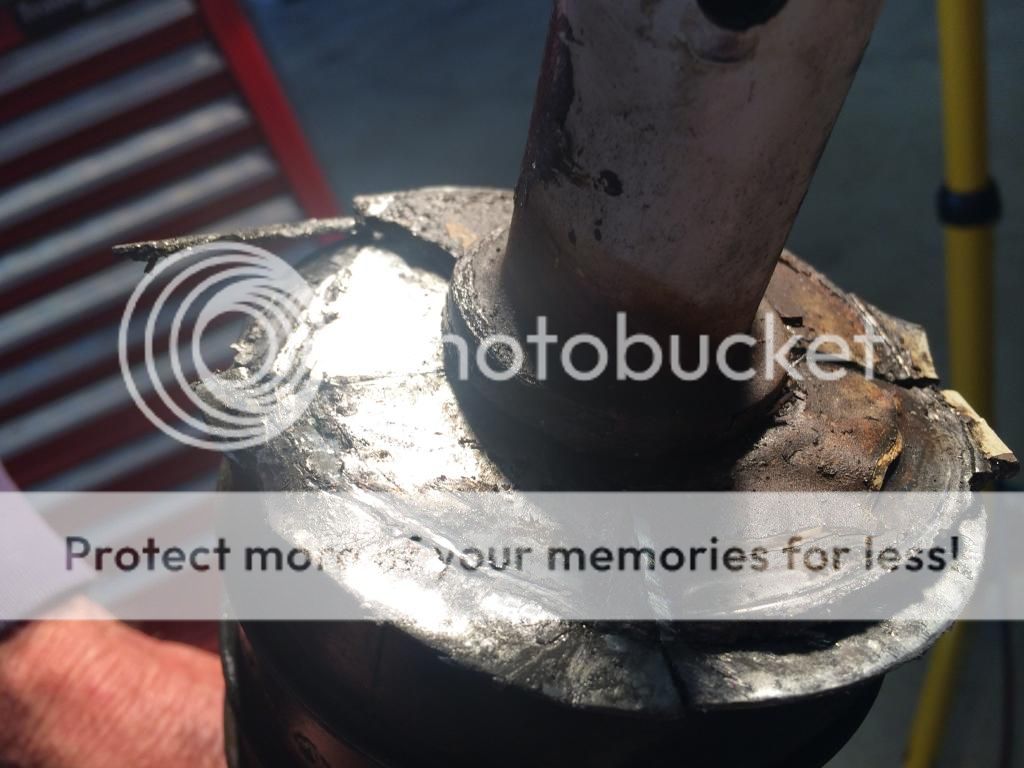
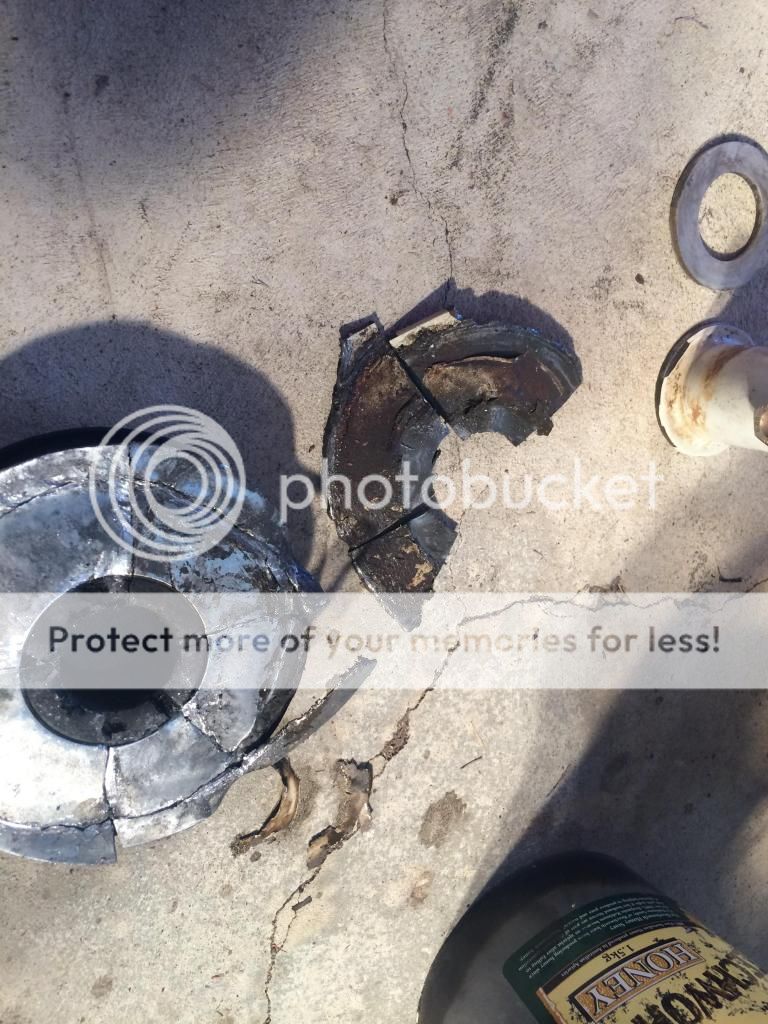
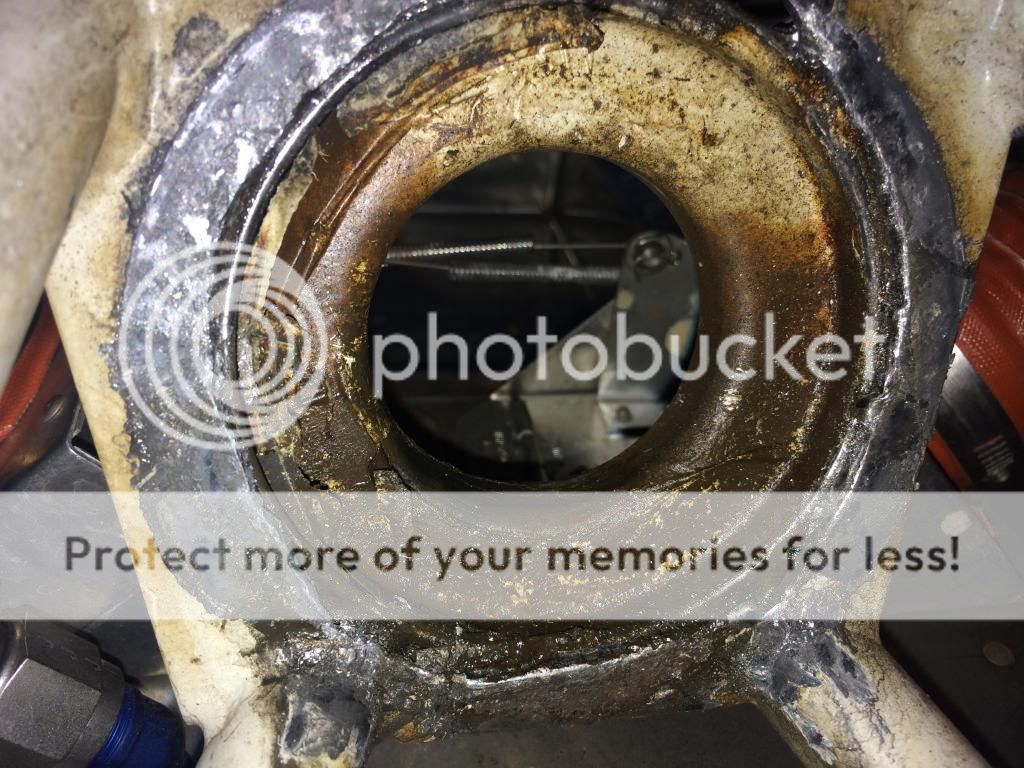
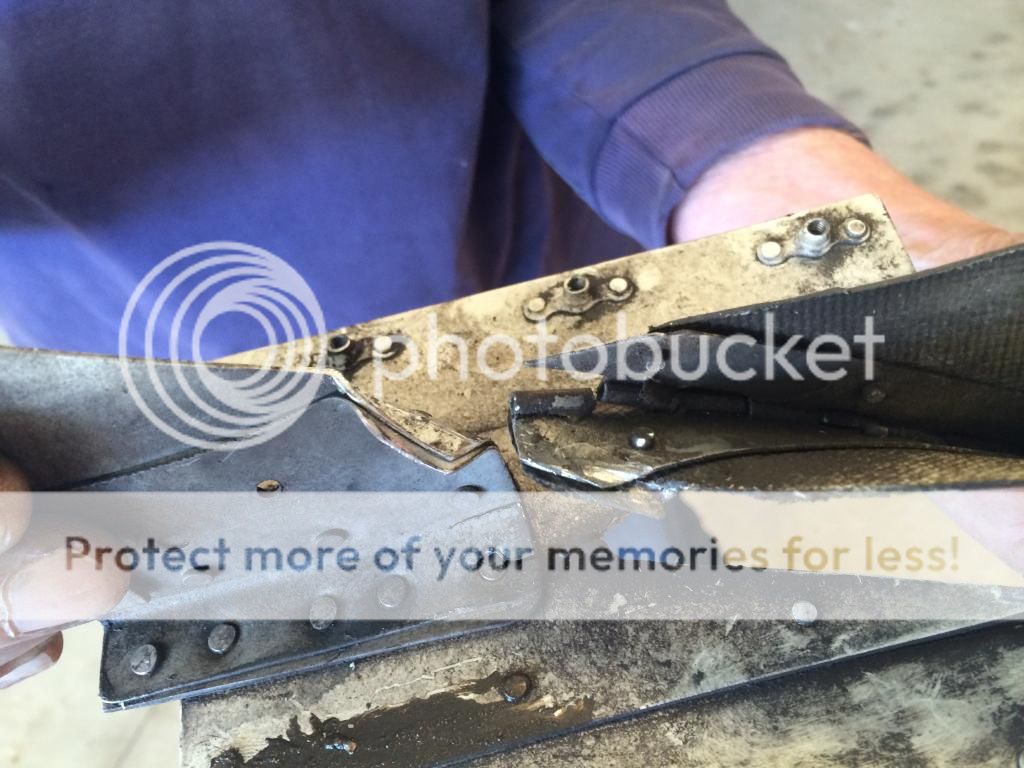
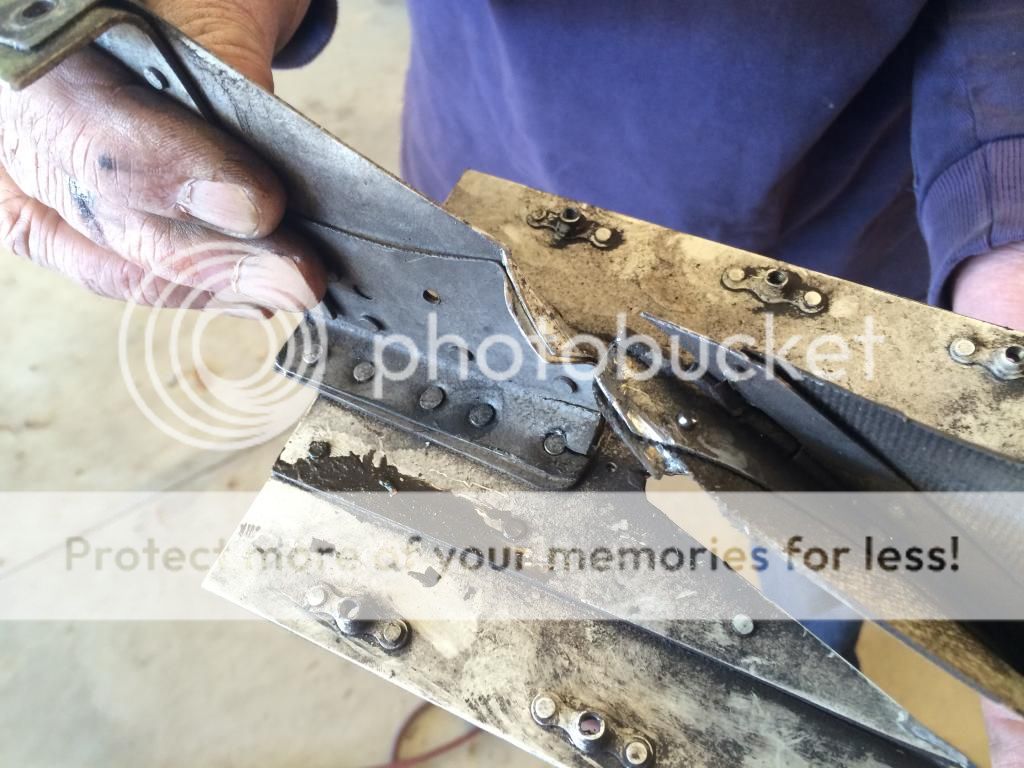
We are damned lucky that the nose gear did not fall out. The suspension arm pulled straight through :eek: yes straight through. The only thing holding it in was the fact the keeper cup on top would not pass the weld mount and the nose fairing struck and damaged the lower centre cowl bracket.

IMG_2368_zps8ed3af70.jpg


IMG_2369_zpse904f35c.jpg


IMG_2370_zpsa82eaa3c.jpg


IMG_2371_zpse5b59d74.jpg


IMG_2372_zpsbf4d4cf9.jpg


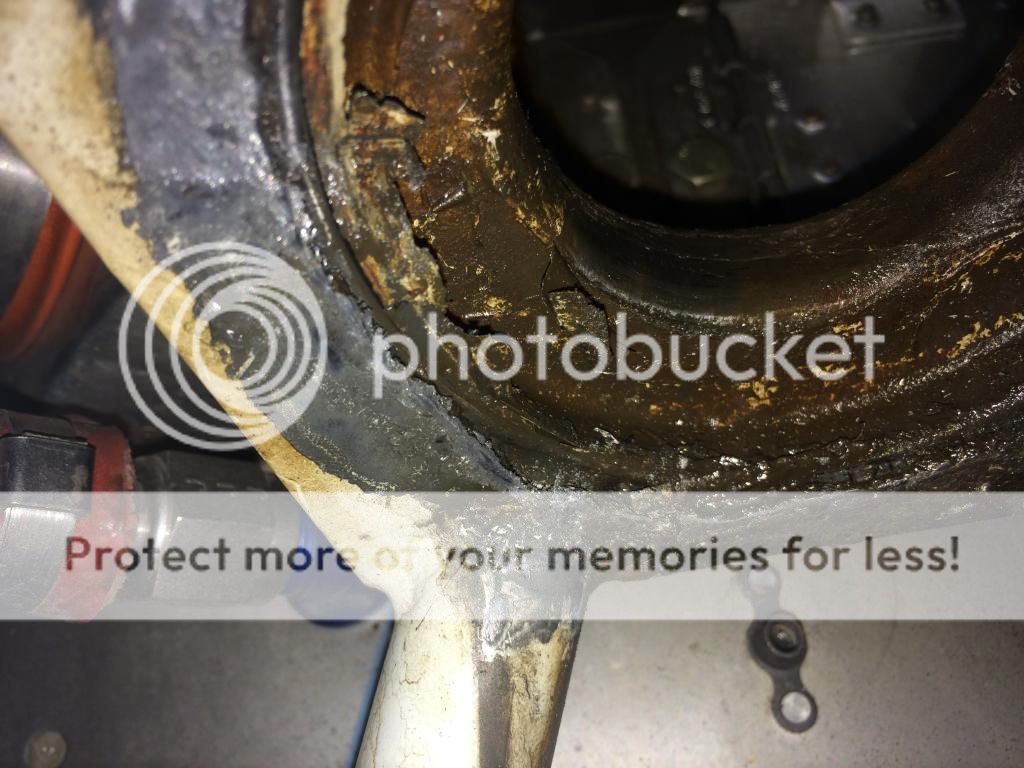
You can see here the rubber mounts and their metal disc has punched the hole straight through the square plate and those segments as seen above were all cracked and some segments were missing.
IMG_2376_zps852b15f8.jpg


IMG_2377_zps4726c197.jpg


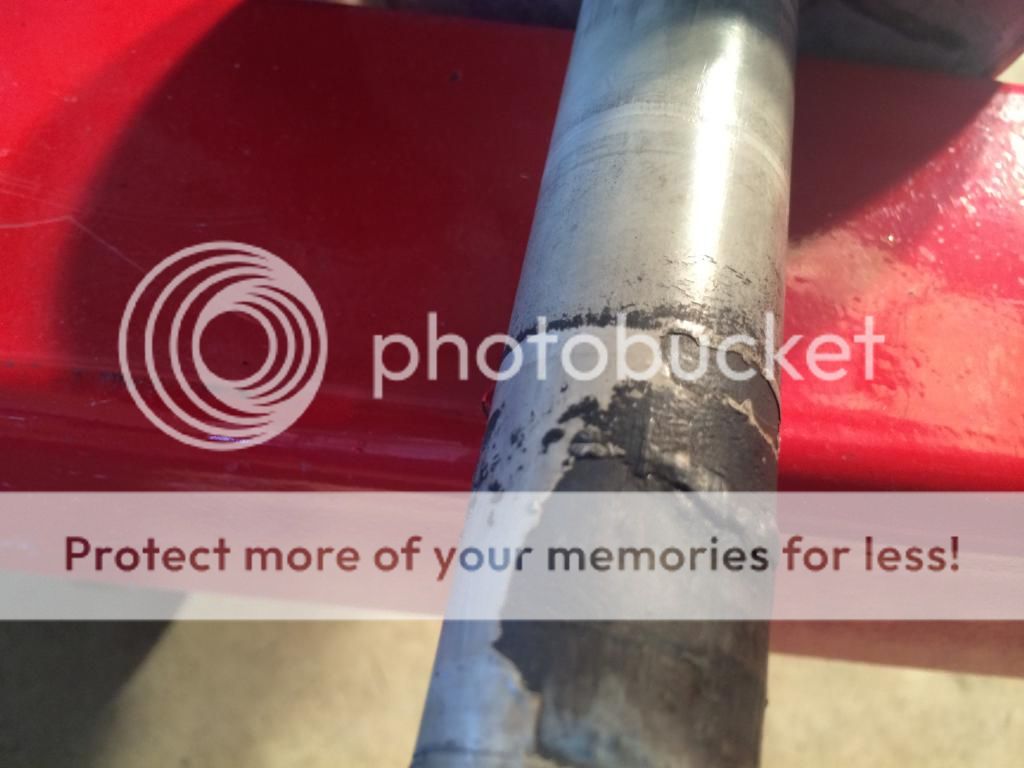
Wear and damage to the centre shaft!
IMG_2378_zpsee0f3091.jpg


To be continued on the next post?..
 
???continued from the previous post


Now the scary bit, this is all that stopped the nose gear falling down under the fuse (swinging on the lower bracket) and causing a nasty landing accident. :mad: An inch of interference and then the nose gear fairing and lower cowl bracket
IMG_2379_zpsbe54fe39.jpg


IMG_2380_zps2de9e8cd.jpg


IMG_2381_zps2d2b920b.jpg


I am a massive Vans fan, sold many aircraft for vans including a few -10's, I love them, but this really makes me unhappy. We are grounded for some lengthy period and I need this machine for work and other business maters. Looks like I will be paying twice the rate for a mates G36 :(

I will be talking to Vans in the early hours of Saturday morning, if there is anything worthy of report I will be back with it.

EVERYBODY?..do not blow this off as it will not happen to you. Inspect and often and properly, not just a visual look from above.

Still love my -10 ;)
 
Wow!

That's pretty bad. I am surprised you didn't have visible cracks on the top. I also can't help but notice that it appears you only have one of the aluminum spacer washers under the cap. Usually, and especially with 1000 hours, it will require another washer or 2 to take up the slack from the elastomers being constantly compressed. Had you ever checked the nose gear for slop with the the nose gear off of the ground?

I am glad you caught it, and would encourage others, as I have said before, to start checking this area.

Vic
 
Another item that needs to be addressed with a new design is to provide more clearance between the large elastomer washer and the engine mount tubing. This wear can be seen in the 6th and 7th pics down from Oz's post 1 of 2.
 
Good catch Vic ;) Not much gets past your eyes!

The spacer is only one as you note, at our first annual we determined that a second one would not fit. Not sure by how much and maybe we could have forced it in, but alas we did not.

Perhaps the extra movement, and bouncing over rough grassy tufts this has hammered the mounting surface a bit more? Not sure it would make any difference, but it might. I gather you had a second one installed, and still had the same result. In hindsight we should have gone back again the following year. I have just ordered more ;)

Most importantly I wish to say this.
I have just had 37 minutes (at 2am ) on the phone to Stirling at Vans, and he has been outstanding in assisting me, as I had no drawings with me (a big no no) yes I know, and we worked through a bill of materials of all new bushings, fasteners etc to go on Fedex today. What a great guy and a big thank you to Vans for being such a great supplier.

Next big bravo is for the whole engineering team. It has been 3 weeks since Vic started this thread and I am pleased to say that the Service Bulletin and parts for repair is coming very soon. I would not want to start a stampede on the factory by any means but the solution and website release of this is not very far away. And I mean not very far away (a hint, probably before I eat breakfast ;) ).

So it is fair to say I might have the first shipment too?.;) but I never said anything. I assume the website will have ordering instructions along with the inspection and repair SB.

Great work guys and girls! Proud to own a Vans RV10 :):):)

Try getting that service from Cessna or Beech ???(who said that? :roll eyes: )
 
I see a new page has started.

Anyone reading this?go back a page and read my posts at the bottom.

Inspect and inspect carefully and inspect often. Read carefully so you understand why!
 
Agree

Another item that needs to be addressed with a new design is to provide more clearance between the large elastomer washer and the engine mount tubing. This wear can be seen in the 6th and 7th pics down from Oz's post 1 of 2.

I agree. I also showed some pictures of it in my post (#25) - on a system that hasn't failed it's easier to see the indented brass lord plate and wear marks on the welds. I rotated the top Lord to the middle and relieved the new top brass washer slightly to minimize the conflict at those welds at about 4 and 7 O'clock. This might be a smart thing to do at annual anyway - rotating the Lord cushions to bring a new brass plate to the top. I wonder whether the sequence of failure starts with failure of the load-distributing top Lord washer or failure of the plate in the engine mount "cup"?

For what it's worth, the removal and inspection of the nose gear is not too bad. I've done it twice now and it only takes about 20 minutes once you have the cowl off and a way to tie the tail down - and a heavy helper. I used three 5 gal buckets filled with sand tied to the tail tie down point, then placed a backup support just aft of the firewall in case the tail tie-down failed. I have added this task to my annual, as well as looking for other indications like damage to the bracket that Oz found.

Also, as Scott pointed out in his earlier post (#33), it's important that the shaft on the WD-1016 NOT be lubricated - hence the need for my second nose gear removal:). If you have an oily engine compartment, it's likely that some could find its way to that shaft and reduce the load dampening effect of the system. I was able to remove mine, clean the shaft and rubbers with a detergent, and reinstall. Probably another good thing to check at annual while you have it apart.

I have always had a little squeak in my nose gear when I go over bumps a bit too fast - now I know why. The Lords are gripping the shaft of the WD-1016 when they are compressed, exactly as they are designed to do. I could even see some rubber that had adhered to the shaft where it was gripping.

Just reviewed the SB, wow was that fast. Looks pretty good, easy to complete if you have no cracks, looks like a field fix of the existing mount if you do have cracks.
 
Last edited:
http://www.vansaircraft.com/pdf/sb14-8-29.pdf

I wonder if this will be treated like the previous RV 10 SBs, (center door latch, and tail bulkhead doubler) where the needed parts are automatically sent to the owners of these planes free of charge??

A cant say for certain what the plan is, but since the NOTIFICATION doc says "Obtain a WD-1001K (or M)-MOD Doubler from Van's Aircraft", and because what parts you need are dependent on what you find after doing the inspection of your mount, I am pretty sure you are expected to contact and request what you need.
 
I agree. I also showed some pictures of it in my post (#25) - on a system that hasn't failed it's easier to see the indented brass lord plate and wear marks on the welds. I rotated the top Lord to the middle and relieved the new top brass washer slightly to minimize the conflict at those welds at about 4 and 7 O'clock. This might be a smart thing to do at annual anyway - rotating the Lord cushions to bring a new brass plate to the top. I wonder whether the sequence of failure starts with failure of the load-distributing top Lord washer or failure of the plate in the engine mount "cup"?

For what it's worth, the removal and inspection of the nose gear is not too bad. I've done it twice now and it only takes about 20 minutes once you have the cowl off and a way to tie the tail down - and a heavy helper. I used three 5 gal buckets filled with sand tied to the tail tie down point, then placed a backup support just aft of the firewall in case the tail tie-down failed. I have added this task to my annual, as well as looking for other indications like damage to the bracket that Oz found.

Also, as Scott pointed out in his earlier post (#33), it's important that the shaft on the WD-1016 NOT be lubricated - hence the need for my second nose gear removal:). If you have an oily engine compartment, it's likely that some could find its way to that shaft and reduce the load dampening effect of the system. I was able to remove mine, clean the shaft and rubbers with a detergent, and reinstall. Probably another good thing to check at annual while you have it apart.

I have always had a little squeak in my nose gear when I go over bumps a bit too fast - now I know why. The Lords are gripping the shaft of the WD-1016 when they are compressed, exactly as they are designed to do. I could even see some rubber that had adhered to the shaft where it was gripping.

Just reviewed the SB, wow was that fast. Looks pretty good, easy to complete if you have no cracks, looks like a field fix of the existing mount if you do have cracks.

The metal backing plates on the Lord elastomers is gold anodized aluminum, not brass. It is relatively soft compared to the steel in the engine mount and wouldn't have any impact on the failure.
Not all mounts will have the interference. If there is any it is usually very slight and the alum. backing will just deform slightly at the point of interference. It would be acceptable to relieve the backing plate at the interference locations if desired, but not considered necessary.
 
Thanks

Thanks Scott for weighing in, keeping us straight, and most of all for responding to this issue at lightning speed.

I wasn't pondering whether the interference of the Lord washer was causing the cracks in the plate, but whether the failure of the top Lord washer was the first step in the failure that then changed the load distribution on the plate, and so on. It seems like the Lord washer is soft enough that it probably is the other way around. I relieved mine at the engine mount welds just to reduce the potential for damage to the welds. No matter, I like the SB for uncracked mounts and will implement it at next oil change or annual. Looks like the new doubler will eliminate the interference with the top Lord washer anyway.
 
The metal backing plates on the Lord elastomers is gold anodized aluminum, not brass. It is relatively soft compared to the steel in the engine mount and wouldn't have any impact on the failure.
Not all mounts will have the interference. If there is any it is usually very slight and the alum. backing will just deform slightly at the point of interference. It would be acceptable to relieve the backing plate at the interference locations if desired, but not considered necessary.

As we see in the pics and including my own, no notches have been cut out/sanded smooth to prevent mount tube interference. I will take care of mine during SB compliance. Maybe this can be added to the plans or anyone building should make a note. Thanks for being on here with your great advice. 1.3 hrs today and still loving our -10.
 
A cant say for certain what the plan is, but since the NOTIFICATION doc says "Obtain a WD-1001K (or M)-MOD Doubler from Van's Aircraft", and because what parts you need are dependent on what you find after doing the inspection of your mount, I am pretty sure you are expected to contact and request what you need.

I called the order line this afternoon. I was asked if I found a crack or not to determine the appropriate solution. They validated my builder number and sent the part out at no charge. I took the opportunity and ordered a couple other parts too.

Bob
 
I did the same thing. I gave them the list of serial numbers that I service and they sent me e parts at no charge. I have over 1,000 hrs and verified today that there are no cracks. The paint has worn off, but no cracks have developed. The doubler will go on soon.
 
I did my inspection yesterday. Took about 30-45 minutes including taking the cowl off, hooking an engine hoist to lift the engine. If you pull the bolt on he top hat and lift the engine, the nose wheel will stay on the ground opening a gap so you can inspect.

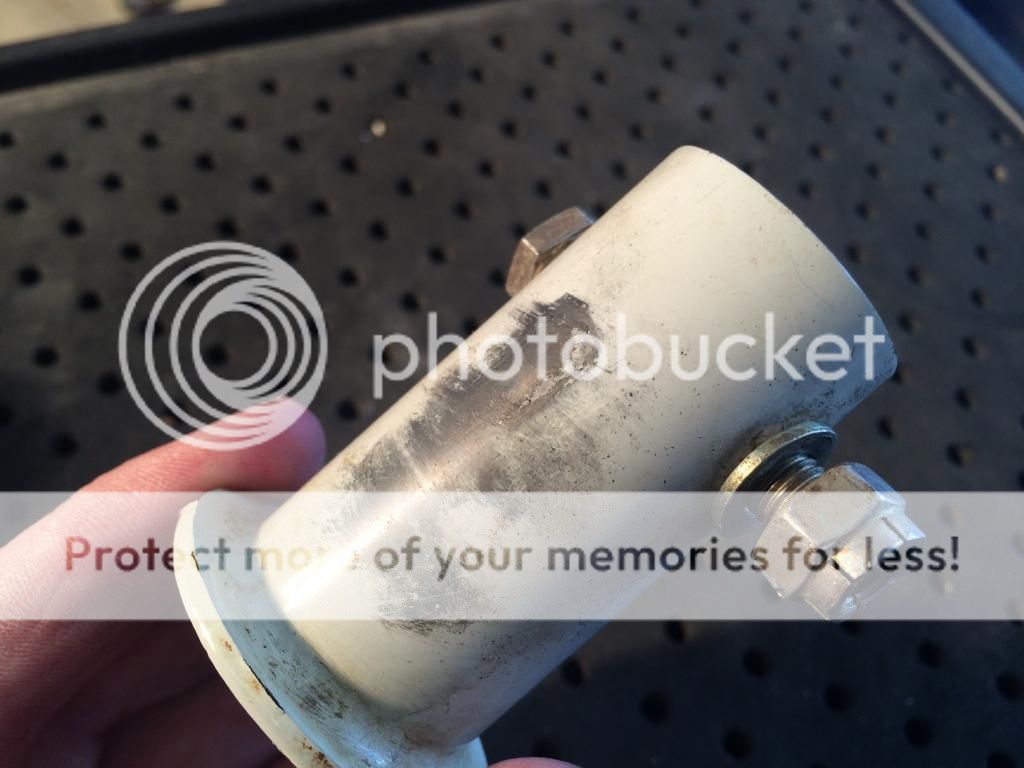
As you can see below, there are no cracks, just a transfer of the powder coat from the engine mount to the rubber donut.

We have over 1,000 hours on is setup with mostly hard field landings, but a fair bit of "pattern training". I am always anal about getting new pilots in our plane to get a full flare and hold back on the stick during taxi. I don't know how much difference this makes, but I try to take it easy on the nose gear whenever possible.

I do know first hand the damage from having the nose gear fold back on landing. It's not a pretty sight and it's not a cheap fix. Everybody please check for this problem per the SB.

44e6fb3c6f8c48216809f58eb3c3b706_zpse766aab0.jpg


988a32fdf1277c4a17bbe903ac5f9afa_zps79a15a05.jpg
 
Question on Van's Fix??

I have my doubler plate from Van's. My plane has not flown so obviously there are no cracks.

For "no cracks discovered" procedure there are 7 steps to follow. It does not mention welding. Is this correct? Do I just put the doubler in there and not weld??
 
I used a small amount of RTV to hold the plate in place in cash the donuts loosen up to prevent damage from the plate beating up on the weldment.
 
Future Kits

I am getting ready to order the finish kit. Has Van's addressed this issue with the mount, going forward?
 
Vans Fix on Future RV-10's

Vans has fixed this problem on future builds. If the engine (and landing gear) mount is sold currently, the problem is fixed. Forgot the exact date.
 
Jack, there is no requirement to weld. However, I didn't like the idea that it just sits in there, possibly rubbing on the existing parts, or gets glued in. Since it was easy enough to remove the nose gear (and the engine mount was already off the airframe), I decided to get mine welded and the powder coat redone. You can see this in the thread on the service bulletin. I think it was worth the extra trouble and expense.
 
Back
Top