What's new
Van's Air Force

Don't miss anything! Register now for full access to the definitive RV support community.

Rudder TE Frustrations

PHXflyer

Member
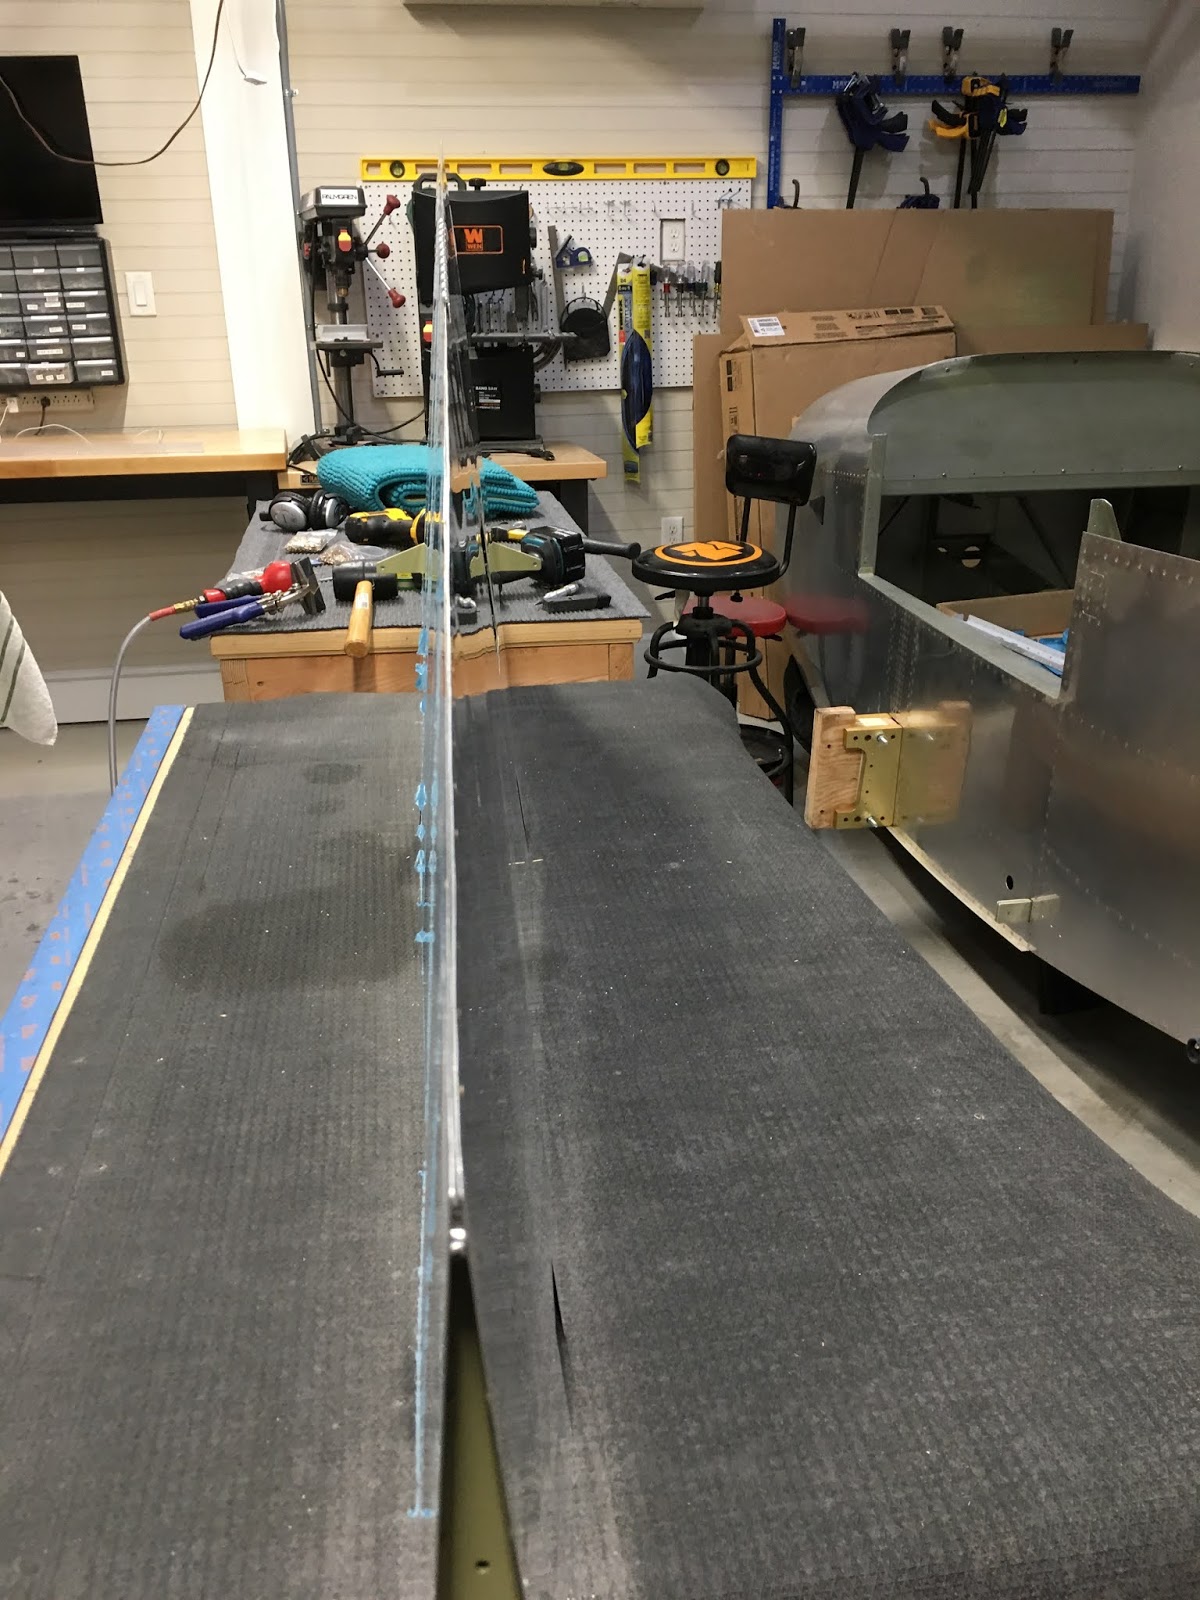
I'm ordering my 3rd rudder assembly for my 14 kit tomorrow. Why? Because the first rudder I built the trailing edge skins bowed outwards at the bottom and top end, as well as having gaps between the skins and TE itself, and the TE came out wavy. I'm a beginner, notwithstanding the fact that my VS came out flawless, so I had no issue ordering a new rudder and figured, since the rudder is one of the more complex components to build on this bird, I was all too happy to learn from previous mistakes. However, in speaking with the Van's advisor at the factory before I ordered the second kit, he said that the 3M VRB tape I used was a reason the corners of the skins may have bowed out, since it wasn't "sticky" enough, and he said that's why some people use RTV or the material used to seal the fuel tanks. I didn't want to mess with either of that stuff so early in my build, and I found a VRB double-sided tape that was thick. I had an "aha!" moment, thinking that was the VRB tape I should've used, and that tape would go on easy and do what the RTV or sealant material does. Wrong. When I went to rivet my TE this morning, the heads on the squeezer (I had ordered the angled heads made for the TE from Cleaveland Tools) just created huge craters in my TE skin because the skins "sank" into the underlying VRB material. I'm really annoyed because notwithstanding the TE issue I now have, this rudder came out flawless otherwise.

I have two questions for the learned minds on this forum:

1. What is the purpose of using tape or some filler on the TE, and can I put the TE together without any underlying material? I've read that it's to hold the TE triangle in place on the right skin when we are bowing the left skin into place in order to rivet the stiffeners on the two halves together. However, using cleco's along the TE will accomplish the same thing. When I folded the left skin onto the right on both rudder builds, I had cleco'd every hole on the TE, and as I riveted the stiffeners together, I pushed the cleco's below the last riveted stiffeners all the way through both skins along the TE. Both times I wondered why any sticky material was even required.

2. From everything I've read, the rudder is one of the most complex components to build. Why does Van's not make a simpler build design, especially since this is only the second component being built by greenhorn ignorant newbies such as myself? On other, earlier RV kits, the rudder skin was one-piece that slipped onto the rudder frame, with the TE being a folded corner. Seems to be a far easier build methodology.

Sorry for the long-winded post. I'm just really frustrated at this point.
 
thoughts

Did you let the VHB tape fully cure prior to riveting? They use that tape to secure panels on skyscrapers, so properly applied and cured, it should have plenty of bond strength.

I used Proseal, clecoed it to a piece of steel angle, and waited until the pro seal was cured before riveting.

Are you sure that you are not over driving the rivets?

Just some thoughts...
 
TE rudder

I used the 3m tape and was not happy with how sticky it was. If I was to do it again, I would use pro seal let it dry 24 hours and then rivet it up.

You did dimple the TE skins and machine countersink the triangle wedge? So should fit together nicely and the tape and/or glue will hold it all together when clecoed for riveting with the angled heads?

140507 phase 1 almost complete
2020 donation
 
1. What is the purpose of using tape or some filler on the TE, and can I put the TE together without any underlying material? I've read that it's to hold the TE triangle in place on the right skin when we are bowing the left skin into place in order to rivet the stiffeners on the two halves together. However, using cleco's along the TE will accomplish the same thing. When I folded the left skin onto the right on both rudder builds, I had cleco'd every hole on the TE, and as I riveted the stiffeners together, I pushed the cleco's below the last riveted stiffeners all the way through both skins along the TE. Both times I wondered why any sticky material was even required.

Do I understand this correctly that you are leaving the clecos in place next to the hole you are riveting? If that is the case, you will certainly have a wavy TE.

The purpose of the tape or proseal is so you can put the TE of L&R skin together and let it cure. Once it is cured, you will take all the clecos out and use a back rivet plate, preferably large enough back plate that the entire TE or most of it lay flat on the back plate. Then drive every two or so of the rivets and only partially till all the rivets are driven. A table saw can make a very nice back plate or you can simply find a piece of flat steal 2-3” wide and 4’ long from many scrap stores.
A good tip for getting the TE straight is to use a piece of angle aluminum or any other stiff metal and match drill to the TE. When you are sitting your proseal, cleco this stiff angle to the TC to keep it as straight as possible till it has cured.
 
TE adhesive

I used the 3M tape on both rudders I built. The first one came out nice but was damaged by raccoons that visited my workshop and knocked it off my storage rack. The second rudder came out great. I carefully rolled the tape onto the TE and held it in place for a couple days to cure using soft weights from my collection of scuba gear. When ready to rivet, I used Cleaveland Tool's flat squeezer set in a Numatx pneumatic squeezer with a 1.5" yoke.

I practiced beforehand with the leftover pieces of VA-140 used to make the R-916-1. The Numatx squeezer is really sweet for this because it is very small and maneuverable. Because the 3M tape is so thin it never caused a "puckering" problem that using Proseal or thicker tape would/might have. The adhesive is only needed to hold everything in place while riveting. It is not required for holding the skins to the R-916-1 trailing edge.

The other possible issue is not getting the TE modifications aligned with the chord line. For my first rudder I built a jig that allowed me get it aligned. It worked but was a real hassle. For my 2nd rudder, I made a wedge out of HDPE that worked perfect.
 
I was a newbie when I did mine and was apprehensive about doing it. Read a lot of posts to determine best practice. Mine came out very well.
I think the trick as mentioned whether you use proseal or tape is clecoing the trailing edge it to a straight edge angle for several days. The tape takes time to reach maximum strength.
I used a har dryer to heat up the trailing edge and tape as I was applying and clecoing the trailing edge which increase the tackiness of the tape. After letting it cure for about a week, I got busy doing other things, I riveted every 10th hole and only set them about a 3rd of the way until all rivets were installed. Went back over the every 10th rivet pattern to fully set. I also alternated the direction of every other rivet. Maybe over kill but worked well for me. I did all my trailing edges this way.
 
I agree with others in that the key to a straight trailing edge is using a straight edge when bonding. I also used a straight edge for riveting.

I used a piece of aluminum angle match drilled to an extra piece of trailing edge material (for hole spacing) for the bonding phase - just be sure to protect from bonding the angle too (tape or wax or something).

On the -10 rudder I used a piece of steel angle as a back-rivet bar. Made holes and screwed outside edge to the bench. Trick here is matching angle of the rudder while back-riveting to match surface of the steel.

Here's how it turned out. You can see the steel angle on bench in background.

IMG_1445.jpeg
 
Last edited:
I really, really appreciate all the replies. You guys are all awesome for taking time to reply to a struggling newbie.

Unfortunately, I am still not seeing the full "picture" with the TE. I still don't understand what the purpose of the tape or proseal or RTV is. We have sheet metal being attached to a solid piece of metal. What is the purpose of laying down any sticky material, which will only put another layer of material down between the skins and TE, and that material is essentially pliable no matter how much you let it cure?

I've countersunk the rivet holes in the TE triangle, and dimpled both skins. If I lay down any material whatsoever in between these pieces, it's only going to force them farther apart, notwithstanding the fact that squeezing the rivets may push any of that material out of the rivet holes. But then there will be this extra material in between the rivet holes pushing the skins apart in between the holes. What is the purpose of laying anything sticky down?

Maybe if I can understand just this one aspect of the TE build, I can then wrap my mind around how to proceed (and, hopefully, have more patience and focus).

Thank you.

As I understand it, the bonding isn't required structurally - helps keeps things aligned for riveting. The recommended 3M tape is very very thin - really just a thin layer of adhesive remains so not an issue in terms of space between layers. On the -10 I used a very thin layer of proseal, also not enough thickness to be an issue.

But many have just riveted rudder trailing edges using a straight backing piece which can work well if you take your time and check alignment frequently.
 
As I understand it, the bonding isn't required structurally - helps keeps things aligned for riveting.

That's my interpretation also.

If you attach an angle piece to the TE, it has to be removed before riveting. The pro-seal / VHB / whatever is there so the TE doesn't move while riveting. Once the rivets are set, the point of bonding has served its purpose. IOW, the angle is attached so the adhesive bonds the TE "straight", then the rivets are used to lock it in.

The riveting of the trailing edge is specifically explained in a manner that looks gentle/gradual compared to normal riveting. This seems to suggest that the method employed is meant to not upset the bonding process.

Thanks. Makes sense now. Also, since I last posted, I spoke with Van's builder assistance tech this morning. He said, in addition to what you pointed out, that the other main reason for adding VHB/Proseal to the TE is to create a type of vibration damper. He said in the past on earlier kits the vibration experienced by the rudder would result in micro-cracks, and putting in a kind of pliable seal between the TE layers eliminates this issue. In addition to ensuring the pieces remain aligned during riveting.

Thanks to all for the feedback. Great learning experience, if an expensive one.
 
Back
Top