Numbering your photos 1 through 9 top left to right and bottom left to right.
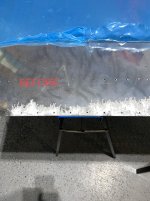
1) Hard to tell but photo #2 is after blend? See below.
2) Where is this? What was the original thickness (0.032?) and final thickness. In general 10% loss of thickness is OK. Some times the stock material was on high side of tolerances, so loss of some thickness is not as critical.
3) & 4) Looks fine. Of course clean, etch, alodine, prime with two part epoxy primer made for aerospace / aluminum. In the old days a rattle can of Chromium spray paint, long ago outlawed
5) That kind of sucks. It is the shop head. The go to repair is drill out and replace. WARNING. That is a really long "spaghetti fastener". "Drilling out" or trying to drive it out not easy and high risk of damaging hole. The fix to that is over size. Is that rivet doing much? It is next to very larger attach bolts. The adjacent rivets are good. The rivets with corrosion on the head are still functional through the stack up. It would be wise to inspect every year. I think it is OK. The rivet is seated and taking shear load despite the shop head corrosion. I would CLEAN the shop head up a little, use care to remove MIN MATERIAL (shop head does not have to look perfect) and take care to not damage finish of spar cap adjacent. If you have some decent* shop head material left I would leave these alone, clean area, spot prime. What is decent*? Use your Mark 12 calibrated eye ball under strong light and magnification, squint and use the German Engineering method: "Gut Un enough".
(Drilling it out and replace rivet - You could drill it out but would do it on a very accurate drill press or CNC and have spar JIGGED accurately and securely. You will have to basically drill full length / depth of rivet out, to almost the full diameter without hitting the spar. Not easy but it has been done. You might be able to bring it to a machine shop. Now you have to get some long rivets and a VERY big squeezer. You can't use a 2x rivet gun and a 1lb bucking bar. Because you are starting with a small diameter drill bit you have to be careful it is not wondering or going off center. For that reason don't start with a too tiny pilot drill bit, may be 1/2 diameter of hole for a drill bit. Then step up diameter slowly. Start on the manufacture side. Shop heads tend to drift off center slightly. Shave off the shop head of BOTH manufactured head and shop head to know where the center of the hole. Jig spar. Drill a little, stop and check and measure progress. If you elongate hole you will have to drill it oversize. Personally I would try to leave it, by all means prime the whole area.
6) This is the elevator steel weldment. It is over built and looks like surface corrosion. Clean up, smooth, and re-prime. HOWEVER use some diligence and estimate material lost you can go 20% may be more for small local areas.
7) Blend and prime. Measure loss in thickness. 10% rule applies. If it is a few more thousands than 10% loss (0.0032 lost assuming base material is 0.032, final thickness 0.0288). If it was 0.027 I would not worry.
8) Low stress area remove damage, prime.
9) See #5.
The parts appear repairable. How you repair them, quality and details of repair will be up to you. If in doubt replace that part or seek help from vans. If you do ask for help you need to MEASURE and draft out detailed damage mapping. What I just said above is good structural advice, but it is based on what I see and GUESS from photos and no measurements. Keep that in mind.
CLEAN IT UP, MEASURE and get back to us. Cheers.


 IMG_7034.jpg429.2 KB · Views: 494
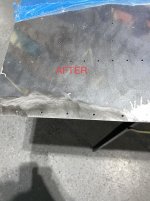 IMG_7033.jpg505.5 KB · Views: 470
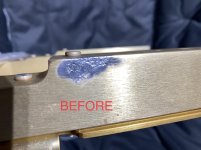 IMG_6793 2.jpg364.3 KB · Views: 479
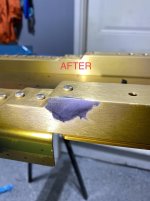 IMG_7039.jpg253.4 KB · Views: 520
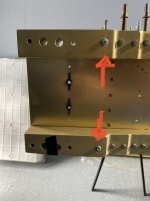 IMG_7031.jpg219.3 KB · Views: 415
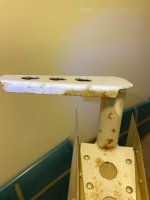 IMG_6998.jpg229.4 KB · Views: 378
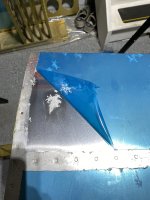 IMG_7045.jpg343.1 KB · Views: 418
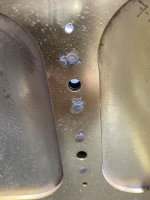 IMG_7044.jpg326.6 KB · Views: 357
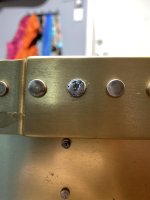 IMG_7041.jpg255.8 KB · Views: 354
