What's new
Van's Air Force

Don't miss anything! Register now for full access to the definitive RV support community.

Whirlwind 200RV propeller spacing?

RV8iator

Well Known Member
Benefactor
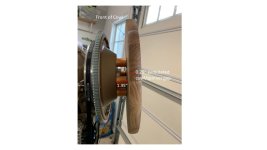
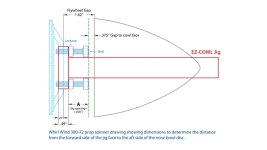
I am trying to determine beforehand the spacing I need from my engine flywheel and the front of the cowl lip to mount a WW200RV propeller. I have talked to the WW folks the answer's I get are,

"The distance from the rear bulkhead to the mounting flange of the propeller is 1.600 inches" ?? &

"you need approx. 1.6 inches from the front of the flywheel to the edge of the cowling." This one I at least understand.

I have measured from the front of my flywheel and I have 1.7 inches, (stock VANS cowl) but don't know for sure it that's the correct place to measure.
I'm just trying to determine if I may need some sort of spacer.
Does anybody have a photo of their WW200RV installed or can you furnish information on what I'm really supposed to measure.
 
Call Bill!

Call and ask for Bill Koleno. Have as much info available as possible. He will help you. WW is a great product and they have a great team.
 
Thanks

I got in touch with Bill and he is sending drawings of their installation.
thanks
 
Post info Please

I got in touch with Bill and he is sending drawings of their installation.
thanks

I am at the cowl fitting stage and could use this information. This thread is spot on with the information I need. Any chance the loop could be closed with this thread and a posting of the clearance numbers, this would be greatly appreciated. I am sure others that with this propeller will be looking for this information at some point as well.


Thank you for leading the way.

Cheers
 
I am not sure what the issue is for these dimensions. I have an -8 with an IO-360A3B6D and fit the cowl with the prop on. The stock cowl fit and clearance where fine. If you are using stock cowl and Lycoming engine I don't see what the issue might be.

If you haven't got an answer by Wednesday, I can measure and post then.

I did call WW to help determine the min cowl/inlet spacing from the blades in the static condition and they said the trailing edge blade travel is 1 inch.
 
Last edited:
The flange on the WW is 1/2 inch thick. I made 6 half inch spacers and used the prop bolts, spinner backing plate and flywheel to position the spinner with relation to the cowl. Made the space between the spinner and cowl at 3/16 which I figured was about the minimum spacing required for cowl removal. I guess I worked backwords from what you are doing.
 
Website had info

Kevin at American Propeller sent me a drawing that shows dimensions of the fly wheel to the back of the spinner for the 200RV. Feeling like a dork, I found WW website and right there is the information. The DWG Kevin sent was dated 2010 and did have a different dimension (1.67 vs 1.62) than the current DWG on WW website. For those that need this information go to:

http://www.whirlwindaviation.com/props/rvseries.asp

Cheers
 
Don't do it!

If you had in mind to complete your cowl before you get your WW prop, all that I can say is don't do it! I tried using spacers and it didn't work out well. I had to do major work on my cowl after the fact by literally cutting the front off and re-glassing. It was a major setback in time and money. I had to get help with the major re-glass as it was above my pay grade. A friend of mine who also has the WW prop had the same issue. He had the prop sitting in his spare bedroom but didn't mount it. He used a spacer because he didn't want to risk scratching it. In his case he ended up buying a brand new cowl because it would have taken too much time to fix after cutting too much off the back. There are just too many things to consider and align that can't be easily seen with a spacer. My suggestion would be to move on to other task until you get your prop in hand and mounted. When you spend that much for a prop it would certainly be nice to have the cowl perfectly aligned. The good news is that after the rework mine fits great and even made the WW website gallery.
 
Question this.

If you had in mind to complete your cowl before you get your WW prop, all that I can say is don't do it! I tried using spacers and it didn't work out well. I had to do major work on my cowl after the fact by literally cutting the front off and re-glassing. It was a major setback in time and money. I had to get help with the major re-glass as it was above my pay grade. A friend of mine who also has the WW prop had the same issue. He had the prop sitting in his spare bedroom but didn't mount it. He used a spacer because he didn't want to risk scratching it. In his case he ended up buying a brand new cowl because it would have taken too much time to fix after cutting too much off the back. There are just too many things to consider and align that can't be easily seen with a spacer. My suggestion would be to move on to other task until you get your prop in hand and mounted. When you spend that much for a prop it would certainly be nice to have the cowl perfectly aligned. The good news is that after the rework mine fits great and even made the WW website gallery.

I thank you for the caution but wonder why a spacer did not work. If the space is not correct I can see that, but the prop hub is metal, when bolted on this will put the back of the spinner a certain distance from the face of the fly wheel. If I make up a 13" circle out of wood, plexi etc and put PVC spacers so the aft edge of the wood sits in space at the same distance as the spinner sitting on the prop hub then build my cowl, how can I go wrong. I know of metal prop guys using this method. In fact what I planned to do was to set the spacer at where I want the front of the cowl to sit (takes into account required space between cowl and spinner) this way I can cleco the front of the cowl to the simulated spinner rig.

The only variable I can see is the distance used to orient the simulated spinner. If there is something else I am missing I sure would like to know. I certainly will bolt it on if that is what is needed but wonder why. Thanks for any amplifying information you can provide.
 
Mike,

I think in my case everything just allowed too much slop. You'd want to make sure to use all of the bolts into the prop attachment plate, make sure the holes in the template are very tight on the bolts, make sure the threaded inserts in the prop attachment plate are fully seated and not sticking out the back of it a little, and so forth. If the PVC isn't tight fit on bolts you'll get slop there. Also I believe that in my case the spinner had a slight overhang beyond the spinner plate. There are just too many dimensions to get perfect. If you end up being off a 1/8" on one side or back, then it'll be painfully obvious. I'd never chance it again unless I had a solid spacer and at least used the actual spinner back plate.

I'm only a half hour south of Olympia by plane, so if you're ever down by Scappoose you can check mine out some time if you want.

Mark
 
I get it now

I see where you are coming from. Too bad we did not have this exchange a week sooner. I just drove down to Van's last Friday to pick up a finish kit for a local builder who is currently deployed to Afghanistan, I could have easily worked in a swing by Scappose. I know a couple guys with planes some are RVs so maybe I can put a trip down your way sometime.

Thanks for the head up.

Mike,

I think in my case everything just allowed too much slop. You'd want to make sure to use all of the bolts into the prop attachment plate, make sure the holes in the template are very tight on the bolts, make sure the threaded inserts in the prop attachment plate are fully seated and not sticking out the back of it a little, and so forth. If the PVC isn't tight fit on bolts you'll get slop there. Also I believe that in my case the spinner had a slight overhang beyond the spinner plate. There are just too many dimensions to get perfect. If you end up being off a 1/8" on one side or back, then it'll be painfully obvious. I'd never chance it again unless I had a solid spacer and at least used the actual spinner back plate.

I'm only a half hour south of Olympia by plane, so if you're ever down by Scappoose you can check mine out some time if you want.

Mark
 
Intent of Original post

I was retrofitting a prop to an existing cowling so I had to have the exact numbers. Kevin and the folks at WW went above and beyond with me. They actually made me a one off rear plate to make the spinner fit my needs and it fit perfectly.
 
When I came to my cowl work, American prop sent me a mock-up spinner backing plate. Just bolted it on and fitted the cowl. It made the process quite easy.
However I have an issue now with engine mount sag. This is causing the spinner backing plate to touch the inner bevelled part of the cowling. I made some allowance for sag but obviously not enough. I guess I'll fix it with an extra washer in the bottom Lord mounts.
If I were doing it again I'd leave about 5/16" between cowling and spinner.( I now have about 3/16")
 
If you had in mind to complete your cowl before you get your WW prop, all that I can say is don't do it! I tried using spacers and it didn't work out well. I had to do major work on my cowl after the fact by literally cutting the front off and re-glassing. It was a major setback in time and money. I had to get help with the major re-glass as it was above my pay grade. A friend of mine who also has the WW prop had the same issue. He had the prop sitting in his spare bedroom but didn't mount it. He used a spacer because he didn't want to risk scratching it. In his case he ended up buying a brand new cowl because it would have taken too much time to fix after cutting too much off the back. There are just too many things to consider and align that can't be easily seen with a spacer. My suggestion would be to move on to other task until you get your prop in hand and mounted. When you spend that much for a prop it would certainly be nice to have the cowl perfectly aligned. The good news is that after the rework mine fits great and even made the WW website gallery.

I have the same problem having changed my Sensenich to a 200RV. For some reasons, not only is the gap between the back spinner plate and the front cowling are no longer parrallel but is is rubbing at many places inside the inner bevelled part of the cowling and on the outside. I really don't feel like redoing the whole front end but it seems like my options are limited.
 
WW 300-3B/A-72 Spacers

Reviving an old thread..

I plan to purchase the Whirl Wind Aviation 300-3B/A-72 prop for my RV-8 (Titan IOX-370-CDE1U8). My plan was to use the spacer/plate system to fit up my cowling before ordering the prop since I am deploying overseas for a few months this summer.

Hector at WW has been helpful with information/measurements but for some odd reason there are limited CAD drawings (like this one for the Rocket https://m.whirlwindaviation.com/pdf/Whirl Wind 200RV 74RV Spinner Options_RevA.pdf) for the 300 series. The only drawings I have are the ones attached. I had originally thought that my spacers would be sufficient, however, after reading this thread I am a little concerned.

Can anyone with a 300 prop on a similar setup confirm that my 1.35" spacer idea is correct? My plan would be to have the front of the cowling to sit directly against the front face of my 13" plate resulting in a 1/4" gap between the spinner and cowl. I've also considered increasing to a 3/8" gap after some other reading.

Please see my photos below and I would appreciate thoughts of those who have WW setups. Also, although we love typing sometimes - I'd prefer a phone call for those who've done this for further clarification as needed. I have mocked up a wood spacer/front of cowl reference but planning to CAD it out of plastic to tighten down the bolt spacing tolerances. Note that some of the measurements in these photos are repeated in different variations - just to reinforce my plan.

Cheers,
Mark
 

Attachments

  • Slide1.JPG
    Slide1.JPG
    147.2 KB · Views: 43
  • Slide2.JPG
    Slide2.JPG
    77.7 KB · Views: 36
Hi Mark,

I was at Whirlwind in El Cajon last week to mount a new prop on the R-3, and Jim Rust confirmed the 1.6” spacing between the back of the spinner and the prop flange face, so yes, I think your math is correct if you want .25” spacing.

I hav measured the bulkhead spacing on a couple of Hartzell and a couple of Whirlwinds, and they all adhere to the 1.6”.

Paul
 
I think you can let the spacing between the spinner and the cowl be smaller than 1/4" if you like. Mine is between 1/8" and 3/16" and the spinner and cowl have never touched.
 
Thanks, Gents.

Paul, you might remember, you actually visited me and this project in my garage in Nassau Bay around 2006 to provide some guidance. I was flying out of EFD at that time. It’s almost done!…”almost”

Mark
 
Spacing

Reviving an old thread..

I plan to purchase the Whirl Wind Aviation 300-3B/A-72 prop for my RV-8 (Titan IOX-370-CDE1U8). My plan was to use the spacer/plate system to fit up my cowling before ordering the prop since I am deploying overseas for a few months this summer.

Hector at WW has been helpful with information/measurements but for some odd reason there are limited CAD drawings (like this one for the Rocket https://m.whirlwindaviation.com/pdf/Whirl Wind 200RV 74RV Spinner Options_RevA.pdf) for the 300 series. The only drawings I have are the ones attached. I had originally thought that my spacers would be sufficient, however, after reading this thread I am a little concerned.

Can anyone with a 300 prop on a similar setup confirm that my 1.35" spacer idea is correct? My plan would be to have the front of the cowling to sit directly against the front face of my 13" plate resulting in a 1/4" gap between the spinner and cowl. I've also considered increasing to a 3/8" gap after some other reading.

Please see my photos below and I would appreciate thoughts of those who have WW setups. Also, although we love typing sometimes - I'd prefer a phone call for those who've done this for further clarification as needed. I have mocked up a wood spacer/front of cowl reference but planning to CAD it out of plastic to tighten down the bolt spacing tolerances. Note that some of the measurements in these photos are repeated in different variations - just to reinforce my plan.

Cheers,
Mark

That's pretty close to my measurements. I used 1" for a 3/8" cowl to spinner gap, but mine was done without the flywheel. Subtract .250". Difference is .100". 3/8" minus 1/4" is .125". Pretty close to what I ended up using. Whirlwind recommended 3/8". Whiirlwind also has a faux spinner loaner to check.
 
Make sure you allow for the thickness of the flywheel. The 1.6" is to the prop flange, not the flywheel.
 
Make sure you allow for the thickness of the flywheel. The 1.6" is to the prop flange, not the flywheel.

This is exactly why I wanted a drawing like the one below. But I am pretty sure the prop flange and flywheel are the same thing according to WW....see drawing below:

https://m.whirlwindaviation.com/pdf/Whirl Wind 200RV 74RV Spinner Options_RevA.pdf

Thanks,
Mark

EDIT: Updated info from Larry - thanks and that was exactly what I was looking for! See attached dimension
 

Attachments

  • ww.jpg
    ww.jpg
    72.3 KB · Views: 26
Last edited:
Back
Top