What's new
Van's Air Force

Don't miss anything! Register now for full access to the definitive RV support community.

rivet pitch problem- starter contactor

Desert Rat

Well Known Member
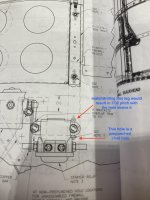
Hey guys- I was laying out the contactors this afternoon, and ran into something odd.

Per print, the most inboard nut plate picks up an existing rivet hole for the lower leg and then you're supposed to match drill thru the upper leg, but that would put the hole way below min. rivet spacing per mil-spec with the next rivet up in the run. This row of rivets goes through the firewall, then the vertical angle behind which ties in to lost of other important stuff, so it's kind of a big deal

I know that manufacturing engineering take precedence over mil-spec, and I've given that advise myself, but this just doesn't look right. If I drill it per print, there will only be about 7/32 center to center between these 2 rivets, which is less that 1/2 the Mil-Spec requirement.

I'm inclined to just skip the nutplate, put a nut on the back side, and live with the fact that if it ever dies on the road, swapping it will be a two person job. But, I looked at a lot of build logs online and I see that a bunch of people have just lived with how this turns out.

I'm curious if anybody has talked to Van's about it?
 

Attachments

  • 66942856392__E272039D-0196-466F-A994-695620B0BCA8.jpg
    66942856392__E272039D-0196-466F-A994-695620B0BCA8.jpg
    250.3 KB · Views: 177
  • 66942810346__505EDF14-ACF0-4560-A864-2E80A685AFE8.jpg
    66942810346__505EDF14-ACF0-4560-A864-2E80A685AFE8.jpg
    165 KB · Views: 178
One leg

I cant remember exactly, but i think i just cut off the other leg and just used one leg. The leg is only there to keep it from falling off and keep it from rotating. It is going into thick metal, i believe.

Also think about fuel line exit. It is close to contactor. You may want to move one or the other 1/8” to 1/4” (Hint: we all have moved one or both)
 
Last edited:
You’ll be glad it’s there

When you go to change your that contactor you’ll be glad it is there. I’m pretty sure I did it just like the plans show it.
 
You could drill out the existing rivet and used that hole for the plate nut #10 bolt hole. See the battery box bracket above as an example. Just have to make the bus bar that runs between the relays (contactors) a little longer..YMMV
 
Last edited:
You could drill out the existing rivet and used that hole for the plate nut #10 bolt hole. See the battery box bracket above as an example. Just have to make the bus bar that runs between the relays (contactors) a little longer..YMMV

I think thats the move unless doing that will interfere with something on the engine mount. I'll take a look.

FYI- its not a #10 hole, it's .25 for a -4 bolt. Thats why this becomes an issue here; the K1000-4 nutplate has a huge span between the lugs compared to the smaller ones. I also question why you need four 1/4" bolts here instead of much smaller fasterners. Is it because thats what the mounting ears on the contactors are sized for? For pete sake, that's the same number and size of bolts that hold the engine mount on some airplanes.

My bad - yes it is a 1/4” .

OTOH, a 3/32” hole adjacent to-and-within 2D of another 3/32” hole in material that’s .063” thick x 3/4” wide, isn’t going to affect yield strength of the angle material.
 
2D edge distance

I remember spending a lot of brain cells on those contractors and that hole. In the end I put that one where it was shown.
 
Don't skip the nut plate!

There is no harm in positioning that nut plate horizontally by drilling 2 new holes for a nut plate of your choosing.
A veteran builder once told me, "never miss an opportunity to install a nut plate".
 
Dont think so

There is no harm in positioning that nut plate horizontally by drilling 2 new holes for a nut plate of your choosing.
A veteran builder once told me, "never miss an opportunity to install a nut plate".

In this case, the aluminum angle runs vertically, so a horizontal orientation would not be ideal.
 
Hey, I saw that I made the front page with this. Am I "somebody" now?

At any rate, I wanted to circle back to this with a resolution. I talked to Kevin at builder support and he confirmed that yes, the print is correct.

Other reasonable optioned include; foregoing the nutplate and just do a fiber lock nut on the backside, or center the nutplate on the next rivet hole down.

I was originally planning option 2, but once I really started looking this area over I determined that it's the same situation on a nutplate to the BATT contactor as well as on the fuel line doubler. I also considered how bad it would suck to have to change this on the road by myself not be able to change this without a helper.

Long story short, I ended up just building it to print rather than creating a cascading set of modifications.

However, I did oversize the firewall doubler enough that I could pick up a second existing rivet instead of drilling another shy pitch abomination. I also made it a little wider, which allowed me to fudge the location of the fuel line hole about 3/8" inbd and down to solve for the conflict with the starter lug that so many people have warned me about.

Thanks for the comments. All good.
 

Attachments

  • IMG_6656.jpg
    IMG_6656.jpg
    260.1 KB · Views: 133
Back
Top