What's new
Van's Air Force

Don't miss anything! Register now for full access to the definitive RV support community.

FAB Failure

JordanGrant

Well Known Member
For posterity:
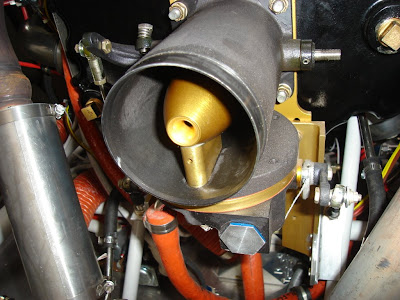
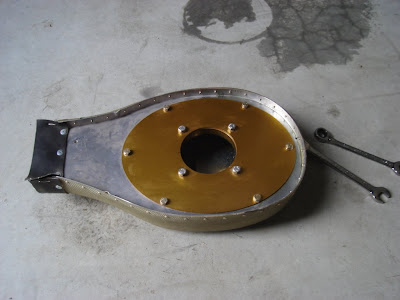
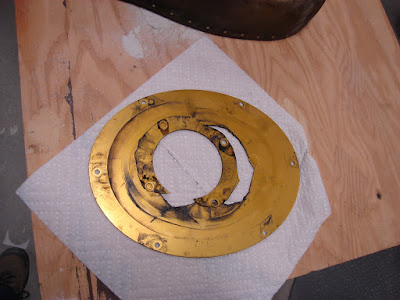
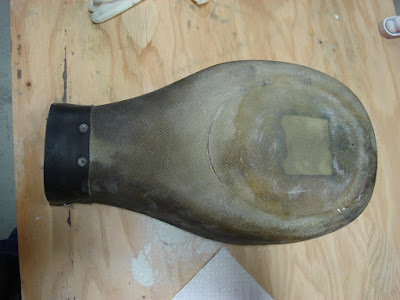
While doing my annual, discovered that the mounting plate for my FAB had cracked all the way around. The filter had also rubbed clear through, splitting the fiberglass of the FAB. (This is an Airflow Performance fuel injected version). Whilst taking the FAB off, I also found that the four bolts that hold the mounting plate to the compression ring were loose. Either (A) they vibrated loose or (B) I forgot to tighten them at the last annual. I think (B) is more likely, and the following pictures show you what happens when you let the FAB vibrate too much by not mounting it up tightly:

DSC01757.JPG

DSC01756.JPG
 
Jordan,

Bummer, but you are not the first one the experience this with the FAB. I've had both of these issues with mine, both not quite as severe because I was lucky to catch them earlier. Fortunately, the fix is pretty easy for both.

For the top plate, us the old one as a template to make a new one. I remade mine from 090 (stock is 063.) When you mount it to the carb, use large area washers under the bolts to spread the load out.

For the bottom of the air box, cut out a piece of scrap 032 or so to fit in the bottom of the box so that the filter rests on it rather than the glass. Attach it to the bottom of the box with screws. If it wears through the aluminum, then make a new one. It takes about 5 minutes to snip out a new one, you could do it at every annual if need be.

It looks from the picture like you had to old first generation Van's FAB mod air door on the bottom. We you one of the (many) people to have that mod fail on you? I was!
 
Looking towards a solution

Jordan:

In your opinion, what's causing all the vibration?

Do you think prop balancing would solve your vibration problem?
 
I too, had the filter wear through the fiberglass airbox.
The filter is a tight squeeze between the top plate and the bowl so it surprised me that there was any movement allowing the wear.
I epoxied a .016 aluminum plate for the filter to sit on to prevent this in the future.

Scott A. Jordan
80331 / N733JJ
860 hours
 
I, too, have cracked several FAB mounting plates...

I believe I finally solved the problem by "softening" the connection between the FAB and the lower cowl. I hypothesized that the cracking was due to relative movement between the engine and the cowl. The FAB was quite close to the cowl and the gap was sealed per the plans with a strip of baffle material. Any movement between cowl and engine put large deflections on the FAB. I cut the snout of the FAB to increase clearance with the cowl and replaced the (baffle) seal with a piece of scat tubing.

This configuration has lasted longer that any previous installation (~2yrs - so far).

Good luck,

Dean Pichon
 
Jordan:

In your opinion, what's causing all the vibration?

Do you think prop balancing would solve your vibration problem?

Prop balancing comes up in every one of the ten or so threads on airbox failures. Mine is dynamically balanced, and has been since day one.

I've had two top plates crack so far, with the last one going on something like 400 hours or so. There are two types of RV owners - those who've flown long enough to have a failure and those who haven't yet!

The most likely cause is not engine movement, but the tremendous acoustic vibration going on in an induction system. The engine simply doesn't move enough cycles for the connection to the cowl to be the main driver, in my opinion. During cruise, the engine just sits there. Induction air, at WOT, is a fairly significant start/stop flow pattern.

BTW, I had the exact same fiberglass failure as shown in Jordan's first post. I cleaned things up, and put several layers of glass over the inside of it, and no further problems.
 
Good repair ideas!

For the top plate, us the old one as a template to make a new one. I remade mine from 090 (stock is 063.) When you mount it to the carb, use large area washers under the bolts to spread the load out.

That's a great idea to beef it up to .090. Unfortunately, I don't have any of that laying around, and besides I'm under the gun since I'm leaving for Iraq next week, so I just ordered another one from Van's. I like the washer idea, though, I think I might have some that will work.

For the bottom of the air box, cut out a piece of scrap 032 or so to fit in the bottom of the box so that the filter rests on it rather than the glass. Attach it to the bottom of the box with screws. If it wears through the aluminum, then make a new one. It takes about 5 minutes to snip out a new one, you could do it at every annual if need be.

I thought about this, too, but I hesitated because I'm worried about failures that would send bits of metal into the intake. If I continue to get lots of wear, I may do that, though.

It looks from the picture like you had to old first generation Van's FAB mod air door on the bottom. We you one of the (many) people to have that mod fail on you? I was!

Yup, mine failed 1/2 way though my first long cross country (at about 50 hrs). I did a field repair to get home then just glassed it over when I got back.
 
I believe I finally solved the problem by "softening" the connection between the FAB and the lower cowl. I hypothesized that the cracking was due to relative movement between the engine and the cowl. The FAB was quite close to the cowl and the gap was sealed per the plans with a strip of baffle material. Any movement between cowl and engine put large deflections on the FAB. I cut the snout of the FAB to increase clearance with the cowl and replaced the (baffle) seal with a piece of scat tubing.

This configuration has lasted longer that any previous installation (~2yrs - so far).

Good luck,

Dean Pichon

That's a great idea, too.
 
4 layers more?

Prop balancing comes up in every one of the ten or so threads on airbox failures. Mine is dynamically balanced, and has been since day one.

I've had two top plates crack so far, with the last one going on something like 400 hours or so. There are two types of RV owners - those who've flown long enough to have a failure and those who haven't yet!

The most likely cause is not engine movement, but the tremendous acoustic vibration going on in an induction system. The engine simply doesn't move enough cycles for the connection to the cowl to be the main driver, in my opinion. During cruise, the engine just sits there. Induction air, at WOT, is a fairly significant start/stop flow pattern.

BTW, I had the exact same fiberglass failure as shown in Jordan's first post. I cleaned things up, and put several layers of glass over the inside of it, and no further problems.

My repair is 3 layers of 8.5 oz on the insides, plus a layer on the outside. We'll see how that does. If it wears excessively over the next year, I'll epoxy an aluminum buffer into it.
 
I'm beginning to see a trend in this area.... Might duplicating the plate in stainless steel remedy the situation? Besides weight, what might the drawbacks be to fabricating it in stainless?
 
The Better Mousetrap....

Guys,
Here's a possible solution. My "4s" custom intake. Made by Charles Wilhite. Weight is almost nothing compared to the "Fab". There's a conical K&N filter within the larger blue cone. The front of the cone is flexible silicone that fits up to the cowl. The curved "P Trap" shape is the ideal airflow shape. I have over a year flying on this mod and I wouldn't trade it. Although I have no comparable performance data to a 4 with Van's "Fab" my "4" is at least as fast and the unit shows virtually no wear from any reason!


picture582.jpg
[/URL][/IMG]

picture581l.jpg
[/URL][/IMG]

Bill
 
Im not putting an alt source door in my -8 after all the problems. Instead I'll put a screen just fwd of the carb heat door. Did this in my other plane with no noticeable issues. This keeps little birdie and plastic bags fwd of the carb heat door which the becomes the alt air source.
 
That's a great idea to beef it up to .090. Unfortunately, I don't have any of that laying around, and besides I'm under the gun since I'm leaving for Iraq next week, so I just ordered another one from Van's. I like the washer idea, though, I think I might have some that will work.
I might have enough laying around to make another one. Can you give me the L X W dimensions of the part, and I'll see if I have a piece big enough. If I do, PM me your address and I'll send it to you. It might not get there in time for you to ship out, but then again, Van's part might not either! Either way you'll have it waiting when you get home.
 
My 6A

Had 3 long cracks in my top plate at annual 594 hrs, replaced with thicker sheet and washers to spread the load.
 
stainless

I noticed cracking after around 50 hours. I made a doubler and added large washers. This is now on my routine oil change inspection list.

Fairings, etc made stainless replacements for the wheel pant brackets, which is another area that people have experience failures from cracking and fatigue. See http://www.fairings-etc.com/brackets.htm

If my doubler fix doesn't hold up, I'm going to pursue having a stainless steel replacement plate made. Sounds like if someone made 100 of them, they'd have no problem finding buyers.

Don
 
The most likely cause is not engine movement, but the tremendous acoustic vibration going on in an induction system.

Ya'll should listen to Alex. The issue is number of stress cycles and the rate at which they accumulate per flight hour. Aluminum has no knee in its S-N curve; given enough cycles all aluminum parts fail. At low load per cycle it merely requires more cycles.

Aluminum fatigue strength is usually quoted for 10 million or 100 million cycles, an arbitrary figure on a slope which steadily (although exponentially) declines to zero strength. Ten million cycles may seem like a lot (and it is if we're talking wing spars), but it's nothing in the context of the vibe Alex describes. Assume a 2400 RPM cruise, or 4800 intake cycles per minute, or 288,000 per hour. It only takes 35 hours to reach 10 million cycles, and that doesn't count the harmonics.

Two choices...either greatly reduce material stress (to push failure way out into the far exponential reaches of aluminum's S-N curve), or change material. I'd suggest ya'll should quit fooling around and make steel mount plates. Steel does have a knee in its S-N curve, so stress below the knee doesn't fail the part no matter how many cycles you apply.
 
How much does beefing up the plate thickness help?

Two choices...either greatly reduce material stress (to push failure way out into the far exponential reaches of aluminum's S-N curve), or change material.

Dan, does increasing the thickness of the plate effectively reduce the stress? (i.e., beefing up to a .090 plate instead of .063) If so, does that add 'cycles' nonlinearly as well?
 
My latest stab at this problem was to mount two of the standard top plates epoxied together. This setup is way stiffer than the single plate and my idea is that maybe the composite construction will help dampen the vibration. Don't know how it will work yet, over time. I agree that someone needs to market a pre-cut steel plate.
 
Just Curious....

Are we seeing the same type of failures on the O-320 engines? I have ~600 hours on mine now and have not seen cracking (yet!). Alex's and my hangar mate had one crack with less than 100 and he runs his

I could not tell from the posts what engines and induction everybody had. Might be interesting to see if there are patterns. Dan and Alex can tell me if this does not make sense.

I thought maybe I was lucky until the cylinder AD hit...... so much for clean livin';)
 
Just as a reference point, my airplane is 17 years with well over 1000 hrs. and I have seen no cracking anywhere in the FAB set-up (built per plans). The last 750 hrs. have been with a compression ratio of 9.5:1 which I would assume would exasperate the problem.
 
Dan, does increasing the thickness of the plate effectively reduce the stress? (i.e., beefing up to a .090 plate instead of .063) If so, does that add 'cycles' nonlinearly as well?

I visualize the plate to be loaded like a diaphragm, so yes, increasing plate thickness increases distance from the neutral axis to the outermost fiber and thus lowers stress at the outermost fiber. Thickness has nothing to do with cycles. Cycles is simply the number of times the part is loaded and unloaded.
 
Dan, does increasing the thickness of the plate effectively reduce the stress? (i.e., beefing up to a .090 plate instead of .063) If so, does that add 'cycles' nonlinearly as well?

From the looks of the photo in the original post, that appears to be a bending or diaphragm failure. Bending stress goes as 1/(thickness squared) so increasing the thickness from .063 to .090 will decrease stress by about a factor of 2 (.09^2/.063^2). That'll make an aluminum part last longer. I don't have a fatigue curve handy for aluminum, but it probably isn't quite linear, so no guess on life increase. As Dan wrote though, steel (including stainless alloys) has the handy property that, if you decrease the stress below the so-called endurance or fatigue limit, it will never fail. The question is what that stress level is, and how to determine what the stress is on the part, in practice.
 
Charles Wilhite

I am amazed to see that people are buying stuff from Charles Wilhite again.
It was just 3 years ago that he stiffed a bunch of us with his composite
canopy ripoff. He still has $1200 of my money. Beware.
 
After reading about an off-airport landing due to the carb partially falling off the bottom of the engine (nuts backing off) I've added a pre-flight check where I stick my hand in the inlet and make sure the airbox is not loose.

Doug
RV6 350hrs
 
After reading about an off-airport landing due to the carb partially falling off the bottom of the engine (nuts backing off) I've added a pre-flight check where I stick my hand in the inlet and make sure the airbox is not loose.

Doug
RV6 350hrs

Yup, I actually do the same. My wife (and test pilot for first 40 hours) had the compression ring slip off during one of the test flights. The FAB got lodged in the bottom of the cowling, partially blocking airflow. This led to a partial loss of power. She declared an emergency and flew back to the airport and landed without incident. Now I tighten that thing WAY down and we also check it like you do prior to flight.
 
Safety those intake bolts.

Not sure if you where referring to the bolts to the carb/servo or the bolts to the airbox? I was not happy with the fold over tab method of safety from Vans so I used Phillister Head Bolts and safety wired.

If you where talking about the AN3's that hold the airbox on, I apologize.
i4eqdw.jpg
[/IMG]
 
If you where talking about the AN3's that hold the airbox on, I apologize.

The Airflow Performance setup is different. You bolt the FAB into a ring that goes around the intake of the throttle body. That ring is held on by "squeezing" force supplied by a hex-head bolt. Kind of hard to explain, but easy to understand if you saw a picture.
 
Airbox plate

We've been making the air box plate for the FM-200 and FM-100 for Van's filtered air box out of .090 aluminum for a couple of years now. Seems the clearance of the box to the front of the cowl is important.

Don
 
The Airflow Performance setup is different. You bolt the FAB into a ring that goes around the intake of the throttle body. That ring is held on by "squeezing" force supplied by a hex-head bolt. Kind of hard to explain, but easy to understand if you saw a picture.

OK how about a picture. I will be assembling my FAB soon and don't want to re-invent the wheel if it works.
 
Crystal Clear

The Airflow Performance setup is different. You bolt the FAB into a ring that goes around the intake of the throttle body. That ring is held on by "squeezing" force supplied by a hex-head bolt. Kind of hard to explain, but easy to understand if you saw a picture.

Sorry, I see that in your original post now.
 
AFP FAB Airbox Pics

OK, here's some pics. If you don't have the AFP system, they are probably not relevant to your project, but here's how it works for me.

This is the "compression ring", for lack of a better term. You can see that it has a split in it, and is threaded for a hex bolt. That bolt tightens down the ring.
IMG_0698.JPG

Here is the AFP intake, the the ring fits around the last 1/2" or so that's smooth.
bottom%20of%20engine%20looking%20up.jpg

Here is the FAB assembly, you can just see the ring mounted inside, secured to the top plate with four bolts/lock washers.
the%20offending%20air%20filter%20assembly.jpg
 
We've been making the air box plate for the FM-200 and FM-100 for Van's filtered air box out of .090 aluminum for a couple of years now. Seems the clearance of the box to the front of the cowl is important.

Don
I just looked at the clearance between my FAB and the cowl, and it's pretty tight - maybe 5/8" or so. That's probably much closer than it needs to be. If it were out to a full 1", or maybe a bit more, their might be less stress/vibration on the FAB from interaction with the cowling. Probably make it easier to put the cowl on and take off, as well.
 
Mhee 2

Reading this thread got me thinking that I should check my FAB, took off the lower cowl and found this:

RV-6AFabFailure1.jpg


RV-6AFabFailure2.jpg
 
Re: How Many Hours to Failure

I haven't looked at it recently, but about 119 hours or so. I never was very happy with the airbox... Very hard to remove and it rubbed on the nose gear a little in the back, but the worst was that really was too stiff of a connection with the cowl, the tube I made was not flexible enough to provide good isolation. Another thing I didn't like was the abrupt transition between the tube diameter and wider airbox. I was in the "let's get this thing in the air already" mode when I built this.

I have been eying DanH's thread on rubber ducts, as well as rvermeland's beautiful FAB he built for a James cowl; and thinking of building the entire piece out of urethane rubber.

Hans

PS One other thing, I noticed the plane seemed slower than usual on the last flight. Loss of ram air.
 
Last edited:
My FAB soulution

The problem at 500 hours:

airbox.jpg


My latest solution at 1500 hours (the second plate lasted 1000 hours):

Using wide area washers with the below plate. Note flush rivets on asecond doubler plate on right side.

doubler.JPG
 
I just found this crack in my new thick plate this evening

I just found this crack in my new thick plate this evening. I made it not too long ago to replace the original thinner one. Looks like I'll have to go to something like 1/8".

IMG_6074.jpg


Bob Axsom
 
Last edited:
HAHAHAHAHAHA

HAHAHAHAHAHAHAHAHAHAHAHA! Seriously Brian I didn't see that coming. Yes that was my first thought slow down for longevity.

Bob Axsom
 
Airflow Performance Airbox Departs on T/O...

Hate to keep this thread alive, but there seems to be a trend here... New Air Flow Performance customers take heed...

My AFP airbox departed the intake body of my fuel injection soon after T/O yesterday, at approximately 150-200 feet, resulting in a total power loss on my RV-8. I dead-sticked the plane in and stopped 20 feet short of a fence, nearly losing the aircraft to barbed wired fences and the other evils lurking beyond the the airport boundary. Luckily the last 250 feet of runway was uphill... I was not previously aware of the list of similar occurrences, concerning the AFP airbox problem.

I am trying to devise a method of safetying the airbox to the aircraft and noticed mention by Kahuna of drilling the compression ring to the metering tube, in a previous thread. Has anyone found a a good way to safety the airbox, so as to preclude an unplanned jettison at an untimely moment?


Thanks,

Tom B.
 
The ring, assuming that is what came loose, is clamped by a 1/4-20 screw, IIRC. That puts more than a thousand pounds of clamping force on the ring. Hard to imagine it coming loose, unless something was jamming the threads or otherwise adding thread friction, in turn preventing proper clamping.

Glad the plane and you are ok, nice job! Also, what caused the engine to lose power?
 
Not familiar with an AFP filtered air box (FAB);that typically comes from Vans, while the fuel injection system, including the ring, originates from AFP. There is a specific order in which the mounting bolts and the clamping bolt on the ring must be done to insure that the FAB is held tight. Someone can chime in with that info or you can call AFP to make sure you get it right. When done correctly, I'm not aware of any recurring problems with the FAB coming loose. Regardless, the FAB coming loose in itself wouldn't cause an engine out. Did it block the air intake somehow?

Erich
 
Airflow Performance Airbox Departs on T/O...

When the airbox departed from the intake/metering tube, it managed to rotate inside the cowling and block the majority of the smooth airflow to the engine (as I discovered after shutdown). At full power and (greatly reduced) airflow, my suspicion is that the engine flooded due to the overly rich mixture created by the blockage. Pulling the throttle to idle had no effect in the short amount of time to landing.

Loss-of-power to landing spanned approximately 15 seconds, with little time to do much other than fly, switch tanks and retard the throttle. I suspect the engine may have come back and operated at a reduced power setting, as the ensuing ground run-ups suggested, IF there had been more time for the engine to clear but time and altitude didn't allow for that.

Luckily, it seems this hasn't happened to anyone else at this high of a power setting and this close to the ground. My sense is if it had happened at a lower power setting, with more altitude, it probably would have cleared, with time and operated at a reduced power setting sufficient to limp back in. Just another data point for everyone (with this system) to take note of-this was obviously a worse case scenario to be aware of.

I will determine a more secure method of safetying the airbox to the intake tube, so as not to have the compression ring(with a single screw) as the sole source of attachment. Results to follow...
 
Not familiar with an AFP filtered air box (FAB);that typically comes from Vans, while the fuel injection system, including the ring, originates from AFP. There is a specific order in which the mounting bolts and the clamping bolt on the ring must be done to insure that the FAB is held tight. Someone can chime in with that info or you can call AFP to make sure you get it right. When done correctly, I'm not aware of any recurring problems with the FAB coming loose. Regardless, the FAB coming loose in itself wouldn't cause an engine out. Did it block the air intake somehow?

Erich

You must tighten the ring clamp bolt around the throttle body prior to tightening the 4 plate bolts.
I used locktite on these fasteners and have had no trouble or loosening in 1000 hrs.

This is also easy to check on preflight by sticking your fingers in the snorkel intake and checking that the airbox doesn't move.
 
Back
Top