What's new
Van's Air Force

Don't miss anything! Register now for full access to the definitive RV support community.

Firewall Spin Finish

BLittleton

Active Member
All, I'd like to give a "spin finish" to my forward firewall. This pic is my first attempt on a piece of scrap...not bad, but could be better. I used a 2" scotch bright pad on a mandrel in a hand drill. First, is there any reason I shouldn't do this to the stainless firewall? Second, any tips to make it really nice? Thanks!
2rw9f6u.jpg
 
The technique is called engine turning. It's best done with a drill press. I've had success with a wood jig that has a horizontal and moveable vertical guide. To be honest once all the firewall forward is done you're hard pressed to see your hard work. Google machine turning and you'll find lots of info.
 
I gave it a try on my subpanel for the engine controls. It is a lot of work to do it this small. I laid out a grid and used a drill press with some special rubberized material that had grit embedded in it. I thought about doing the firewall, but it wasn't going to fit on my drill press :D I'm not sure how it would look going freehand, but it does add some "bling" to the airplane!

IMG_3816-M.jpg
 
Good grief, Bruce. I can't imagine how long that must have taken. But it's beautiful!!!

Drill press is definitely the way to go here. Some sort of grid or laser system or ? to help with precise positioning before each turn would help produce a professional-looking result. Unfortunately for a large piece like a firewall, that would be one monster drill press.
 
Last edited:
I did mine by hand using a 2" scotchbrite pad with an aluminum backing plate... Longest time was to lay out the 1" grid. Once you get a rhythm it goes pretty quickly...


A typical drill press won't have the throat depth you'll need. Most guys would do this by hand. I did. If you use a 1x2" board clamped across the firewall for a guide, you might get a bit more consistent line... not that anyone would ever notice after the firewall is covered.

If you've got friends with big tools, find one with a Haas CNC TM2 mill with open sides. You can write a program very quickly to advance the mill for a perfect layout. If I were doing another one, I'd try this.

Also, you can make your own tool to do this from a bolt, large washer welded to it, and a scrap of Scotchbrite pad. The softer pad will actually work a bit better than the rigid tools shown above, though either will work. Use a piece of adhesive Velcro to hold the Scotchbrite to the washer face.

It's fun customizing like this that keeps things interesting!
 
Last edited:
I have used a sharpie pen to mark a grid on the metal first. The sharpie marks will be mostly removed by the scotchbrite, the rest can be removed with acetone.
 
Any movement w/ the hand-held drill will result in those blurry or 'soft' turns. A drill press will give you the best results. For the firewall, you'll need to borrow a long-neck press. We did a LOT of machine turning on our Jenny. Here's the link describing what we did. We marked a grid in pencil, any variation from a perfect pattern really stands out. Alternately, I hear you can purchase sheets of stainless already burnished, just not sure of $.


http://curtissjennyrestoration.blogspot.com/2011_11_01_archive.html
 
Last edited:
This may be an option for the engine turning project.

The grid is marked on the fixed and sliding board, the turning device is powered by an electric drill.

Many years ago I used this method along with an old engine valve and valve grinding compound to turn a firewall on a 1939 Plymouth.

f0ubk.jpg
 
Looks cool..

..other than aesthetics, is there any particular reason to do this? I wonder, because many old planes had this done is various spots. Just curious if it affects the material in a positive way.
 
Not sure Mike, but the Spirit of St. Louis had some of the most beautiful work I have seen on aircraft.
 
I agree.

Not sure Mike, but the Spirit of St. Louis had some of the most beautiful work I have seen on aircraft.

Last year at Oshkosh, there was a beautiful scaled replica of the Spirit of St. Louis, which also has a turned cowl. Looked great! I wish I had a picture of it to post..
 
The Spirit of St. Louis was definitely an inspiration as I built my airplane. I looked at quite a few images with Google image search like this:

102591092.yVie6qmZ.jpg


The small subpanel piece I did was done as Don describes using a layout board and moving the piece along a set of grid lines and clamping down a fence board on the drill press. There are many different ways to lay out the swirls, but I think the basic one I used looks pretty. Just move a radius length for each swirl and overlap the same distance.
 
..other than aesthetics, is there any particular reason to do this? I wonder, because many old planes had this done is various spots. Just curious if it affects the material in a positive way.

Mike I read once that the swirls were done with a round stock of pure aluminum to in essence alclad the sheet because some of it rubbed off on work.
I have no idea how much truth there is to this. I have thought about getting a piece of aluminum stock and try it to see what the swirls look like. I have experimented with different scotchbrite pads, sandpaper, etc.
 
Welp...I did it!!!

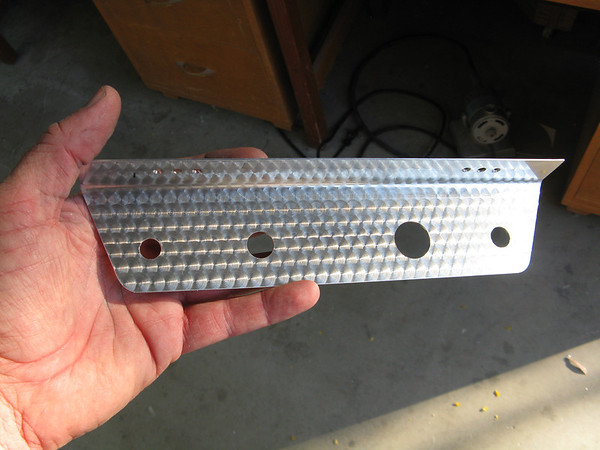
Thanks all for the tips/discussion you posted. I found a drill press and used it to engine turn my firewall.
The drill press is DEFINATELY the way to go. After trying a couple of patterns, I decided to go with no overlap
side to side, and a 1 inch overlap top to bottom (2" pad). I also made it a point to go from bottom up so the
"fish scales" are layered like shingles on a roof (i.e. bottom tucked under top). I'm really happy with the
effect and added a little "artistic flare" in the center of the firewall.

So be honest, do you see "artistic flare" in this shape, or just a guy who's drill press wouldn't reach all the
way to the center of the sheet? I hope both can be true. The drill pressed swirls were just so crisp and pristine,
I didn't want to muddy them up with trying to wrangle the drill by hand. In all my practice attempts, the hand swirls
were terrible compared to the drill pressed ones.

v5d3bn.jpg

dlic9l.jpg
 
Last edited:
Cabin side turning

I got all of the stuff to do this job before deciding instead to insulate the engine side of the firewall against fire with Fiberfrax and SS foil - per Dan Horton's method.

However, it struck me that it would have been better to do this on the cabin side,where it could be seen in normal operation - well at least as much as on the engine side.

One advantage of doing it on the cabin side is that the flanges face forward, allowing the pattern to be executed right up to the edges, which are covered by the structure in any case. I think that the disruption to the pattern on the engine- side jobs, caused by the flanges, is a pity - and very visible.

However, it was too late for me because,even thought the fuse wasn't built when I decided to go for engine side fire protection, the stiffeners were already riveted on. This needs to be done on a 'raw' firewall.
 
Back
Top