What's new
Van's Air Force

Don't miss anything! Register now for full access to the definitive RV support community.

Primer Problem

sellis

Member
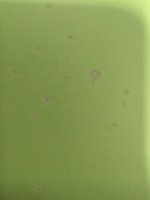
Can someone help me understand my problem? (See pic)
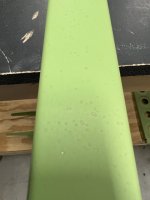
I assume this is caused by either contamination on the surface or moisture in the air line.

I cleaned with Prekote and maroon scotchbrite, rinsed well, dried with compressed air, let sit for 12 hrs to fully dry, then primed, so I don't think it was contaminated. And I wore latex gloves the entire time.

I have a small water separator in the airline after 50' of hose. It's a 25gal compressor. I added another disposable water filter from harbor freight at the gun and the finish only improved marginally.

Could temperature do this? It was right at 60 degrees when I painted but it had been warming over several hours from a low of about 48. Otherwise, a beautiful day and I sprayed just outside my garage door.

This is AKZO primer mixed 50/50 and it sat for 30min after mixing before spraying. I'm using a 3M Accuspray gun with a 1.8 tip.

Any thoughts would be appreciated.
 

Attachments

  • Bad Prime Coverage.jpg
    Bad Prime Coverage.jpg
    58.7 KB · Views: 334
Contamination

I looks like contamination from possibly oil, silicone etc. Is the air line new and has not previously been used with an inline oiler for air tools? Was there anything else being sprayed in the area while the parts were waiting to be painted, e.g. Armor All or fly spray?

As an aside, priming should be done within 6 hours of cleaning, otherwise the aluminum oxidises again. Once scuffed and cleaned it can be wiped down again with degreaser (naptha) or methylated spirits just before spraying.

I ran out of light and had to wait till the next morning. Cleaning took longer than expected! Probably should have wiped it back down.

I did use a brand new air hose in order to extend mine to get outside. I do not have an in-line oiler. There was nothing else being sprayed. Could the new hose have done this? Thanks for your insight!
 
There are a million possibilities. But I'd start by looking at two of 'em:

1) Where did you store the epoxy overnight and how cold do you think the epoxy was when you mixed/sprayed it? The epoxy and whatever you're spraying both need to be at 60+. 70 is better.

2) There are those who think "swiss cheese" looking primer is a result of putting on a <too> heavy first coat.
 
Contaminated

It looks like surface contamination.
Doubtful a new hose would have contaminates. Florida? Maybe surface condensation? Cool part in warm humid air.
Wipe with a solvent before spraying.
Try a Gorilla tape test after the standard cure time. Apply a section. Rub it down really well and rip it off. If nothing comes off, leave it.
Paul is correct. Aluminum starts oxidizing immediately. Sooner the better.
 
Last edited:
Acetone

I scotchbrite and then wipe with acetone before priming.

Using acetone is important because it does not leave a residue or film behind. Some paint thinners, especially the environmentally safe stuff, leave stuff behind and could screw up the primer.

Also too thick could be culprit because the inner stuff dries thru the outer layer.

Best to use a flash or mist coat first just to get some material down, and then come back 15 seconds later with a final thin coat. Primer should never be thick.

Also make sure the primer has flashed off before hitting it with paint.


The picture is a classic case of chemical contamination, probabaly a silicone. Make sure you use a clean cloth or I just use paper towels. The scotch brite should take off any silicon contamination, silicone cannot be wiped off, it needs to be scrubbed off.
 
Last edited:
You said you rinsed well. I'm not sure what that means. If you meant with water then that is not enough. I wipe with lacquer thinner as part of the prep process. Some use acetone instead, but the key is you need a degreaser.

I have sprayed Akzo in lots of different temps. I mix 50/50 and sometimes add just a touch of extra lacquer thinner. I also just use a HF gun for priming, so nothing special there. I only have a water separator in my setup. I don't think water is your problem. If it was you would see it all over the piece.

One other thing you should pour your primer through a paint filter as you pour it into the cup. HF sells these but there are probably better ones out there. I use the HF ones. This will help stop your tip from clogging and stop you from getting small globs on your paint surface.
 
The original post states he uses PreKote as part of his primer prep. For the non-prekote users, here's what that process involves: spraying PreKote on the part to be primed; scrubbing with a scotchbrite pad; followed by a clean water rinse (says distilled not required). The parts are then allowed to dry before priming. I believe the instructions state the part should be primed within 12 hours, and do not wipe with other chemicals.
The PreKote site claims the product bonds to the aluminum at the "molecular level". I don't what that means, but I'm guessing it's what slows down the oxidation process which allows increased time before priming.
Who knows if that is true, and tough prove/disprove in our garage workshops.
All that said, I've used PreKote since the beginning of my project with good results. The process is time consuming, as are most other primer prep methods, and not sure I would do it again.
To the original poster, a few thoughts:
First: I wonder if the shiny aluminum may be contaminated with something that does not get removed with the PreKote scrub. I have always done a pretty good wipe down with one of the following: MEK (the best but most ugly), or less ugly Acetone, or safest 99% Isopropyl Alcohol. I just want to remove any contaminates that have accumulated during the part prep..drilling, cutting, etc.
Second, is your drying method: Initially, I allowed the parts to air dry before priming. This obviously increases the wait time before priming. I also noticed "water spots" on the metal after the part dried. Not sure that would affect primer adhesion, but I didn't like it. I then considered using my air compressor to dry the parts. However, I was concerned that oil/water/dirt contamination may result if proper filtration wasn't used. I resorted to using a hair dryer with good air velocity on medium heat to fully dry each part...did I mention time consuming earlier?
And finally, even though Prekote claims you have up to 12 hours, maybe more I can't remember, I usually try and get primer on the aluminum part as soon as possible.

All that said, since you're using Akzo epoxy primer, you could probably skip the Prekote process all together and just thoroughly clean/scuff/clean and spray Akzo as soon as possible. Although, I'd be worried the wing may corrode and fall off mid-flight!:)
 
Could temperature do this?

No, low temp causes issues with curing, not application, though it can create dry spray and pimples if the temp doesnt match the solvent type (fast, slow, etc.). But not what your pic shows.

Pic is not detailed enough to make a guess. Please load a close up pic. You can search for fish eye and see if that matches your problem. Fish eye typically comes from silicone contamination. It is VERY hard to remove; No way prekote would remove it. Some epoxy primers will produce something similar to fish eye if the first coat is put on too heavy. Never used akzo, so can't say if it is subject to that. The SPI epoxy primer definitely is.

Moisture in the lines would not cause a problem that looks like your pic.

The problem is liekly entrapped under the first coat, so you can add more layers and block it back to flat. If this wont' be getting a top coat, no further effort needed, unless the bare metal is exposed.

Larry
 
Last edited:
Thanks to all of you for the responses. I have a number of things to try.

The temp issue is intriguing. It was a cool morning and the part and the epoxy both could have been cooler than the outside air temp since they had been in the garage. That could certainly cause condensation.

Some type of chemical contaminant could also be an issue, but it would almost certainly have to have been introduced after the cleaning process, probably through the air line in some way.

And, I definitely could have put it on too heavy. I've sprayed steel before, but never aluminum, and I never had this issue, but that's been years (and different equipment).

Lots to think about and work on. Good thing this whole amateur homebuilt thing is all about learning! Grateful for the help.
 
Pic is not detailed enough to make a guess. Please load a close up pic. You can search for fish eye and see if that matches your problem. Fish eye typically comes from silicone contamination. It is VERY hard to remove; No way prekote would remove it. Some epoxy primers will produce something similar to fish eye if the first coat is put on too heavy. Never used akzo, so can't say if it is subject to that. The SPI epoxy primer definitely is.

Larry

This is as close as I can get without loading a huge file. It doesn't look like fish eye from pics I've seen, but I'm no expert. And I would have thought the Prekote would remove just about everything. What causes silicone contamination?
 

Attachments

  • Bad Prime closeup.jpg
    Bad Prime closeup.jpg
    484.6 KB · Views: 154
My guess is that it is contamination. What are you using for mixing cups? Most paper cups have plastic coating that dissolves in paint. I have also seen people use a syringe to measure paint. Syringes have some kind of lubricant in them and will cause fisheye.

Use plastic mixing cups made for paint available at your local paint store. Use metal measuring cups to measure the paint, or the markings on the paint cup.

Good luck,

Bill Wuorinen
Osprey 2 amphibian N137W
RV-7A N237W
A&P/ I.A.
 
Fish eyes

Definitely fish eyes. Alcohol and water will remove any oily and salty hand prints. I used Kleanstrip Prep All for wax and grease removal in a previous life. It dries a bit slower than acetone and lacquer thinner so you can see the finish if there are still any contaminates. Alcohol and water to remove hand prints then wipe Prep All on with a clean cloth or paper towel and wipe off with a clean paper towel. Tack rag then prime. Worked good for me over several thousand paint jobs.
 
My guess is that it is contamination. What are you using for mixing cups? Most paper cups have plastic coating that dissolves in paint. I have also seen people use a syringe to measure paint. Syringes have some kind of lubricant in them and will cause fisheye.

You may have nailed it! I'm using 3M PPS cups, but I used syringes to avoid a mess. I read that somewhere and thought it was a great idea. Dang, it's always the little things!
 
Definitely fish eyes. Alcohol and water will remove any oily and salty hand prints. I used Kleanstrip Prep All for wax and grease removal in a previous life. It dries a bit slower than acetone and lacquer thinner so you can see the finish if there are still any contaminates. Alcohol and water to remove hand prints then wipe Prep All on with a clean cloth or paper towel and wipe off with a clean paper towel. Tack rag then prime. Worked good for me over several thousand paint jobs.

Thanks for confirming. I'll go with what the guy with several thousand paint jobs says!
 
Rubberless

You may have nailed it! I'm using 3M PPS cups, but I used syringes to avoid a mess. I read that somewhere and thought it was a great idea. Dang, it's always the little things!

Grainger sells 60ml Rubberless syringes with catheter tip. I quit using rubber plug syringes when the plug came off and made a mess! :D
 
Hi

This kind of problem was shown here many times ... and I had the same.

Did you took syringes to mix the paint?

If yes, then you should not take systinges that have a rubber piston. They are lubricated somehow, and this is what mess up the primer.
 
Paint mixing proportions are not at all critical, for reasonable size mixes use the cups with quantities up the side, 1:1, 2:1, 3:1, etc. Or use a small ladle or a shot glass (more clean up), or anything that gives an approximate measure. Mixing cups are best, pour straight from the paint can. Mix and then pour straight into the gun through a filter.
 
This is as close as I can get without loading a huge file. It doesn't look like fish eye from pics I've seen, but I'm no expert. And I would have thought the Prekote would remove just about everything. What causes silicone contamination?

Definately not fisheye. Those problems always have a vertical profile that looks like a volcano crater. Very thin in the center with a defined higher ring around it. It is due to surface tension differences that push the fluid to the edges. Definately lots of pimples and that could be moisture or being too cold for the solvents in your epoxy. FYI, the air temp is not generally that relevant on the cold side, it is the temp of the epoxy and the metal you are spraying it on that matter. On that hot side of things, that air temp matters more. Always preheat the garage long before spraying and leave that epoxy in the house. You must use temp guns to confirm panel temp in the winter. Ugly surface is not your biggest concern. Once most epoxy primers drop below their minimum, in the first 24 hours after application, they can go dormant and will stop their curing process and not restart. It is not like your west epoxy that will eventually cure, just slower than normal.

I have never seen empty spots like that, without a ridge before, so can't say what it is.

Larry
 
Last edited:
As others have said, the syringes may be contaminating the paint. But I would definitely put an oil filter in-line too, even with the new hose. If it’s a conventional piston compressor, it will ALWAYS shoot water and oil into the airline.
 
Primer problem ideas

Don't overlook possible gun contamination. I bought a new gravity feed spray gun from HF and while the gun performs flawlessly it was also completely saturated with a lightweight oil to prevent corrosion during shipping (overseas...). I cleaned it thoroughly (or so I thought) before first use and still ended up with something that looked like that. Binks and Devillbiss guns back in the day were not packed in oil, not sure what they are doing currently.
Bruce
 
I work in an automotive paint shop and this is what we call craters. The number one hitters for this is silicone. Silicone contamination will bring a paint shop to a stop. Aside from all of the things others have already listed, look at things like your deodorant, your hand lotion/soap, etc. too. We have had cases of associates trying a hand lotion and suddenly we can't put a good finish on a car. Be careful with lubricants of any kind. Silicone is a great lubricant and therefore ends up in everything. If it has rubber, check and make sure it's not a silicone rubber. We test everything for paint compatibility because you never know what the ingredients might be. You've had a long open time, things like refrigerators or air conditioners that have a leak can put vaporized oil into the air that will collect on surfaces. Just some things to think about.
 
What was extended?

I ran out of light and had to wait till the next morning. Cleaning took longer than expected! Probably should have wiped it back down.

I did use a brand new air hose in order to extend mine to get outside. I do not have an in-line oiler. There was nothing else being sprayed. Could the new hose have done this? Thanks for your insight!

What does this mean? Did you use one air hose? What was extended? An air hose can cause this.
 
Thanks to all of you for the responses. So many great ideas and things to try. I'm looking at all of these possibilities and will make several changes to the way I do things.

Skip12: Yes, I used one new and one used hose. I'll try another new one, by itself, when everything else is in place as well.
 
UPDATE: I tried a new batch with 3 of the (easiest for me) changes suggested.

1. Kept the 2-part epoxy primer inside and waited until the afternoon to prime when everything was the same temp, around 75 degrees.
2. I tossed the syringes and used a stainless ladle to dip out the paint into a marked mixing cup (PPS System).
3. I turned down the fluid level to put on a thinner coat.

Not certain which was the silver bullet but this batch looks fantastic. Thanks again to all of you for your suggestions!
 
Back
Top