What's new
Van's Air Force

Don't miss anything! Register now for full access to the definitive RV support community.

Oil Consumption and Breather Tube

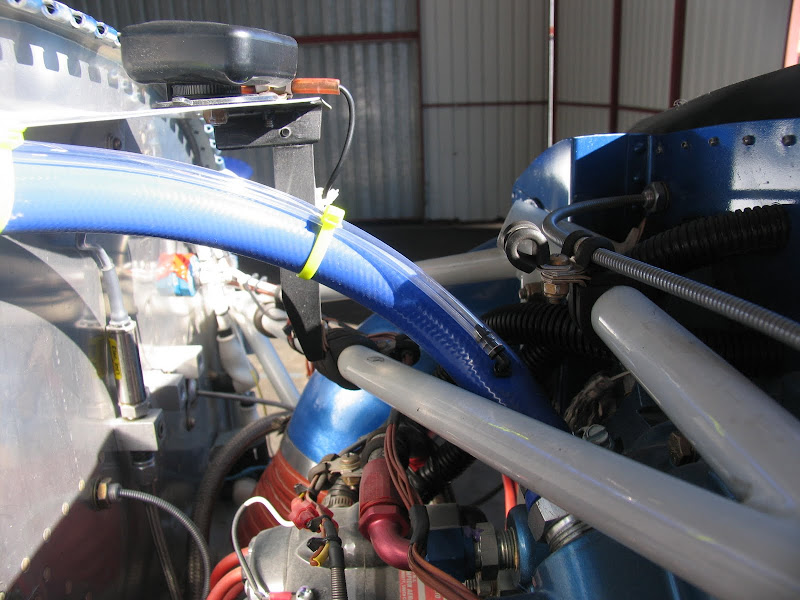
I am using -4 hose and fittings

Ok, me too.

The port in question is the factory turbo oil return. In that application it returns far more oil to the sump than the separator would ever require.

If you really want to check your separator performance just plug the return port and route the drain line to a catch bottle for a few hours.
 
Frustrated

Bill,
mine returns to the same port and seems to do a good job.

As you know I removed the exhaust more than 2 weeks ago and I am still waiting to get it back from the welder:mad:
In the meantime, I fitted a temporary test vacuum tube to the breather tube with a gauge in the cockpit so I can get a sense of the efficiency of the reed valve. Now if I can just get that exhaust back....
I'll post results just as soon as I get the exaust back....

IMG_2753.JPG


IMG_2754.JPG
 
I start at 10 qts after an oil change and maintain 9qts on the dip stick.
However, I will put in only 9 qts in the future and maintain 8qts.

I have measured oil consumption as precisely as I can by counting the number of quarts in and measuring how much comes out at the time of an oil change,
divided by total hours flown since last oil change.
As best as I can tell my consumption was just a bit shy of 1 qt per 11hrs. without the oil separator.
I am expecting slightly less oil consumption with the oil separator and keeping the oil at 8qts. we'll see.
The fact that we presently enjoy the most beautiful flying weather does not help
keep my impatience in check.:( 
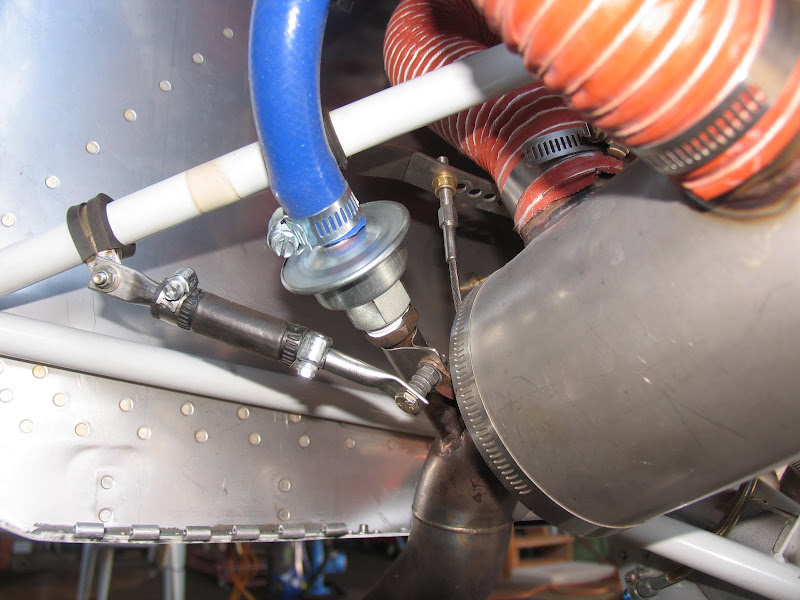
Where is that exhaust?
 
Results!

Finally got my muffler pipe back and wasted no time getting this Air/Oil separator checked out. The stub was welded in at a 45 degree angle and in this position the anti rotation clamp doubled as an extra support for the Reed valve. I chose this position to keep the Reed valve somewhat shielded from heat next to the heater muff and to catch any residual oil that might collect after shut down.
I tapped into the breather line at the top of the crank case and routed a vacuum hose into the cockpit to read Crankcase pressure in flight.
I am a little confused as to exactly what I am seeing. I am not sure how to compensate for altitude or how altitude affects crankcase pressure.
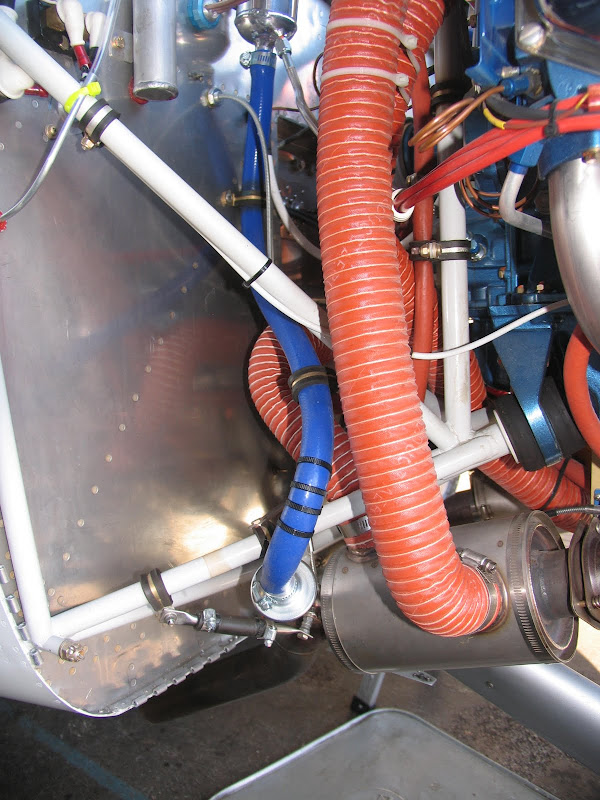
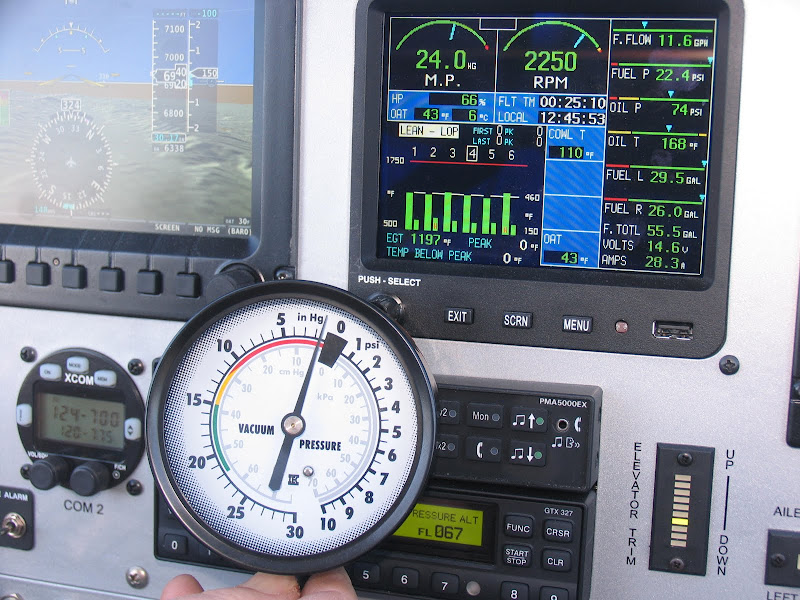
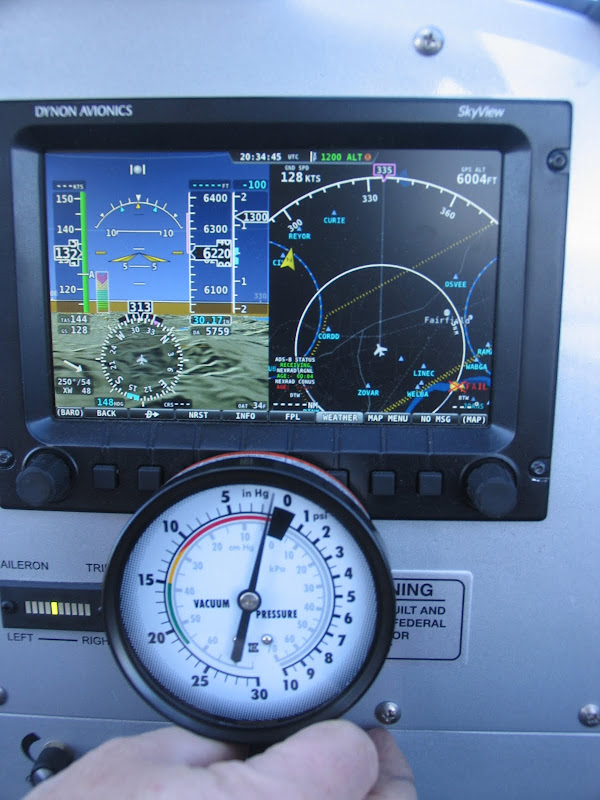
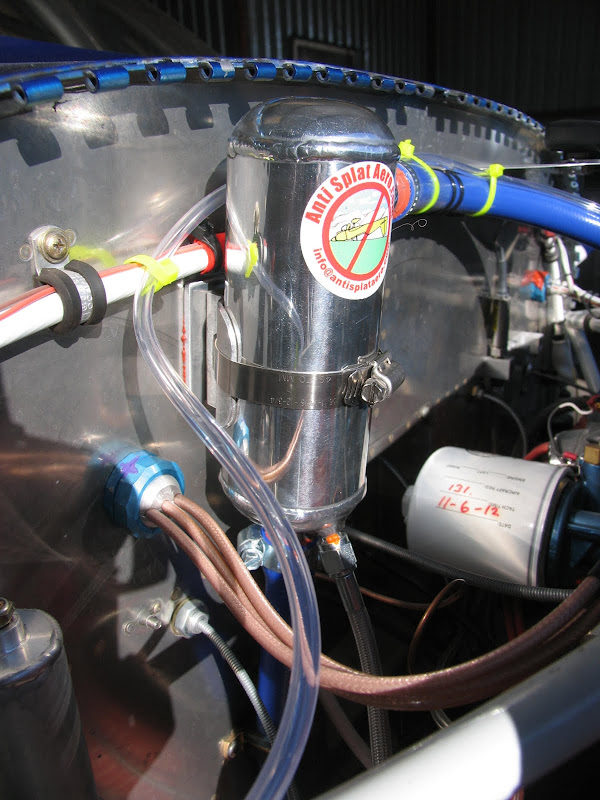
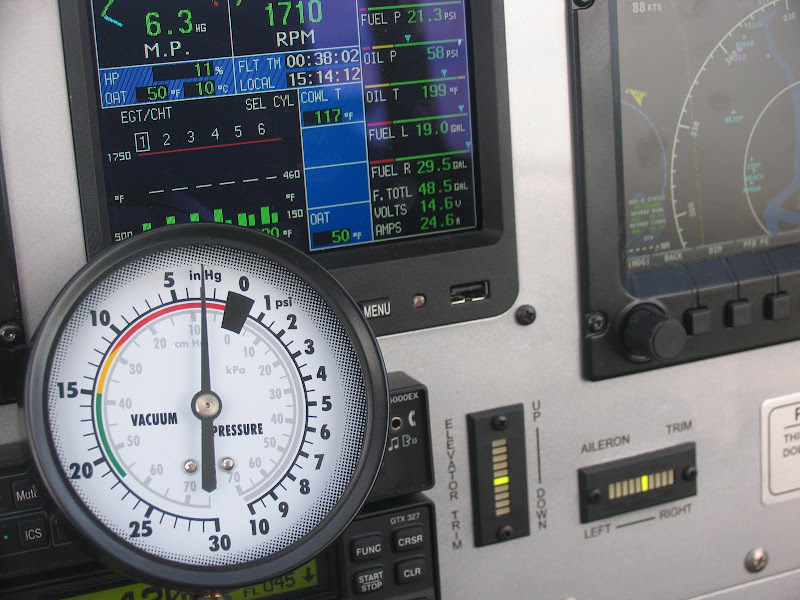
The gauge reads between one and one and a half inch Hg but does not change with altitude, at least not up to 7500 feet? Maybe someone can explain this to me.
I can't tell the difference in horsepower but I did noticed what appeared to be a much cooler running engine in particular oil and Cylinder temps.
I never had trouble getting oil up to 200F with the butterfly valve closed but couldn't get any higher than about 178F.
Herer arer some pics.

IMG_2759.JPG


IMG_2765.JPG


IMG_2777.JPG


IMG_2773.JPG


IMG_2787.JPG
 
Ernst,
I believe that it is reading differential pressure, so altitude would not have affected it. You are seeing about what I suspected, a good negative pressure in the crankcase! I don't understand the oil temp change though.

I re-routed my oil return line to the oil return tube coming down from the number 5 cylinder. I used a #6 tee and also used -6 hose to the air oil sep with a hose clamp on the #6 line at the air oil sep end. I am hoping this will allow the oil to drain more freely. I only have an hour since the mod.

Keep us informed on your progress.
 
The valve is what Allan Neemo supplies, do you think the Napa valve could do better? I am not sure what to expect without comparison, maybe Allan can tell us what we could hope to find as far as vacuum goes. From Anti Splat's website
This one way vacuum check valve accomplishes a number of things, (all being good) and greatly enhances performance of your aircraft. I will attempt to touch on some of the benefits here. Should you have questions or require more information just give us a call. This assembly, when fitted to your engine will create a vacuum in the crankcase of 5 or 6 inches when in operation. It accomplishes this via two separate actions, # 1 exhaust flow over the bias cut tube, and # 2 the pumping action of the engine crankcase volume changing with rotation.

One could assume that evacuating air from the crankcase also evacuates hot air
in the same process. Maybe I am just fooling myself, it was a very cold day today.
 
Last edited:
I would more suspect the way the tube is installed in the exhaust then the valve. I have the same valve sitting here and I can't see any restriction nor feel any restriction when I blow through it. I also would think that 1-2" would be sufficient to accomplish the goal of eliminating crankcase pressure. I'm not sure what the value of much more decreased pressure adds. Someone else may have a better understanding
 
The valve is what Allan Neemo supplies, do you think the Napa valve could do better? I am not sure what to expect without comparison, maybe Allan can tell us what we could hope to find as far as vacuum goes.

I don't know a performance difference. I just note a difference between your valve and mine. FWIW, there is discussion on the hot rod boards about poor lifespan for the China copy check valves.

Mine is running between 2.5 and 3.5" Hg negative. I have measured 5" or so on roadrace bikes with a megaphone.

BTW, as a check on the NAPA valve I built an inline valve module using a 2-stroke tent reed. I suspected it might increase vacuum due to a faster open-close response; at 2700 RPM the check valve is operating 22.5 times per second. It did not, so the NAPA valve became the permanent installation.

23i9lb7.jpg


One could assume that evacuating air from the crankcase also evacuates hot air in the same process. Maybe I am just fooling myself, it was a very cold day today.

Lot of folks claim that case vacuum helps ring sealing. I have no data. However, IF combustion ring seal is improved you would get a reduction in blow-by, which is proven to reduce oil temperature.
 
What would happen to crankcase pressure if the check valve stuck open?

Don't know. Good case for an experiment. Someone should connect the hose directly to the exhaust tap and measure breather pressure. In my case I'd expect the hose to soften and split where it's clamped to the check valve nipple. Been there.

Or stuck closed?

Probably blow the front seal. However, it would be easy to add a pressure relief.
 
Been thinking about a simple pressure relieve valve, would hate to be the one taking a perfectly good airplane and cause the prop seal to blow.

Since I have the vacuum gauge all rigged up, I'll install the Napa Valve and see if there is a difference.
I'll report back.
 
A "whistle slot" would be a good thing to add to the hose. This is simply a short, 1" to 2" lengthwise slit in the tubing. The hose itself, and the negative pressure in this case, holds the slit closed in normal use. If the valve should get blocked the positive pressure in the hose would open the slit to relieve the pressure.
It is a requirement in Canada to have either a small hole in the cowling area, or a whistle slot, in case the breather hose were to be blocked by ice.
I have a whistle slot in my hose and there are no leaks at this location but it is there if needed. A small hole would not work as well in this application and it would upset the negative pressure that you are attempting to get with the valve.
 
A "whistle slot" would be a good thing to add to the hose. This is simply a short, 1" to 2" lengthwise slit in the tubing. The hose itself, and the negative pressure in this case, holds the slit closed in normal use. If the valve should get blocked the positive pressure in the hose would open the slit to relieve the pressure.

Just a lengthwise razor cut? Hmmm. That Tom, he smart fella ;)

I was thinking another check valve, flipped opposite the header tap check valve, tee'd in the line to the header.

Picture worth....well, you know:

ykmmb.jpg
 
Last edited:
More Results

I changed out the Reed valve to a Napa equivalent from O'Reilly's Auto parts.
Here is the one I exchanged.

IMG_2793.JPG


Went up for a test flight and noticed no difference at all.
What I did notice was a dramatic increase in vacuum at low MP and somewhat high airspeed as in 125kts or more. Decelerating below 90kts and less returned the indicator back to about -1.5 Hg.

IMG_2790.JPG


IMG_2792.JPG


The whistle slot Tom Martin is talking about seems very simple but I tried on a left over piece of hose and found that it leaks and would probably ruin the effect of the check valve. It certainly works as a pressure relieve but a second check valve might be the answer to that concern.
I'd still like to know how Allen came up with 5 or 6 inches of vacuum?
 
Low MP at higher airspeeds causes ring flutter and decreases much of the blow-by.

I wonder if your readings are due to being a six cyl vs four cyl? Number of exhaust valve openings are 50% more. Pressure pulses overlapping more?
 
Google Napa 2-29000

If you Google Napa #2-29000, it brings up a bunch of Ford high performance forums that have done this same installation that Dan has done. I found it interesting to read their perspective.

Bill Newkirk
RV-3 under construction
 
I wonder if your readings are due to being a six cyl vs four cyl? Number of exhaust valve openings are 50% more. Pressure pulses overlapping more?

Ernst, I think Wayne is on the right track. Set aside any possible difference in valve performance. You have your tap located in the tailpipe of a 3-into-1?

Gas flow (velocity) past the slash-cut end of the tap is usually considered to be the source of low pressure. It probably is, but it may not be very powerful. I think a more powerful source is the gas pressure oscillation seen in the individual head pipes, which are strongly positive and negative (see the CAFE EPG reports). When the pressure oscillations from three cylinders are combined in the tailpipe the amplitude may be lower. I don't know for sure. I am tapping a single headpipe and seeing higher numbers.
 
I would be interested in the pressures if the valve failed OPEN. Ernst, maybe you could measure this in the same way, but on the ground. Dan's fix with the double reed valve would only take care of the failure closed.
 
You have your tap located in the tailpipe of a 3-into-1?
That's correct.
I might take the cowl off one more time and measure vacuum hooked up straight to the stub just to test this theory.
 
At an idle speed of 740 RPM(12.33 Rev/sec), we would have 37 Exhaust Valve pulses/sec on a 6 cyl engine. So 18.5/sec on one side where the check valve is installed or 67.5 pulses/sec at 2700 rpm. I would guess you won't get much positive pressure at idle, but at 2700 rpm you should. Thanks for testing this guys! I am considering all of the positives/negatives and may just put up with an oily belly after all vs a blown crankshaft seal away from home.

Also the source of our vibrating floor pans...harmonics. 67.5 Hz.
 
How about 2 check valves, one for each exhaust?
It would be highly unlikely to have 2 of those valves stuck at the same time
and double the efficiency.
Attaching the breather tube to a stub in the exhaust has been done around here for years and that alone helps keep the belly dry especially when used in conjunction with the air oil separator.
 
Last edited:
Ernst,
Just wondered if you had any results to report back to us. I also installed the NAPA valve yesterday. I did not get to measure the pressure yet, but post the results when I do.
Bill
 
Last edited:
No definitive results but very encouraging signs.
My next oil change is coming up soon and the only accurate way to determine oil consumption for me is to measure total oil in at oil change minus total oil out at the next oil change.
From what I see on the stick, I've only added one quart in 35 hours and oil level on the dip stick appears about a half quart low from where I started.
My oil consumption was pretty stable around 11hrs/qt before installing the reed valve.
My closest guess at this time is about 20hrs/qt. or even a little better.
I'll post the results in about 3 weeks.
The belly of the aircraft is bone dry and clean so as to not even leave an oil stain on a white Kleenex.
 
I did some measurements today with my NAPA reed valve now installed in the exhaust. I did not get to fly, but I ran the engine up to 2000 RPM and saw just shy of 1" of vacuum in the crankcase. I kind of expected more, but like I said, I was on the ground and not at full power by any means.

Without the exhaust reed valve and just the air/oil sep, my oil consumption had stabilized around 1qt. every 10 hours using 9qts on the dipstick as the starting point and 7qts as the ending point.
 
Just to post an update on my results with the entire system. I am now using 1qt every 16 hours. This is using an operating level of 8 qts and adding a qt. at 7. 145 hours now on the engine.

My next step is to maintain an operating level of 7 qts. and see how that compares to the 8 qt. level.

You might remember that without the air/oil sep I was burning a qt every 8 hours or so.
 
How about 2 check valves, one for each exhaust?
It would be highly unlikely to have 2 of those valves stuck at the same time
and double the efficiency.
Attaching the breather tube to a stub in the exhaust has been done around here for years and that alone helps keep the belly dry especially when used in conjunction with the air oil separator.

Today I CNC machined some mag hole covers for my Rocket and the plan is to weld aluminum nipples to the covers and use those for the breathers (yep two.). I'm plugging the breather at the top of the accy case because it doesn't make sense to have it there for inverted flight. The hoses will drop straight down from each into PCV valves attached to the exhaust pipes.
 
As a background, I have the ASA air oil separator, including the NAPA check valve connected into my exhaust outlet tube.
I was performing an oil change and decided to inspect the outlet tube where it protrudes into the exhaust tube. It has been around 100 hours or so since the installation, and has performed very well for me, as I have posted previously. Below is a photo of the port.

35597848974_a4e090c6ab_b.jpg
[/url]IMG_3001 by Bill Peyton, on Flickr[/IMG]
As you can see, it is significantly blocked with carbon buildup. Here is a photo of what came out.

35597847644_7ed3e08921_b.jpg
[/url]IMG_3003 by Bill Peyton, on Flickr[/IMG]

I spoke with Alan at ASA, we concluded that my separator port protrudes to far into the exhaust tube. When the welder installed it, it ended up protruding an inch at the front of the slash cut of the tube. Most of the buildup was at the very end of the port. Today I spent 2 hours carefully filing the tube back so that the downwind end of the slash cut is flush with the exhaust tube, and the front is less than 1/2 inch (I used a 30 degree slash cut).
The coked oil buildup was very fragile and could almost be removed by banging the exhaust pipe on the table, but came out easily with a screwdriver.
You can believe this will be monitored at every oil change from here on .......
 
Last edited:
Interesting

I had the same problem, but at around 50 hours it plugged up and caused leaking from everywhere else on the engine due to the high crankcase pressure. I will look to see how far mine protrudes into the exhaust when I get a chance. For now I have disconnected it and am running a straight breather tube.

Vic
 
protrusion

I built my own system that works very well and has no build up in 120 hrs. I am flush on down stream side and 1/8 in. on upstream side. Ron
 
Same here

After about 100 hrs of operation I found the opening to the exhaust almost closed. However, the carbon build up or whatever it was accumulated around the less than smooth weld surface on the inside of the stub.
I opened it all up after seeing the accumulation with a newly aquired borescope. This time I reamed the inner surface to a smooth finish.
The stub is welded in at about a 30 degree angle and protrudes about an 1/4 of an inch into the exhaust pipe just below the heat muff.

20140530193133.jpg
 
carbon

On my system I welded the spigot to a stainless steel washer 2.8 in. dia. x .063 thick. The washer was shaped around a steel bar so it had a good contour fit to the exhaust pipe before welding. spigot locates napa valve about 1 in. from exhaust pipe. The washer was sealed to pipe with "thermeez ceramic putty " and two hose clamps. The residue that I have just below the valve is still liquid not burnt. Is it possible that the welded fittings are transferring more heat and burning the oil before it gets into the exhaust flow ? There are a bunch of clamp on units out there, how are they working ? Also my valve is mounted at about 2 o'clock position right in the exit airflow. Ron
 
My outlet tube is smooth on the inside, so not the issue on mine. I believe that we are just starting to see 100+ hours beginning to accumulate on these installations and time will tell the viability. I know mine will be in my periodic maintenance routine. I located a pop-off valve from McMaster Carr. I am looking at the possibility of inserting it in the system as a safety.
 
50 hours, plugged up

I started seeing little leaks, from silicon valve cover gaskets, then they got bigger! 50 hours after I installed the spigot, it had completely closed up and would not let my crankcase breath. I am happy that I did not blow a crank seal. I am now running a standard crankcase vent tube that exits outside of the cowl, it does not terminate inside the cowl. Think I will be leaving it that way.
 
Mine was welded on my tailpipe as per original instructions. Flush on the rear and 1/8th showing on the front.
 
Dan,
Mine was located 2feet from the exit end of the tailpiece. The clog was contained to only the part of the spigot that protruded inside the pipe.
 
Who would like to temporarily relocate one EGT probe to the breather spigot location? Exhaust gas cools as it makes its way down the system. It might be useful to know the temperature at the breather port.

Here?s the background. Motor oil has a typical flashpoint (generates enough vapor immediately above the surface to support momentary ignition) between 400 and 500F, and cracks (hydrocarbon chains break up) between 550 and 600F. Cracking forms coke. A quick spin through some web articles suggests that if liquid oil is allowed to dwell on a surface in the coking range, a buildup results. Thus the goal for a clean exhaust spigot would be a surface temperature much above (to flash away oil droplets, never allowing a liquid film to form) or below the coking range.

A hypothesis, requiring a test or data. One measurement is worth a great many guesses.
 
Dan,
Judging from the way the particles looked, I would call it coke. Deriving from that it must be in the 550+ degree range. I am going to look if I still have a single probe egt laying around and use a hose clamp to clamp it to the exhaust pipe at the spigot attachment. The only problem with that is I would assume it would be hotter in the center than at the sides, which are acting as heat sinks, absorbing cooler air.
There can't be a whole lot of oil going out the spigot since I am only burning a quart every 20 hours.
Dan, have you ever seen this with you arrangement?
 
I wonder if it wouldn't help to have a large volume chamber screwed to the top of the accessory case instead of the standard pipe fitting? The large volume of the chamber would reduce velocity of the air and perhaps allow the oil to remain in the chamber instead of being swept overboard. The standard overboard vent would then exit the top of this chamber. This is similar to a standard oil separator, but with less plumbing involved. Keep it as high as the cowl will allow and the oil may just run back into to crankcase.

Time to break out the lathe and see if theory and reality will cross...
 
Who would like to temporarily relocate one EGT probe to the breather spigot location? Exhaust gas cools as it makes its way down the system. It might be useful to know the temperature at the breather port...

There's an old drag racer trick used to determine the point of a header collector which has the highest temperature (which is exactly where you want the pipe to end). They would paint a stripe along the length of the header, make a full pass, and observe the area where the paint burned off. This will often be a very distinct band. I don't know if the typical log style collectors used on the 540 will show this, but it might.
 
separator

Michael, I have an andair oil separator mounted as high as I could get it. It would oil the belly until l added the spigot. I don't know if the andair separator is a good separator or not. Ron
 
I am going to look if I still have a single probe egt laying around and use a hose clamp to clamp it to the exhaust pipe at the spigot attachment. The only problem with that is I would assume it would be hotter in the center than at the sides, which are acting as heat sinks, absorbing cooler air.

Any and all temperatures are of interest...pipe wall temperature, center of exhaust gas stream, air temperature inside the spigot, whatever. Get what you can.

Dan, have you ever seen this with your arrangement?

Recently inspected, perfectly clean. I'm tapping a single head pipe, roughly 18" downstream from the cylinder flange.

BTW, as noted in a different thread, I'm now running the second reed valve I suggested here, as safety to eliminate any possible positive breather pressure due to failure of the primary valve or plugging of its port. So far (about 8 or 9 hours) it is bone dry, suggesting that breather system pressure is staying consistently negative.

The red stripes are added to the photo to make system layout apparent.

fpcn5z.jpg
 
Second Reed valve?

Dan,
will you tap another hole into the exhaust pipe or leave the second reed where it is?
I am convinced that you are right about the temperature scenario concerning oil burn off.
A stub welded into the exhaust further upstream would have been better for more than one reason.

I have a temperature probe located just inches away from the reed valve on the firewall just above the exhaust pipe.
Not very useful for this purpose but there I am monitoring engine compartment temps around 160F on most flights.
I'll be most interested in getting some precise temp information on the reed valve exhaust intersection.
 
Dan, will you tap another hole into the exhaust pipe or leave the second reed where it is?

Just as you see it. If case pressure goes positive it will work just like an ordinary breather tube, with one exception...it will dump into the lower left corner inside the cowl. The resulting oil at the lower cowl seam should be obvious during even the most cursory preflight.
 
Back
Top