-POSTING RULES

-Advertise in here!
-
Today's Posts
|
Insert Pics
Keep VAF
Going
w/a Donation
VAF on Twitter:
@VansAirForceNet
|

02-26-2023, 12:02 PM
|
|
|
Join Date: Feb 2023
Location: Washougal WA, Grove Field 1W1
Posts: 6
|
|
Quote:
Originally Posted by azonic75
Look where it says AN470- that is the rivet size and length.
I would strongly suggest you have a mentor help you get started. None of this is complicated but having someone get you off on the right foot will make your life much easier. Join the local EAA chapter, lots of people willing to make sure you get started and enjoy the building of a safe airplane!
|
I have a friend and an RV builder stopping by this week to answer a million questions! I will be going to my local EAA meet-ups too! Thanks!
|

02-26-2023, 12:17 PM
|
 |
|
|
Join Date: Jan 2005
Posts: 805
|
|
You may want to stop what you are doing and review thoroughly Section 5 of the Plans (linked below). Section 5.4 covers riveting and explains the rivets that are used.
https://www.vansaircraft.com/faq/sec...l-information/
__________________
Carl N.
RV-8
KAWO
Last edited by RV8JD : 02-26-2023 at 12:20 PM.
|

02-26-2023, 12:20 PM
|
|
|
Join Date: Jan 2005
Location: Irvine, CA
Posts: 1,008
|
|
Hi Brady,
With the RV-12iS plans, rivet types are never shown on the first page of each section. These pages only show the major parts for each assembly. You need to refer to the subsequent drawings for rivet details.
In the drawing you posted labeled “Figure 4,” you need to use five AN470AD4-7 rivets to hold the hinge together. You can find out how to read the rivet code for AN rivets in Section 5 of the kit instructions and in the Standard Aircraft Handbook that comes with the kit.
Also in Section 5 are drawings of nutplates and blind rivets. These will answer a lot of your questions. Also know that for the RV-12iS, the type of rivet used most often is the LP4-3. You probably received two boxes that contain thousands of LP4-3 rivets.
__________________
Mark
RV-12iS Fuselage
RV-9A Project: Sold
VAF donation made for 2023
|

02-26-2023, 12:33 PM
|
|
|
Join Date: Feb 2023
Location: Washougal WA, Grove Field 1W1
Posts: 6
|
|
Quote:
Originally Posted by rv9builder
Hi Brady,
Also in Section 5 are drawings of nutplates and blind rivets. These will answer a lot of your questions. Also know that for the RV-12iS, the type of rivet used most often is the LP4-3. You probably received two boxes that contain thousands of LP4-3 rivets.
|
I'll continue to review Section 5, especially as I apply the info reviewed.
|

02-26-2023, 01:21 PM
|
|
|
Join Date: Feb 2019
Location: Southwest Florida
Posts: 223
|
|
Quote:
Originally Posted by Ironflight
For something like a -12, with very explicit instructions, I’d get into the project a ways before breaking up the bags, because Van’s instructions might actually reference bags…which would make that the easiest way to find stuff.
|
Unfortunately, the -12 KAI doesn't not ever reference the bag #. You have to look up the part in the inventory to find which bag it's in.
This is my biggest beef with Van's. They don't cross-reference parts, and they don't list which parts are used in each KAI section. IMO, the first page of the KAI section should have a list of the parts and supplies needed in that section, and the bag or sub-kit they were shipped in.
__________________
Joe
2023 Donation Paid
RV-12iS In Progress
Empennage and Wings (except nav lights) done
Working on Fuselage
Finish kit waiting (minus BO items)
Avionics kit at Stein's
Engine on order...
|

02-26-2023, 01:34 PM
|
|
|
Join Date: Feb 2015
Location: Locust Grove, GA
Posts: 971
|
|
Fundamentals Class?
Quote:
Originally Posted by BradyB
Hello Folks.
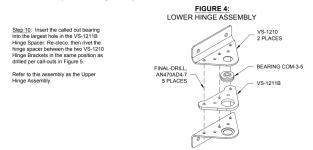
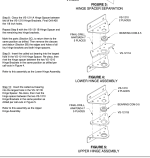
I'm looking forward to building my new 12is kit but feel a bit overwhelmed and somewhat discouraged right off the bat. I'm working on assembling the first part but I don't know which rivets to use. I may be missing something with Van's instructions but I was hoping each section would list the specific hardware & fasteners to use or at least list which hardware bag to use?! How am I supposed to know which rivet type and size to use when assembling parts? See the attached instruction screenshots Attachment 38915.
I have the inventory list of course but how do I connect random bag numbers of random hardware to each build section?
Thank you in advance for your help!
|
I assume you have taken a Fundamentals Class either from EAA or one of the Build Assist facilities that offer them? Or have you reached out to a local EAA Technical Counselor for some guidance?
If not, I would do one of both before you start on your project. I know it's exciting to get started, but it's even more discouraging to make mistakes and then have to wait to get new parts. In your case, you aren't too far from Aurora, but I still think you need a Fundamentals Class.
__________________
Krea Ellis
Locust Grove, GA
DA20-A1 "Princess Amelia" - gone home to Amelia Island
RV-7A Phase 2 (Honored to be Van's "Miss July" 2021) - now at her new home in Lakeville, MN
RV-10ER officially an airplane as of 4/5/22!
EAA Technical Counselor
|

02-26-2023, 04:48 PM
|
|
|
Join Date: Jan 2022
Location: Duluth, MN
Posts: 10
|
|
Brady, fear not! As you figured out, every rivet is specified (sometimes a group of them, e.g. as "LP4-3 TYP"). The RV-12 instructions are very good at this!
Finding parts: I worked from bags for a few weeks and then moved everything into parts bins, which takes hours, but you'll save more time & frustration later. The instructions don't identify which bag parts are in but the inventory list that comes with each kit does, and will remain an invaluable reference. The hard part, though, is translating between naming systems for washers, bolts, nuts etc., e.g. AN and MS. Your parts bin drawers can have both, which will save time. And yes, buy the labeler. Bonus is you can do the spice jars with it, too.
-Chris
|

02-27-2023, 05:24 AM
|
|
|
Join Date: Mar 2020
Location: Saluda,NC
Posts: 213
|
|
Take a class
You’d benefit greatly taking a beginning builder class from the EAA or synergy.
https://synergyair.com/
(Only two hours from you ! )
Or, at least buy a practice kit and get thru that. I took the synergy course, and really enjoyed it. You can ask them questions and pick their brains all day long.
__________________
Donation 2023 paid
ASEL INST COMM Tail-wheeler
RV-12iS builder (Empennage complete, Wings complete!, Fuselage well under way!, finish kit under way!, Garmin avionics ordered, engine ordered, shop out of order )
Got a hangar, and moved some large pieces in!
https://eaabuilderslog.org/?blproject&proj=7buPHH99v
|

02-27-2023, 06:00 AM
|
|
|
Join Date: May 2021
Location: New Hampshire
Posts: 111
|
|
When I received my first kit, I created a spreadsheet with every part on the packing list. Then as I inventoried the kit, I put the smaller parts in organizers and hung the larger ones in groups from the garage ceiling, writing down the location of each part on the spreadsheet. The small bags I could open and sort sitting at the kitchen table which was much more convenient than trying to do it in the shop. The whole process took about 12 hours, but it was worth it. At each step I found the parts I needed by looking at the spreadsheet and layed them out on the table before beginning. I could focus on the building and not get frustrated trying to find parts scattered in dozens of small bags.
Being organized with the inventory and where you place your tools will save you many headaches over the course of the build. It's time well spent.
One thing that continues to catch me is that rarely Van's makes a small error in the bags, like dropping in washers with an "F0" instead of an "FN" in the part number. It's a simple mistake, but really hard to catch in the inventory unless you know the specifications of every little part. There's also the odd piece that's been revised but the plans haven't been updated yet, but that's usually obvious (-1 appended to the part number, for example.) As long as the packing list matches the part number you're ok.
Regarding the drawings, they're usually very clear once you're familiar with them, but it can take some time and practice. If in doubt, ask for help. They're a lesson on conveying a great deal of information with very little text, but they don't try to trick you. The diagram you posted for example shows that 5 holes have to be final drilled for AN470AD4-7. So that tells you to find 5 holes that are similar to the one pointed out, final drill them to #30 (for AD4) and use AN470AD4-7 rivets to attach all the pieces. This kind of notation is used throughout the plans, so once you're familiar with it, it'll be easy to follow -- not that there won't still be an occasional day when nothing seems to make sense.
Welcome and good luck!
|

02-27-2023, 08:07 AM
|
|
|
Join Date: Feb 2023
Location: Washougal WA, Grove Field 1W1
Posts: 6
|
|
Thanks again, Everyone. I went through the random practice hardware kit yesterday and was successful with my new tooling. BTW, I have built an aluminum aircraft before but it was mainly constructed as an ultralight with tubing and brackets. I built a GOAT Primary Glider if anyone remembers these free plans that Mike Sandlin released. That was a scratch-built kit with simple CAD drawings. It was a lot of fun to fly out on the dry lake beds. https://youtu.be/WlY7YfFFN-s
|
Thread Tools |
Search this Thread |
|
|
Display Modes |
Linear Mode
|
Posting Rules
|
You may not post new threads
You may not post replies
You may not post attachments
You may not edit your posts
HTML code is Off
|
|
|
All times are GMT -6. The time now is 12:17 PM.
|