

After getting all of the skin sections (below the longerons) trimmed and clecoes in place, it’s now time to work on all the little details before getting ready to rivet. These include finalizing the forward floor ribs, figuring out some tricky rivet holes near the F-305, making some shims for a few spots with less than perfect fit, and fitting the F-336 Wall outlets at the intersection of the forward floor and side skins. These create a duct of sorts for the exhaust pipes and cooling air exits, and make the junction between side and bottom smooth and rounded.
Unfortunately, I managed to stumble across another of those little hidden time bombs in the drawings. The parts themselves are preformed, and almost ready to use (with just a little trimming to square the ends. The inboard edges curl under to a hidden flange which is pop-riveted to the floor from the inside, and the outboard edge is captured between the lower stringer and the side skin, sharing common rivets with the side. The lower left corner of Drawing 21 shows a cross-section of the F-336 at the firewall and at the F-303 (center section), although they aren’t really labeled as such. The tricky thing is that they show the distance from the side skin to the in board edge of the walls to be 2 1/2” both front and back.
Thinking about how to mount these parts, I figured that I’d pre-drill the holes for the pop rivets (for the inboard flange), then draw a line on the flange, and line it up with the holes from inside the fuse, match-drilling from inside. Since the drawing implied a line of pop rivets parallel to the side, skin that is what I drilled in the floor. Then, of course, I put the part on the airplane and kicked myself - the actual tunnel walls are indeed 2.5” from the edge at the front - but the parts taper down in height and increase in width to 3.5” at the rear - so the line has to be non-parallel!
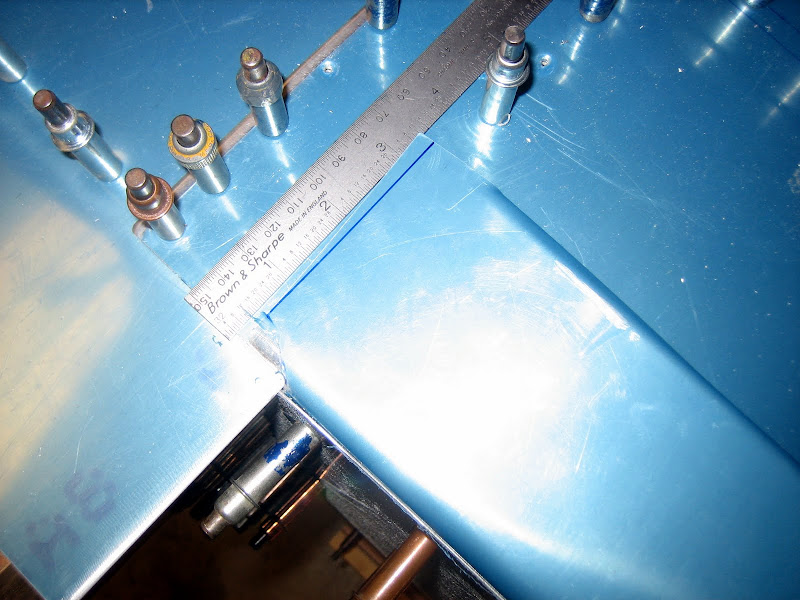
Note that the rear of the part is wider than the front:

Clearly, the rear is NOT 2.5”….
A view of the other side, showing the taper from front to rear:

The only good things about this little error is that the “blank” rivets I use to fill the incorrect holes will be complete hidden underneath the F-336’s, and that I only predrilled the holes on one side. Someone who crawls into a foot well might notice the heads, but I seriously doubt that anything bigger than a cat could ever get down there…..
I ended up installing the forward quarter-circle bulkhead parts to the F-336’s with clecoes, trimming the front edge to make it square, and then sliding the parts down between the side skins and the lower corner stringers. Holding the parts where they needed to be on the belly, I match drilled the side rivet holes, and put in clecoes. I’ll do the pop rivet holes with Louise holding the parts in their final spot, drawing a line on the outside of the skin that represents the inner wall - then drawing an offset lien to get the proper edge distance, pre-drilling the (correct) holes, and then match drilling for the pop rivets.
Once again, fair warning that we have to read the drawings, FIND THEIR ERRORS, then test fit every single part before drilling any holes when building a -3…..
Paul
Unfortunately, I managed to stumble across another of those little hidden time bombs in the drawings. The parts themselves are preformed, and almost ready to use (with just a little trimming to square the ends. The inboard edges curl under to a hidden flange which is pop-riveted to the floor from the inside, and the outboard edge is captured between the lower stringer and the side skin, sharing common rivets with the side. The lower left corner of Drawing 21 shows a cross-section of the F-336 at the firewall and at the F-303 (center section), although they aren’t really labeled as such. The tricky thing is that they show the distance from the side skin to the in board edge of the walls to be 2 1/2” both front and back.
Thinking about how to mount these parts, I figured that I’d pre-drill the holes for the pop rivets (for the inboard flange), then draw a line on the flange, and line it up with the holes from inside the fuse, match-drilling from inside. Since the drawing implied a line of pop rivets parallel to the side, skin that is what I drilled in the floor. Then, of course, I put the part on the airplane and kicked myself - the actual tunnel walls are indeed 2.5” from the edge at the front - but the parts taper down in height and increase in width to 3.5” at the rear - so the line has to be non-parallel!
Note that the rear of the part is wider than the front:
Clearly, the rear is NOT 2.5”….
A view of the other side, showing the taper from front to rear:
The only good things about this little error is that the “blank” rivets I use to fill the incorrect holes will be complete hidden underneath the F-336’s, and that I only predrilled the holes on one side. Someone who crawls into a foot well might notice the heads, but I seriously doubt that anything bigger than a cat could ever get down there…..
I ended up installing the forward quarter-circle bulkhead parts to the F-336’s with clecoes, trimming the front edge to make it square, and then sliding the parts down between the side skins and the lower corner stringers. Holding the parts where they needed to be on the belly, I match drilled the side rivet holes, and put in clecoes. I’ll do the pop rivet holes with Louise holding the parts in their final spot, drawing a line on the outside of the skin that represents the inner wall - then drawing an offset lien to get the proper edge distance, pre-drilling the (correct) holes, and then match drilling for the pop rivets.
Once again, fair warning that we have to read the drawings, FIND THEIR ERRORS, then test fit every single part before drilling any holes when building a -3…..
Paul
Last edited by a moderator:
")

