What's new
Van's Air Force

Don't miss anything! Register now for full access to the definitive RV support community.

Skyview Avionics Received!

So is there any GPS data feeding the ELT?
I assumed the blue wire would connect to the GPS wire we ran previously. That is definitely not clear in the plans.

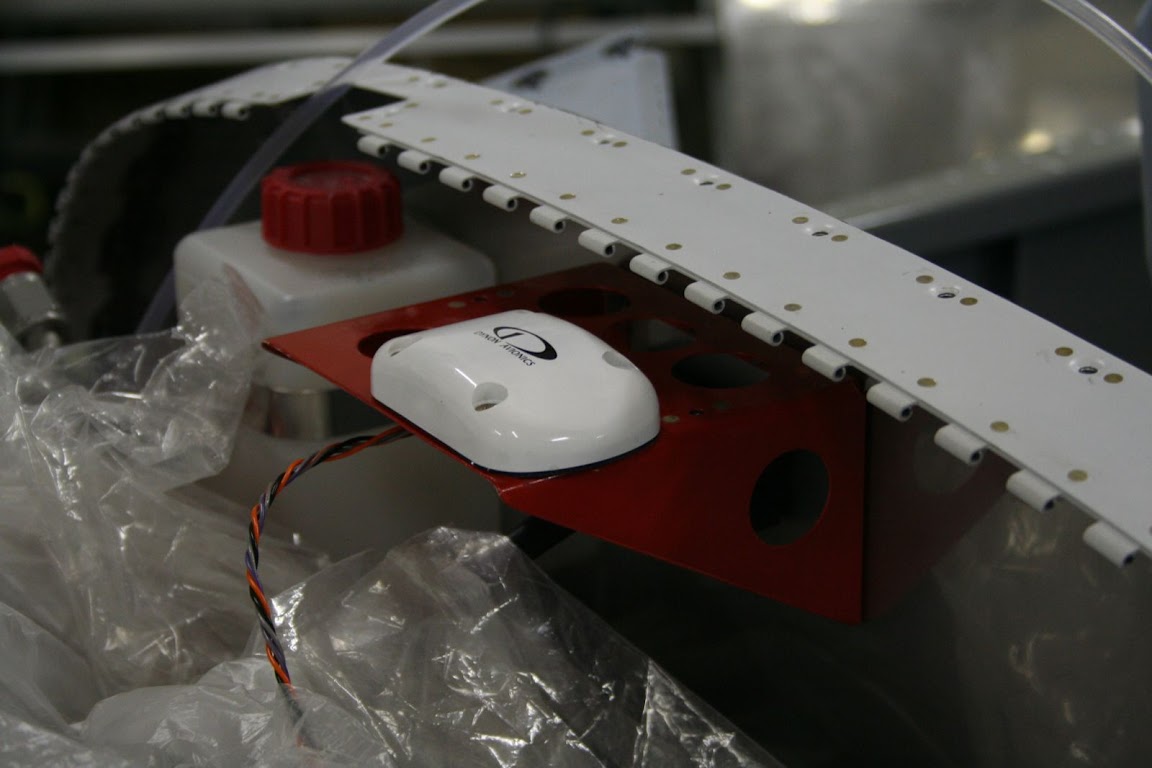
Update: The Skyview does not output the right GPS data to the ELT and Van's made the decision not to add the converter that costs a couple of hundred dollars unless you want. What I did not realize is how accurate the ELT is without a GPS. I was told it is accurate up to 200 yards with no GPS. That is plenty accurate for me and not worth the cost of updating. Make sure the GPS data wire that is in the plane is protected and does not ground out. It can cause your GPS to not work.

What ever happened to the wht/red wire which was ended near the ELT? Can anyone give me a clearer instruction about which wires connect to the ELT. I know the plug (phone type) goes and I can gound it as instructed but since no gry/pur exists I am not sure what else to hook-up. I will seal off the original GPS out shielded wire. Let me know your experience. Thanks
 
What ever happened to the wht/red wire which was ended near the ELT? Can anyone give me a clearer instruction about which wires connect to the ELT. I know the plug (phone type) goes and I can gound it as instructed but since no gry/pur exists I am not sure what else to hook-up. I will seal off the original GPS out shielded wire. Let me know your experience. Thanks

Nothing hooks to the ELT other than the phone wire for the remote switch.
The RED/WHT may have some GPS data in it in the future but not for now.
Van's said that even without the GPS, the ELT is accurate to within 200 yards.
 
Thanks Scott

I saw your earlier post but wasn't sure about the wires and actually after I posted this request for information I figured, as stated in the beginning of section 42C, these instructions are as if the new wiring system has been installed. So now I am wondering about the buzzer power and ground. Those wires get connected don't they?

Someday I will get this thing done. :eek:
 
Do 42D before 42C. In the old plans (original wiring harness in original Finish kit) you had installed an unconnected wire back to the ELT. If you put that in, running the new conversion harnesses will give you yet ANOTHER unconnected wire back to there. Just follow the plans on the ELT, yes the buzzer must connect as shown on the plans.
 
ADAHARS FAILED

This thread was pretty active so I hope this is still a good place to post these issues.

Time to smoke test the Skyview install and received the "big red X" for the ADAHARS. I started making my way through all the set-ups and again have seen the ADAHARS set-up and it showed a different serial number and below this a Red OFFLINE. When highlighted it looked like I could change it but no joy. My searching throught the System Install I had hoped to find something which looked like what I was experiencing but nothing.

I had seen another post where someone mentioned they started their Skyview at the hangar and received the Red FAILED and they went home.
Bill H. posted something about having to updated the firmware and do the set-ups.

I did update the firmware to 3.3.2 and still no change and no xponder confirmation but it does come on with the Avionic switch. Skyview doesn't appear to see the AP servos or the EMS system as this page does not appear.

I will continue to review the Dynon sight and try to figure it out. I did the conversion after the install of the finish kit which was received in July 2011. I felt I was very slow and steady on this install so everything would be right and used others posted experiences to help me along the way.

Thanks for any insight.......:confused:
 
Last edited:
This thread was pretty active so I hope this is still a good place to post these issues.

Time to smoke test the Skyview install and received the "big red X" for the ADAHARS. I started making my way through all the set-ups and again have seen the ADAHARS set-up and it showed a different serial number and below this a Red OFFLINE. When highlighted it looked like I could change it but no joy. My searching throught the System Install I had hoped to find something which looked like what I was experiencing but nothing.

I had seen another post where someone mentioned they started their Skyview at the hangar and received the Red FAILED and they went home.
Bill H. posted something about having to updated the firmware and do the set-ups.

I did update the firmware to 3.3.2 and still no change and no xponder confirmation but it does come on with the Avionic switch. Skyview doesn't appear to see the AP servos or the EMS system as this page does not appear.

I will continue to review the Dynon sight and try to figure it out. I did the conversion after the install of the finish kit which was received in July 2011. I felt I was very slow and steady on this install so everything would be right and used others posted experiences to help me along the way.

Thanks for any insight.......:confused:


Everyone will get the red x the first time you start because it has not been configured yet.
Not sure if this is your problem.

Have you gone through the configure screen where it looks for everything that is hooked up to the Skyview?
I don't have my manual with me but might be able to find the page online that steps you through this.

4-8 and 4-9 will step you through this on the Skyview installation manual. You must detect all the systems.
 
Last edited:
Did the trick

Thanks Scott

Does this detection include the transponder? It looks like there is a different set-up mode for the xponder. I converted my mode S number to the hex code and once this is added it appears be functional.
Currently the VFR code and ALT is in yellow so I am curious how it changes once the hex code is added.

Thanks again. :D
 
Remember, you must have the plane master AND the avionics master ON for the skyview system to detect transponder. (Before you do this, pull the fuse for the fuel pump.) The transponder is powered by ships power, not via the EFIS. Ditto for the AP servos - their switch on the panel must be ON for them to be detected or to operate in flight since they are also powered by ships power.
 
transponder

In order for the transponder to work It must have a port. Go to port set up and go to port 3 that is where the transponder is connected to. the only other port used is port 5 which is for the GPS
 
hex added

Since adding the hex number to the transponder set-up it will come on in GND ALT and ON all in green. Speaking of the transponder I was checking out the com/Garmin radio and when the transponder was turned on I could hear a little noise. Now this is in my garage in a quiet area but if anyone has experienced this let me and if a remedy might be suggested.

I will also check the port set-up under port 3.

Thanks Bill, Scott, and Bayne.
 
skyview

when I tried to mount the GPS to the F-1201Z bracket I could not
find any holes that matched the ones in the reciever, has anyone
had this problem?
 
I had the same. I didn't use the plate.

IMG_2432.JPG
 
Missing something here Help!

As I went to pull some additional wires thru the wings this morning, I looked for instructions - and found none!
I have a roll of wire, the new blue connectors, and no instructions on how to do all that. Not sure, I THINK I saw something earlier, but cannot recall if it was on this thread, or actual papers. What piece of paper actually gets into the wiring of the blue connectors and the wing wiring? I think I am safe to run two additional wires thru each wing for starters.
 
Don

I have a copy of section 31A in PDF format that should answer your question. Send me a PM with your email address and I will forward it to you

craig
 
As I went to pull some additional wires thru the wings this morning, I looked for instructions - and found none!
I have a roll of wire, the new blue connectors, and no instructions on how to do all that. Not sure, I THINK I saw something earlier, but cannot recall if it was on this thread, or actual papers. What piece of paper actually gets into the wiring of the blue connectors and the wing wiring? I think I am safe to run two additional wires thru each wing for starters.

Yes, Don, you need those two additional wires to selective chose between strobe and/or nav lights. The connection of the wires to the new wing connectors is laid out on page 42D-23. You'll find a lot of answers to retrofit questions in 42D. However, you have to browse through it to find it, as there's no index of any kind.
 
As usual, I had the instructions all along. I had inserted the section 30 instructions for the wing connectors and had forgotten about it.
 
In general, the function of the F-1201Z adapter plate is a puzzle to me.

For one thing, the elaborately punched set of various size holes do not, as noted, align with the GPS receiver antenna, nor with the firewall bracket, nor do they correspond in location or number with what is shown in the pictures - Figs 1 & 2 on Page 42C-17. (That doesn't leave much!)

What IS the function? It appears to be to move the GPS antenna forward about 1.5 inches. If that is true, then will installing it on the existing firewall bracket create a problem - perhaps a truncated view of the GPS constellation satellites in the aft direction?

Bob Bogash
N737G
 
Oh - one more thing - installing the AN509 screws from the bottom is contrary to standard aeronautical practice, and also puzzling.

Bob Bogash
N737G
 
When I had Abby do my interior I told her that I wanted an extra length cutout in the carpet for the headset power at the plug location. She contacted Vans to determine where the cutout should be and was told that there would be NO headset power included with Skyview. I too thought I had read it would be included.

I just finished page 42D-22 step 3. The WH-P600 and P601 (ORN/BLK) wires that were run to each headset block on the left and right side are the power supply for the headsets. They are fused with 5A on WH-00026 and are connected through WH-P440 (ORN/BLK) to pin 17 (AUDIO POWER) on the Options plug.
The instructions have you cover the ends with a heat shrink tube and cable-tie them to the headset plugs. As Van's doesn't know what type of headset you're using, it's up to you to find a suitable plug for it and install it in the seat pan.
The wiring is definitely there and everything is set up to install the power outlets.
 
Last edited:
I think it can see through fiberglass but not aluminum. The 1.5 inches might make a difference. Remember, the original avionics had both a GPS antenna and an XM satellite antenna on that plate.
 
You are correct Bill, it won't "see" thru aluminum, I don't even like the extension, don't think it is enough to enable a really good view of the sky, needs to be higher and further forward. I am even thinking about mounting it on the inside under the canopy.
 
Skyview fuel gadge calibrated

On the skyview system I calibrated my left tank. What do I do about the right tank calibration. I get a warning that my right tank in not calibrated.
I could tell it that the tank holds 0 gal and then calibrate it with 0 gal.
 
skyview

I just found that the pilot and copilot ptt.sw. when using the wh-00036
harness are reversed between the wh-rv12-tunnel cable assy. and the
wh-00036 cable assy. that plugs into the av-50000a. Pin #3 of the
wh-rv12-tunnel is the pilot ptt.sw. which goes to pin #3of the wh-00036
where it is labled copilot ptt.sw. I found this out when trying out the
sl-40 radio. I could key the transmitter but no modulation,after checking
I found that keying the copilot ptt.sw. and talking on the pilot mike
avery thing worked.
 
In the EMS display setup, you can add and delete things to the engine displays. DELETE the right tank indication. You do this on the 100% screen. the 40%, and the 20%.
 
I just found that the pilot and copilot ptt.sw. when using the wh-00036
harness are reversed between the wh-rv12-tunnel cable assy. and the
wh-00036 cable assy. that plugs into the av-50000a. Pin #3 of the
wh-rv12-tunnel is the pilot ptt.sw. which goes to pin #3of the wh-00036
where it is labled copilot ptt.sw. I found this out when trying out the
sl-40 radio. I could key the transmitter but no modulation,after checking
I found that keying the copilot ptt.sw. and talking on the pilot mike
avery thing worked.

A big THANK YOU to you, Gene! You just saved me a lot of head-scratching and debugging. I checked my WH-00036 harness on the Fuselage end as everything else was tied up and installed. It sure showed the same discrepancy that you had discovered. Pin 3 was connected to the Co-Pilot PTT and pin 1 was the left seat's PTT. I swapped the pins on the Fuselage end and verified that everything worked as it should (well, just with an Ohmmeter at this point in time).
So, again, thank you, Gene!
Others that got their conversion harnesses should probably check theirs too as this is definitely not a single mistake. I might find the muse to check the protocol and see if maybe Van's instructions for the harness manufacturer are wrong.
 
PTT Switches Reversed

A big THANK YOU to you, Gene! You just saved me a lot of head-scratching and debugging. I checked my WH-00036 harness on the Fuselage end as everything else was tied up and installed. It sure showed the same discrepancy that you had discovered. Pin 3 was connected to the Co-Pilot PTT and pin 1 was the left seat's PTT. I swapped the pins on the Fuselage end and verified that everything worked as it should (well, just with an Ohmmeter at this point in time).
So, again, thank you, Gene!
Others that got their conversion harnesses should probably check theirs too as this is definitely not a single mistake. I might find the muse to check the protocol and see if maybe Van's instructions for the harness manufacturer are wrong.

Our PTT inputs were also reveresed between the Pilot and Co-Pilot inputs
 
Data point: Mine were NOT reversed and I got probably the 1st Skyview conversion harnesses shipped out. Incidentally, the replacement transponder antenna adapter cable (the short 11 inch one from the transponder to the previously-installed antenna coax) did the job - transponder now works! This cable is made by Vans, the one I was sent was shorted between the center wire and the shield. Check yours.
 
Just to clarify about the PTT connections.... If I am not mistaken, the builder has to install wires related to the PTT switches into one of the D-sub connectors. If the function of the switches is reversed, then the wires were installed in the wrong pin locations.
 
skyview

the ptt. sw. were part of the rv-12-tunnel wiring harness. you had to
install the mike and head set pins into a different connector.
 
If I had the nerve and time, I would go back and prove that I did everything by the book. I do remember that I verified the PTT after running the wires and they were ok. I doubt that it's a builder error, but it doesn't really matter, does it. It's an easy check, and it saves you some grief later when testing the radio and all you hear is a carrier and no mod.
Anyway, the info is now out there. It's quite a number of people that reported this issue. Use it or don't.
 
I previously wrote "the function of the F-1201Z (GPS antenna) adapter plate is a puzzle to me." Also "installing the AN509 screws from the bottom is contrary to standard aeronautical practice, and also puzzling." And "the elaborately punched set of various size holes do not, as noted by others, align with the GPS receiver antenna, nor with the firewall antenna shelf bracket, nor do they correspond in location or number with what is shown in the pictures - Figs 1 & 2 on Page 42C-17."

Answers to my questions:

1- The F-1201Z adapter plate included in the Skyview kit was designed for the D-180 instl and has been superceded by (I believe) a Version 3 (although that is not marked on the label - maybe it's in the bar code.) I talked to Tech Support and they sent me the new plate which had the correct holes that now match the drawing and the GPS antenna.

2- The plate does NOT move the antenna forward 1.5 inches as I speculated - it's in the same position, as the plate barely projects forward of the firewall antenna shelf. It's purpose (speculation) is to stiffen the thin sheet metal on the antenna shelf.

3- The screws are installed from the bottom because no holes are drilled in the firewall antenna shelf, so they are captured by the upper surface of the shelf.

4- The antenna electrical lead wires, which exit from an epoxied hole in the antenna base, ride hard on both the adapter plate and the matching hole in the antenna shelf, regardless of orientation of the GPS antenna. I had to enlarge both holes to provide clearance.

5- The plans call for dimpling the four holes in the adapter plate for the AN countersunk head screws. The plate is .045 - .050 thick and I could not create a reasonable dimple, and further - a dimple would project into the base of the GPS antenna (albeit with a rubber pad on the bottom surface.) And, the screws stuck out from the bottom surface in a big way, so the upper surface of the shelf and the lower surface of the adapter plate had a big gap between them. Furthermore, the inability to make the screwheads flush (or even near flush) resulted in inadequate screw projection, so the lock nuts on top barely were penetrated.

I countersunk the holes in the adapter plate - now the plate sits snug against the firewall shelf bracket, the plate upper surface does not project into the GPS antenna base, and the locknuts get good screw penetration without over-tightening.

Bob Bogash
N737G
 
Page 42d-02

Page 42D-02, step 5 requires the cushioned clamp pictured on page 45-04, illustration 2 to be removed and set aside. Problem is, I have no section 45, so what clamp are they talking about?
 
Thanks Joe, I was unaware I could do that! Anyhow, not much help even when you get to see it. I am PRETTY SURE which clamp they are speaking of though.
 
Pitot tube pull:
I've read through this thread and going through the plans, but still have a question about the pitot line pull/replacement. I see on page 42D-02, step 6 the plans have you cut the line and eventually pull it back to the area of the fuel pump (42D-03, step 3).

Then, later, the plans on page 42D-18, step 3 instruct you to tie-wrap the tunnel harness to the aft pitot line. I can't find in the plans where it tells to re-install the pitot line. AND wasn't the reason for pulling the pitot line to make room for running more wires that come later?

Can one of you guys point menin the right direction?

Slane
120043
 
A big THANK YOU to you, Gene! You just saved me a lot of head-scratching and debugging. I checked my WH-00036 harness on the Fuselage end as everything else was tied up and installed. It sure showed the same discrepancy that you had discovered. Pin 3 was connected to the Co-Pilot PTT and pin 1 was the left seat's PTT. I swapped the pins on the Fuselage end and verified that everything worked as it should (well, just with an Ohmmeter at this point in time).
So, again, thank you, Gene!
Others that got their conversion harnesses should probably check theirs too as this is definitely not a single mistake. I might find the muse to check the protocol and see if maybe Van's instructions for the harness manufacturer are wrong.
And here my real-life update. I powered up the Avionics today and found the PTTs to be working in a swapped manner. Meaning, pressing the Pilot's PTT brought the right seat voice on the air and vice versa. I did swap my pins as I believed the electric diagram to be correct.
Well, it is not.
If you look at the names of the pins 1 and 3 on the Fuselage plug, that's the part that is correct. If you follow their connections all the way to the switches you find that the PTT switch names are not correctly labeled. The pin 1 (labeled PILOT PTT) effectively connects to the Co-Pilot PTT switch and vice versa. Well, I found out that the labels on the Fuselage pins are correct and the switches are mixed up.
I swapped my pins back to the positions they were at before I doubted the harness and everything worked as it should.
So again, if you want to measure something, see if pin 1 connects to ground if the Pilot PTT is pressed. That is how it should be.
 
Confusing switches

I powered up my Avionics for the first time today and I got a bit confused by the way Van's switched the components. It appears to be so weird that I am wondering if this can be right, so I need some confirmation from you guys that are already beyond this point.

I should add that my SV installation is a retrofit, so it uses the conversion harnesses.

The thing that is weird is that the Avionics switch seems to be only controlling power to the radio and an optional GPS/ADSB device.
It does however NOT control power to the ADAHRS. So with only the Avionics switch in on position the SV display shows an ADAHRS failure.
I have to then turn on the Autopilot switch(!) to power up both servos (as expected) and the ADAHRS. As soon as I turn off the autopilot circuit, the ADAHRS turns off too and the SV is guessing my airspeed from then on (just kidding).
I don't think this is reasonable nor safe but I wonder if this is how it's supposed to be as per Van's design.
 
Last edited:
THe ADAHRS is powered from the Skyview screen itself through the EFIS fuse and nominally through the Master switch, not the Avionics switch.

The ADAHRS should be working with the Avionics switch OFF. In fact, the ADAHRS and GPS Receiver should be working even with the Master Switch OFF and by powering on the EFIS by holding the left button a few seconds, and thus running only on the Skyview backup battery.

The Servos have their own switch and are powered from Ships power, not the EFIS, that is correct.

So per your exact description above, something is not quite right.

Oh, the Avionics switch also powers the Transponder through ships power, not the EFIS.
 
operating handbook pre start

The operating handbook PRE-START. says to power up, hold left button until screen flashes Is this the way you should boot up your Skyview D1000 or do you just turn on the master sw. which will power up the D1000. I think that when you hold button 1 or left button the D1000 will power on stand by battery power. How do you know when you boot up if you are on stand by power.or A/P batter. Sometimes when I turn on my the master sw the D1000
does not boot up on first try shut it off and retire and it boots up or flashes on.
 
The D-1000 turns on "by itself" whenever 12V power is applied to it, such as when you turn the master switch on. If you then remove external 12V power from it, it continues to run from its backup battery but puts up a message telling you it will power down in 30 seconds unless you hit a certain button. If you are in flight it does go into the 30-second power down routine. See section 3 of the manual.

If no external 12V power is applied, you can power it up by holding the #1 button for a few seconds, it powers up using its backup battery and will stay on until that battery runs out. Or until you manually power it off with the #1 button again. If, while it is powered on its backup battery, you then apply external 12V (like turning on the master), it switches to that power source. If you then remove that power source, it does the same message about 30 seconds.

I turn it on using the #1 button when I am fueling the plane or someone just wants to see what it looks like.
 
THe ADAHRS is powered from the Skyview screen itself through the EFIS fuse and nominally through the Master switch, not the Avionics switch.

The ADAHRS should be working with the Avionics switch OFF. In fact, the ADAHRS and GPS Receiver should be working even with the Master Switch OFF and by powering on the EFIS by holding the left button a few seconds, and thus running only on the Skyview backup battery.

The Servos have their own switch and are powered from Ships power, not the EFIS, that is correct.

So per your exact description above, something is not quite right.

Oh, the Avionics switch also powers the Transponder through ships power, not the EFIS.


Hm, to get an idea of where and what to look for I tried to run the SV without any external power. I was wondering if the behavior was different and if so, how.
Powering on the unit w/o external power gave me the same result as before. The unit comes up, finds GPS and EMS but doesn't find the ADAHRS. The two servos were not found either but that's expected as there was no external power to run them.
Now what is really weird is that putting the Autopilot switch to on, made the ADAHRS immediately come on. It appeared that it needed the switch to be in closed position in order to work. However, no voltage was on the switch, the switch was completely passive.
I pulled the fuse for AP and the ADAHRS went away. I put the fuse back in and it came on.
I removed the harness to the switch module and the ADAHRS went away (AP switch was on). Wires back in and it came back. Something is definitely odd with this as the switch module shouldn't be involved in anything the SkyView unit is doing directly on the bus.
I will check the voltages on the SV bus cable that goes to the ADAHRS tomorrow and see what they do in respect to the switch. I'm not sure what else to look at as the bus is not supposed to get through the switch module.

Update:
I called builder support this morning but so far no hint. They want to discuss this among themselves and see what they can come up with. I'm not sure this is a good sign. It appears no one had heard this before.
 
Last edited:
WH RV12 EGT

I think the title line describes a cable that runs from the EMS module to the engine, with wires for engine sensors. Since I don't have the Rotax, I think I need that wiring harness, but am not even sure if that is the nomenclature, since there is in my plans only one reference to that cable with that number.. Can anyone help?
Page 42D-28, figure 1 is the only place I see this cable, and that appears to be the name of that cable.
 
Last edited:
Follow-up for Bayne

Bayne, the behavior you described is sounds about like what is happening here. When I turn on master the fan in the control module comes on but not the Skyview and not the green light in the switch. Then, if I turn off the master and turn it back on, all three come on - green light in switch, fan in module and the Skyview boots up.

Called Van's and described to Gus. What I understood from him was that the Skyview should boot up when master goes on. He suggested that I pop off the cover on the connectors and probe the pins to see if Skyview is getting 12 volts when the master goes on each time.

I am putting this problem aside for a while while I do the hundred and one other things that remain and am following this thread with interest. Please post something if you learn more about this and I will too when I do follow up on it.
 
The problem is solved.

It was a servo that confused the SkyView system to the point that it didn't see the ADAHRS or the EMS when that servo was on the bus. When supplied with power, it worked fine and also the other servo which is hard to understand. The ADAHRS and EMS disappeared when that servo was powered up. Eventually it died completely and couldn't be detected by SV anymore. At that point the other 4 devices were working just fine and reliably so.
Today I received and hooked up the replacement servo from Dynon and everything is working fine now.
Lessons learned: When something seems to be odd with the SV network, take the devices off the bus one by one to isolate the troublemaker.


Hm, to get an idea of where and what to look for I tried to run the SV without any external power. I was wondering if the behavior was different and if so, how.
Powering on the unit w/o external power gave me the same result as before. The unit comes up, finds GPS and EMS but doesn't find the ADAHRS. The two servos were not found either but that's expected as there was no external power to run them.
Now what is really weird is that putting the Autopilot switch to on, made the ADAHRS immediately come on. It appeared that it needed the switch to be in closed position in order to work. However, no voltage was on the switch, the switch was completely passive.
I pulled the fuse for AP and the ADAHRS went away. I put the fuse back in and it came on.
I removed the harness to the switch module and the ADAHRS went away (AP switch was on). Wires back in and it came back. Something is definitely odd with this as the switch module shouldn't be involved in anything the SkyView unit is doing directly on the bus.
I will check the voltages on the SV bus cable that goes to the ADAHRS tomorrow and see what they do in respect to the switch. I'm not sure what else to look at as the bus is not supposed to get through the switch module.

Update:
I called builder support this morning but so far no hint. They want to discuss this among themselves and see what they can come up with. I'm not sure this is a good sign. It appears no one had heard this before.
 
I received word from Van's regarding the Skyview question: "Where do we connect the intercom wires? The plans only show adapting from a cable that you would have gotten only if you bought the original avionics."

Here's what they just said: "As suspected, the headset wires need to be plugged into the AV-5000. However ---- they won't reach, and you will need an extension - also there are 7 places in the connector on the AV5000, and you have 8 wires, the two ground wires need to be spliced together.

"Bottom line, we will need to make some harness adapters for you guys (about 190 customers) who have the old fuse wiring . Our engineering guys are working on this, but it will take a couple of weeks to get them made and sent out to you."
+++++
Now I just went out and checked and it looks to me like my wires are long enough to reach, and I requested the pinouts and offered to send them a picture as another check. I will post more as this develops.
Bill H."

******************
I too have reached this point and gave them a call - they suggested trying a stretch to see if they would make it by laying them across the top of the radio. They (just) will, but it takes some pushing and shoving at the 5000 connector end. Elsewhere, they have admonitions about running wires across (the bottom) of the radio due to high EMI levels.

Have you any updates to this, Bill?

Bob Bogash
N737G
 
Back
Top