I am planning on ordering my 14 wings soon. Am preparing my shop and understand an easel of sorts is helpful when reviewing plans. Does anyone have a plan I could use to build one? Also I understand a wings dolly or support with wheels is useful when working on the wings and moving them about.

Van's Air Force
You are using an out of date browser. It may not display this or other websites correctly.
You should upgrade or use an alternative browser.
You should upgrade or use an alternative browser.
Construction Site Preparation
- Thread starter dspender
- Start date

sahrens
Well Known Member
Easel
Well, if I can figure out the posting of images,
http://i1197.photobucket.com/albums/aa430/ch47ip/PlansStation04_zps9ec155ae.jpg
and
http://i1197.photobucket.com/albums/aa430/ch47ip/PlansStation07_zps240346ba.jpg
and
http://i1197.photobucket.com/albums/aa430/ch47ip/PlansStation03_zpsf66648fe.jpg
Well, if I can figure out the posting of images,
http://i1197.photobucket.com/albums/aa430/ch47ip/PlansStation04_zps9ec155ae.jpg
and
http://i1197.photobucket.com/albums/aa430/ch47ip/PlansStation07_zps240346ba.jpg
and
http://i1197.photobucket.com/albums/aa430/ch47ip/PlansStation03_zpsf66648fe.jpg
sahrens
Well Known Member
Size of the easel is
The base is 36""x39" with a 2"x6" frame underneath to support the structure and the casters. The uprights are 1"x4"s with an overall height of 63". The top pieces are 24x48 and the shelf for the build binder is 12x36 I think.
I do not have any plans, I threw it together hoping it came out alright. The plans are clipped to the top so I can flip from one sheet to another. That has been very beneficial on many occasions. The drawers in the back contain rivets and common hardware. I put a power strip on one upright with an extension cord, so power could move with it.
The idea was to have a moveable plans / hardware storage / power storage location that moves around with me. In reality it sits in one location and I go back to it to reference the plans. I may have moved it around once or twice.
I hope this helps.
The RV-14 plans are in a binder 11" X 17". When the binder is open, you'll need about 34/35" . I'm dragging mine from place to place as I work, but you could put them on an easel if you have roam for it. My hangar is only 60' X 60' and I'm too jambed up for a castoring easel. There is enough in the way with work tables, benches, tool boxes, etc.
sahrens
Well Known Member
Binder shelf
I find mine to be a great addition. When I first built my easel I did not have the binder shelf. Adding it meant I could stand in one spot, read the build instructions and view the plans. Maybe I am a little slower than some but I find myself reading, and re-reading, the build instructions before committing to some action. Having the plans right there has made it much easier.
I can't see a negative side to adding it. The time spent adding it is somewhat meaningless compared to the time spent finishing the plane.
joe_rainbolt
Well Known Member
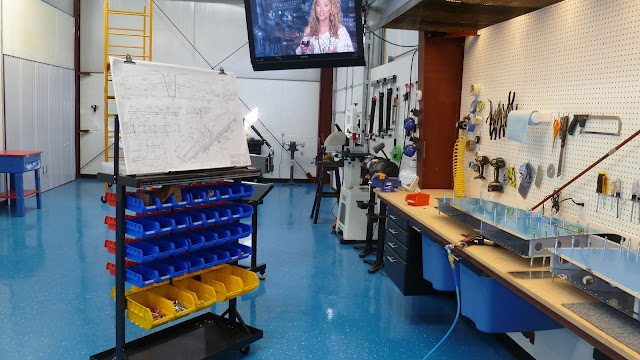
A Harbor Freight solution
I have found a roll-around parts caddy to be a great time saver. Mine started with Harbor Freight parts rack (Item #95551) already on wheels. I just added a white board to the top and clamps on top of that to hold the plans. I didn't think to add a shelf for the binder but , perhaps that could be added.
The red bins I labeled for each rivet type and the blue bins hold bagged parts. Yellow? Those are for clecos, of course")
I have found a roll-around parts caddy to be a great time saver. Mine started with Harbor Freight parts rack (Item #95551) already on wheels. I just added a white board to the top and clamps on top of that to hold the plans. I didn't think to add a shelf for the binder but , perhaps that could be added.
The red bins I labeled for each rivet type and the blue bins hold bagged parts. Yellow? Those are for clecos, of course
joe_rainbolt
Well Known Member
Thanks Don, and I agree, that it's too nice a TV for a shop. I had to move the TV from my house to the shop after I accidentally put a small scratch in the screen. It doesn't affect the TV in any objective way, but all I can see when I look at it is the scratch. Putting it up high prevents me from seeing it -- problem solved!
Rolling rack question
Hello Joe, I have been looking at the rolling racks for parts but my big concern is stability of the rack. If that thing tips over, BIG problem. How stable is it? Obviously the heavy items go in the bottom. I am also concerned that the individual bins may not be secured as "securely"as we want. I was also looking at tip out storage trays.
Maybe the solution is tip out bins on a rolling easel?
I would like to know your thoughts as an experience builder.
Beautiful built space by the way. What material did you put on the floor.?
The picture in this post has done nothing but hurt my self esteemI have found a roll-around parts caddy to be a great time saver. Mine started with Harbor Freight parts rack (Item #95551) already on wheels. I just added a white board to the top and clamps on top of that to hold the plans. I didn't think to add a shelf for the binder but , perhaps that could be added.
The red bins I labeled for each rivet type and the blue bins hold bagged parts. Yellow? Those are for clecos, of course
. That shop is way to clean and organized. On a side note, I have the same bin system and the RV-14 plans fit perfectly on the top shelf. Now I need to go and color code all my bins
