What's new
Van's Air Force

Don't miss anything! Register now for full access to the definitive RV support community.

The pre-inspection inspection

LettersFromFlyoverCountry

Well Known Member
There it is:

final_list_inspection.jpg


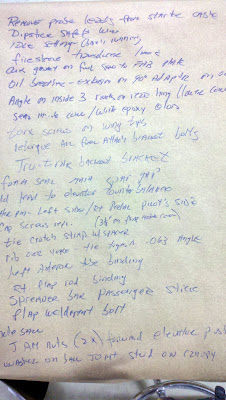
that's the list of squawks found on my RV-7A project by two of the most legendary RV specialists on Planet RV today -- Tom Berge and Doug Weiler.

I post this because in the EAA thread, someone pointed out how valuable RV builder groups are. This is a great example. Two guys gave up their Sunday afternoons to help another builder get his plane ready for the DAR.

And they've done this so many times and they know the DAR so well -- he's also an RV builder -- that I have to believe just knowing that these guys have already looked at the bird, will make his job much easier.

I've got the bigger image of the squawks on the blog, and some notations we made -- and also a link to the audio interview I did with Tom on tips for building RVs.

Two great guys doing great work for RV builders.
 
Translate

Can you translate that chicken scratching so we can understand it? I have poor handwriting but wow!
 
I discussed them on the blog. But here is a quick translation:

1) Move oil breather hose back to the way I had it before VAF told me I should change it. :rolleyes:
2) Separate engine probe wire bundle from starter cable
3) Safety wire the dipstick assembly better
4)Set engine idle to just above stall (haven't done any tinkering on actual engine operation)
5)Firesleeve the oil and fuel lines to the transducers
6) Use a cork, rather than a typical paper, gasket between the fuel servo and the FAB plate.
7) Attach .063 angle across the innermost three rivets on the bottom of the cowling aft hinges. The eyes tend to break in that spot.
8) Seal inside of lower cowling with a white epoxy.
9) Torx screws on the wing tips but do not use any stainless on fuel tank attach points.
10) Retorque all fuel tank attach bracket bolts (one or two were loose)
11) Tighten jam nuts on the forward elevator pushrod
12) Disconnect aileron trim before first flight to aid in establishing whether there's a heavy wing.
13) Add backout bracket prevention to TruTrak wing leveler (mine was purchased before TT made these available)
14) Use foam to seal the forward gap between the main wing spar and the fuse. Aileron boots not needed.
15) Silicon seal area around the bottom edge of the rear window.
16) Use a longer flap weldment bolt
17) Change -8 screws in flap housing covers to 3/8" length.
18) The left aileron push tube is binding, rod ends bearings aren't clocked properly. Loosen jam nuts, adjust, tighten.
19) Right flap pushrod also binding for same reason.
20) Crotch strap bracket...use a spacer and bolts to to tie front and back together rather than nutplate through the floor.
21) Top rib cutout under floor (for installing yoke) is cracked.
22) Bolt missing on passenger stick spreader bar
23) Add washers to the ball joint installation for canopy struts
24) Add led to elevator counterbalance
25) Cotter pin missing on left side of right pedal bolt on pilot side
26) All tires to 40 pounds
27) Double check to be sure the forward tank attach bolt wasn't torqued down.

There were a few others that didn't make the picture which I can't remember.
 
Translation

Thanks Bob, good luck on the inspection. This (VAF) is a great resource for builders. Hope everybody's donating!!
 
That's the way it is done Bob - excellent job getting other eyes on the project. Now fix all those things, and get yet another inspection.....and I can almost guarantee the next guy will find more. Lather, rinse, repeat.... that's just the way it is.

Good luck with the DAR - with the kind of help you've got, you should do great!

Paul
 
I don't know what others have found; but if I inflate the nosewheel tire more than 30 lbs it feels like the front end is coming off the airplane on rollout after touchdown when landing.

John Morgan
 
Back
Top