What's new
Van's Air Force

Don't miss anything! Register now for full access to the definitive RV support community.

Crankshaft seal problem

philmooo

I'm New Here
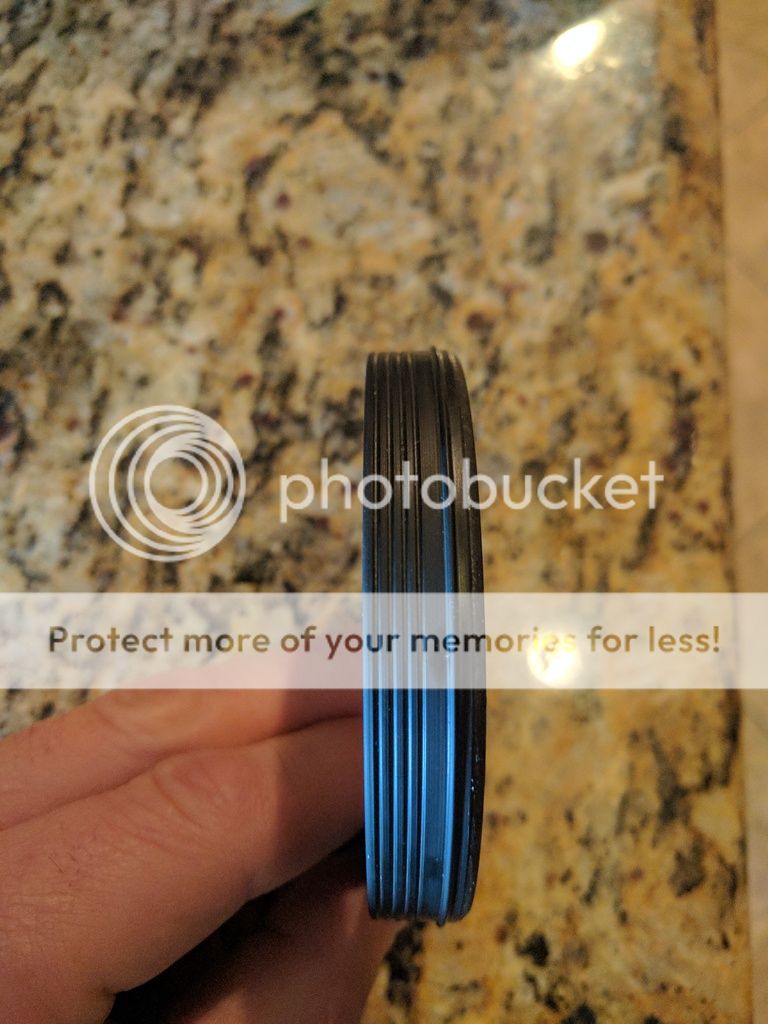
I have an 0-320. I was replacing the alternator belt, pulled all the junk in the way off and happened to find some wear grease around the crankshaft seal. I spun the crank by hand found that the seal is turning with the crank. I found the Lycoming Service Instruction No. 1324C which gives tolerance on wear limits but I can't get anything in there to measure. Anyone ever seen grooves get worn in the case like this??

Am I looking at a tear down for oversize seal install???

IMG_20170609_160330_zpssplngomz.jpg
[/URL][/IMG]
 
Could you post a picture of the removed seal?..... mainly the OD surface.

I do think I remember grooves in the case (like yours) when I replaced my seal.
 
Maybe it's an artifact of the photo or my eye playing tricks on me but that doesn't look like grooves. Had nothing else been mentioned I'd say what I was looking at is the cured sealant that was originally on the seal OD, left behind after the seal was removed.

That said, I found my seal spinning in the case bore after about 300 hours, on a brand new engine. I replaced the seal using the Lycoming approved silicone sealer. 200 hours later no leaks yet, replacement seal seems to be (happily) stationary.
 
It looks like pretty light wear (.005-.010) only in the grooves the spinning seal created. I think you should be able to get a caliper in there to measure the high spots. You could eyeball the grooves by holding different size feeler gauges next to the groove below the caliper edges. I would install a new seal with the best adhesive you can use. I used pliobond and it has held well for 350 hours. The key is to get it very clean. The glue should fill in the wear and hold well.

Larry
 
Last edited:
My seal came loose also on my IO-540. The seal did not make the grooves shown in your photo, its made of rubber. You should have one grove in the case for the ridge formed on the seal to fit into. The other marks that look like groves are probably just marks made from the other smaller ridges on the seal as it spun in the case. The seal is not going to wear the case. Again, its made of rubber. Carefully remove any leftover sealant with a dental pick and rags, Clean it all up several times using acetone. Make sure absolutely no oil or any contaminates anywhere on the crank shaft and case where the new seal will go. Use the new sealant that Lycoming states for installing the new seal, Dow 737 Natural Cure silicone sealant. Remove the spring in the new seal. I heat the new seal up in hot water to make it more pliable to stretch over the prop flange. I wrap the prop flange a couple times with slippery packing tape. Make sure you understand orientation of the seal when you stretch it over the flange. Use a smooth steel round Phillips screw driver or other smooth steel rods to hold and stretch the seal. Now hold the new hot seal in your right hand in front of the flange in proper orientation.. Put a rod through it at the bottom and then partly through one of the upper prop bolt holes in the flange. Fold the seal over the flange and push the rod through so it holds the seal folded over the flange. Now take your other rod and stretch the seal around the flange working
it over the flange bolt bushings. Looks impossible but it will stretch enough and pop right on after the half way point. Dry the seal and allow it to shrink back around the crank shaft. Be very careful so the spring does not slip and pop into the case, hook it back together around the crankshaft and reinstalling it in the seal. Clean the sealing surface of the seal and case again. A light film of sealant on the seal. Allow to set per mfg instructions and push it into place evenly. making sure the new seal bottoms out. The new seal has a ridge formed in it that goes in the grove of the case to help hold it in place. Let the sealant cure at least 24 hours before running your motor.
 
Last edited:
Had the seal replaced twice so far. Did not set right the first time, possibly from being too cold for the glue to set up in the 24 hour timeframe. I was told by 2 different people that did the 2 repairs that MEK is the only thing that dissolves the glue. They tore strips of shop rags about 2" wide, and soaked in MEK and placed it in the opening to soak the old adhesive. Also, the last time it was done, they put a thin layer of the adhesive on the case and seal and waited for it to get tacky. Then put another light layer on the seal prior to pushing it in place.

I left my engine heater on overnight the second go around (set at 80 degrees) since it was getting cold overnight. Tired of pulling the darn prop off and want this one to set properly.

Paid to have it done twice, by different people. I would do it myself next time. Not hard, just follow the instructions.
 
Also, there are 2 different seals available. We pulled both off the shelf and compared them to the grooves in the case and the old one. I believe the case has the ridges like you took the pic of to help with the glue adhesion, as well as the larger groove in the front that the seal pops into.
 
Split Seal?

My O-290-D2 with the 320 crankshaft uses a split seal. I haven't had any leaks. Also, the A&Es around here all use Pliobond rather than the Silicone adhesive.
 
What looks like grooves in the pic are definitely grooves in the case, there is supposed to be one groove for the the seal not 5... I am leaning toward just replacing the seal and monitoring. If it doesn't bond properly I will be in the same boat as I am now and will need to split the case and go with the oversized seal. I fear that with the sealing surface compromised the seal itself will be more apt to push out. If this happens will I loose oil out the front nose section and risk engine loss??

Good call about using a feeler gauge to try to measure.

 
My seal came loose also on my IO-540. The seal did not make the grooves shown in your photo, its made of rubber. You should have one grove in the case for the ridge formed on the seal to fit into. The other marks that look like groves are probably just marks made from the other smaller ridges on the seal as it spun in the case. The seal is not going to wear the case. Again, its made of rubber. Carefully remove any leftover sealant with a dental pick and rags, Clean it all up several times using acetone. Make sure absolutely no oil or any contaminates anywhere on the crank shaft and case where the new seal will go. Use the new sealant that Lycoming states for installing the new seal, Dow 747 Natural Cure silicone sealant. Remove the spring in the new seal. I heat the new seal up in hot water to make it more pliable to stretch over the prop flange. I wrap the prop flange a couple times with slippery packing tape. Make sure you understand orientation of the seal when you stretch it over the flange. Use a smooth steel round Phillips screw driver or other smooth steel rods to hold and stretch the seal. Now hold the new hot seal in your right hand in front of the flange in proper orientation.. Put a rod through it at the bottom and then partly through one of the upper prop bolt holes in the flange. Fold the seal over the flange and push the rod through so it holds the seal folded over the flange. Now take your other rod and stretch the seal around the flange working
it over the flange bolt bushings. Looks impossible but it will stretch enough and pop right on after the half way point. Dry the seal and allow it to shrink back around the crank shaft. Be very careful so the spring does not slip and pop into the case, hook it back together around the crankshaft and reinstalling it in the seal. Clean the sealing surface of the seal and case again. A light film of sealant on both the seal and case. Allow to set per mfg instructions and push it into place evenly. making sure the new seal bottoms out. The new seal has a ridge formed in it that goes in the grove of the case to help hold it in place. Let the sealant cure at least 24 hours before running your motor.

In the auto business, steel/ iron crankshafts routinely get wear grooves from the rubber seal. They even makes special sleeves for the repair. Regardless of what you learned about hardness, with enough rotations and pressure, rubber WILL wear steel. I have no doubt it will do so with aluminum and much faster.
 
What looks like grooves in the pic are definitely grooves in the case

My old eyes...

That said I used the same silicone as David C, and the procedure he described. The new seal was not a snug fit in the case bore- it spun easily, which surprised me- in my fairly extensive automotive experience I've never encountered a seal like this (crank, front or back, etc) that wasn't at least a light press fit. But once the silicone cured it couldn't be turned with finger pressure and it hasn't leaked since.

Silicone is a pretty good gap filler. Seems to me you don't have much to lose by trying a new seal.
 
Back
Top