
Van's Air Force
You are using an out of date browser. It may not display this or other websites correctly.
You should upgrade or use an alternative browser.
You should upgrade or use an alternative browser.
Plenum/Baffle Q
- Thread starter glenn654
- Start date

BillL
Well Known Member
For those of you who run a plenum, have you ever had any problems of cracking baffles?
Was thinking the plenum cover may be too restrictive of movement of the baffles and cause cracking.
Glenn Wilkinson
Interesting thought, I was wondering if the plenum would stiffen the back baffle by #4 on the 360's and prevent cracks in the oil cooler region.
hydroguy2
Well Known Member
A plenum will not necessarily prevent cracking of the baffle at #4 with the cooler hanging off it. At least it didn't for me 
Mine cracked during phase 1 I think. I added a stiffener and all is well since. I have a IO-360 180hpwith a SW8406cooler hanging at angle off #4 and a plenum.
Mine cracked during phase 1 I think. I added a stiffener and all is well since. I have a IO-360 180hpwith a SW8406cooler hanging at angle off #4 and a plenum.
For those of you who run a plenum, have you ever had any problems of cracking baffles?
Yes.
The -8 with an angle valve is sort of a special case. There is very little clearance between the port cylinders and the upper cowl, in particular above the 1/4-20 threaded mounting ears on the tops of the heads. In order to maximize clearance (and create a flange for plenum lid nutplates), I made very short baffle sidewalls that tipped inward at the ears. Because the I expected a significant load across the span of the intake openings, the front cylinder baffle walls were made from 0.060" 2024T3.
Early photos:


Both sides developed stress cracks at the most forward 1/4-20 mounting ear, as well as cracking the ends of the formed flange over the crankcase, behind the prop. The cracking above the cylinder heads was partly due to the plenum bumping the inside of the cowl during start up, but that would not explain cracking at the ends of the formed center flange. Remember, pressure recovery tries to blow up the plenum lid like a balloon, and the numbers are quite high; 136 lbs sq ft at sea level and 200 knots, times about 75% with the cowl exit open. The lid is about 4 sq feet, so there is about 400 lbs of force trying to lift the lid off the engine. In this case, the rubber inlet ducts add no strength or stiffness across the span of the intake openings, unlike a more conventional fiberglass snout.
The cure was to (1) attach the plenum lid directly to the mounting ears on the front cylinders, and (2) eliminate the formed center flange, placing the fasteners there in shear. The lid was reworked to add the necessary mounting ears and a wrap down over the forward face of the center case baffle:


The attach points at the cylinder heads got clamp plates over the glass, which seem to do a good job:

BTW, a fiberglass plenum lid really isn't all that stiff. Glass is low modulus (stretchy, in lay terms), and at engine compartment temperatures the epoxies we use are almost like hard rubber.
Last edited:
N941WR
Legacy Member
Dan, your work puts everything I try to do to shame! Is the inside of your exhaust polished as well?
After replacing the cracked baffles, here is how I kept the crack from coming back:
Same here!A plenum will not necessarily prevent cracking of the baffle at #4 with the cooler hanging off it. At least it didn't for me
Mine cracked during phase 1 I think. I added a stiffener and all is well since. I have a IO-360 180hpwith a SW8406cooler hanging at angle off #4 and a plenum.
After replacing the cracked baffles, here is how I kept the crack from coming back:
Last edited:
rzbill
Well Known Member
Interesting thought, I was wondering if the plenum would stiffen the back baffle by #4 on the 360's and prevent cracks in the oil cooler region.
Probably,
The corner structure that cracks is not the problem. It is the flexible baffle section at the inboard end of the cooler that is the problem.
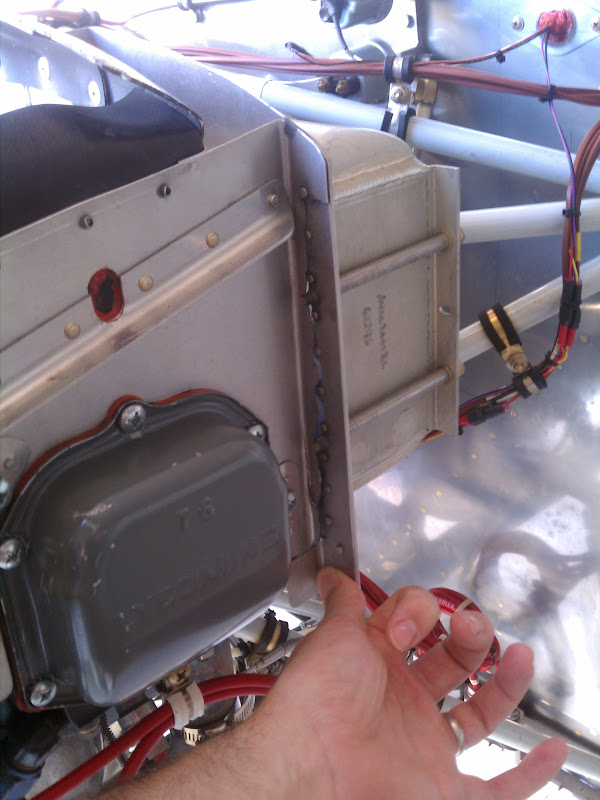
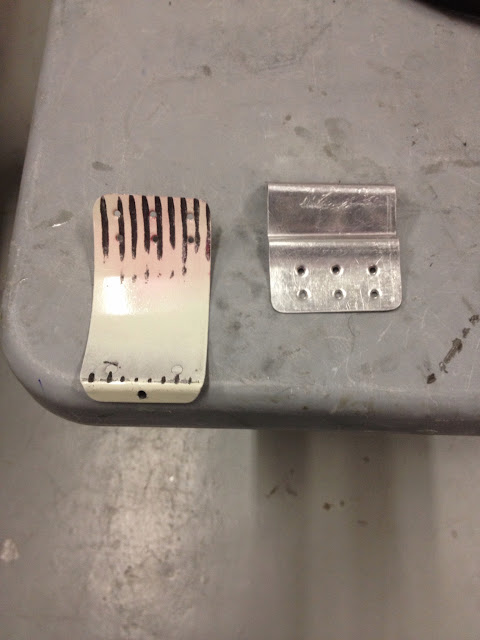
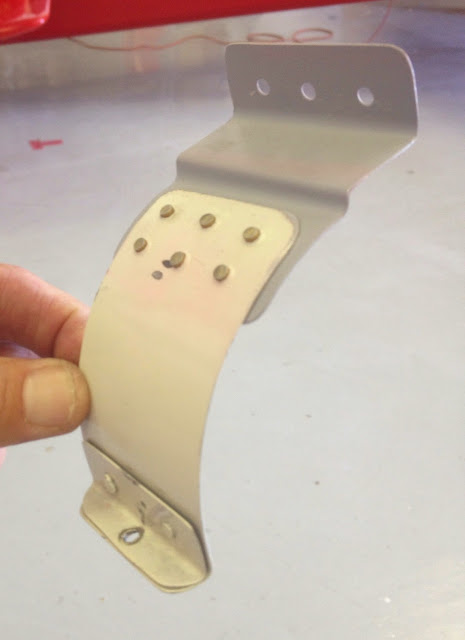
This J-Channel Reinforcement has been completely successful (350 hrs) in preventing the corner cracks.
I imagine similar stiffening can come from a proper plenum top.
N941WR
Legacy Member
Probably,
The corner structure that cracks is not the problem. It is the flexible baffle section at the inboard end of the cooler that is the problem.
This J-Channel Reinforcement has been completely successful (350 hrs) in preventing the corner cracks.
I imagine similar stiffening can come from a proper plenum top.
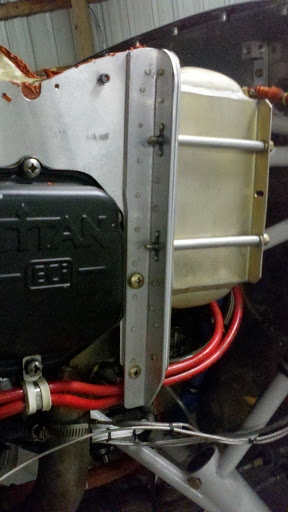
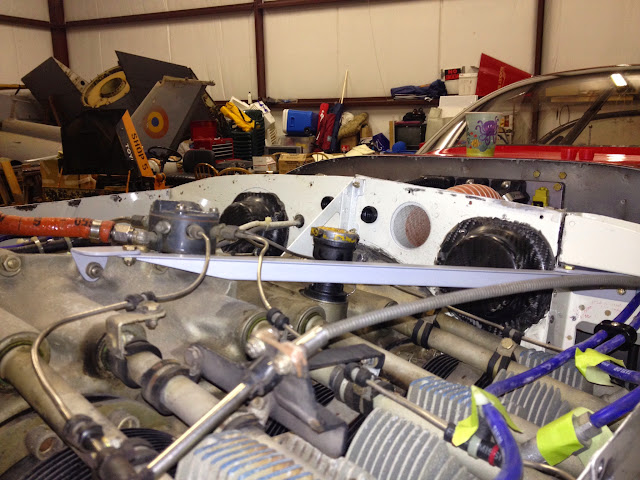
Bill, that might have saved us a lot of work by keeping the rear baffle from flexing at the rivet line. Here are two pictures of a crack that developed in the exact same place on twp different airplanes. . The lower picture is from my plane.
Lionclaw's plane does not have a plenum and mine does, which is why his has the stiffener above the cylinder and my does not.
Same problem/fix on my O-320 as well. Van's really needs to update their baffle kits with this fix.
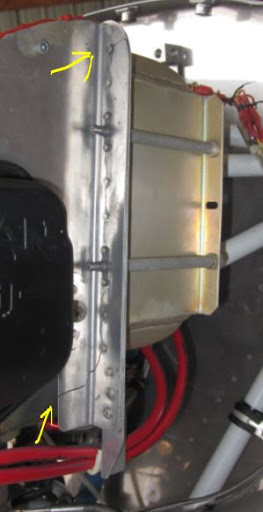
My crack was exactly like Andy's, it went from yellow arrow to yellow arrow:
Last edited:
Weasel
Well Known Member
Yes.
BTW, a fiberglass plenum lid really isn't all that stiff. Glass is low modulus (stretchy, in lay terms), and at engine compartment temperatures the epoxies we use are almost like hard rubber.
Dan, Would you envision a glass plenum to be soft enough to attach to the baffle on say cyl's 1 and 5 and 2 and 6 and then do the clamp attachment on cyl's 3 and 4 to keep the stress on the aluminum baffle down?
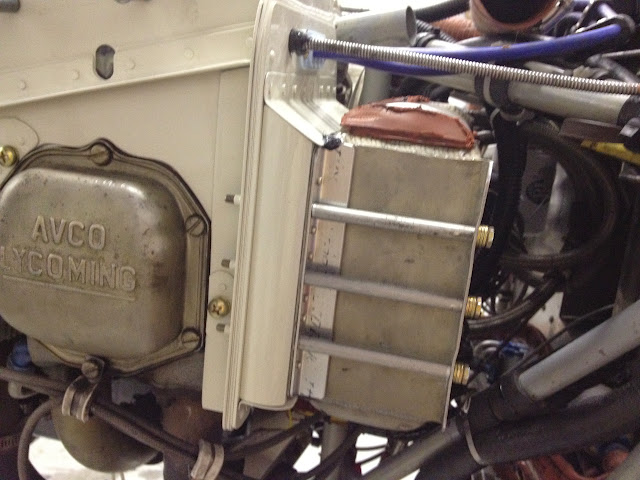
No baffle cracking with an SJ plenum
At 200 hrs, I have no evidence of baffle cracking ... fingers crossed. During the build I did add a .063" doubler all the way around the rear baffle opening at the oil cooler. That was in addition to the .063" doubler that Vans now provides for the outboard bolts at that same location.
The good news is, this area is visible and accessible for close inspection any time the top cowl is off!
Mike S
Senior Curmudgeon
What is the objective of the baffles and Plenom ?
They force the cooling air to go through the fins on the cylinders and heads.
Air will go around the fins if it can, much lower drag.
N941WR
Legacy Member
What is the objective of the baffles and Plenom ?
Looks! It is all about style points!
Well for me anyway. I'm not really sure the cooling plenum is that much faster than the standard Van's cowl.
That said, many will argue the round inlets and cooling plenum are more efficient.
rvmills
Well Known Member
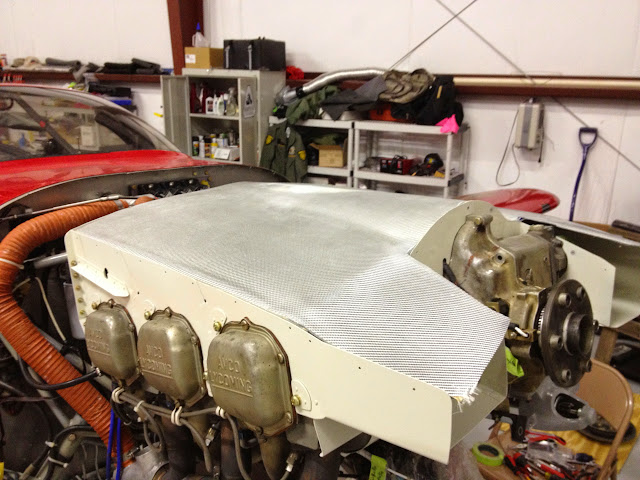
I run a plenum as well, and have had my share of cracks. I used an RV-10 baffle kit as a starting point, but had to modify or fabricate some of the parts to fit my engine (and the stretched -6 cowl). The plenum is a modified RV Bits -10 plenum, with added carbon fiber layers inside and out.
My cracks have been around the aft-mounted oil cooler, though they are different than what Bill and others have shown. I beefed up the heck out of that corner at Cyl #6, including a doubler on the face of the #6 baffle (you can see it under the standard angle stiffener), a doubler on the aft face of the aft corner baffle, and a very robust corner build-up.
.
I did buy correct-length bolts and got rid of all those washers…this was in the baffle re-build and fit phase
I also have an inner brace running from the aft baffle, just above the cooler, to an upper case-half bolt.
With all that strengthening, my cracks are, IMHO, evidence of transfer of fatigue/failure to weaker points. In my case that has been to the curved baffle pieces that go around the #6 cylinder barrel. Failure 1 occurred where the outer curved piece intersects the oil cooler mount. Sheared right off.
It was either make that entire corner over, and risk a repeat, or work out a doubler and alternate mounting method. I chose the latter, and did this:
It mounts to the bottom of the oil cooler standoff bottom flange, with a little rubber layer as a shock absorber, and a thin coating of RTV on the inner face of the curved section (a Paul Dye suggestion). I also had a chronic loosening of the two 1/4-20 baffle bolts on #6. I added the fillister head bolt seen in the last pic above and safety wire it. Both of these fixes have held up well.
However, this Condition Inspection revealed the curved inner (lower) baffle piece on #6 just broke as well…likely another slight shift in failure point…and very frustrating! Especially since this particular baffle piece is a real bugger to remove and install.
I scabbed this together…rivet locations dictated by crack location...but it's (as Cheryl Crow would say) "plain ugly to me"…
...so am ordering new copies of those two aft-left baffle parts…in fact two of each, to see if I can double up the places where these have failed. I am also thinking a shock-mount for the cooler would be a big help here. Next engine gets a firewall mounted oil cooler for me!
All that being said, I would think the plenum would be a strengthening measure, as it would, I'd think, keep the baffles from stretching/flexing outward under the pressure that Dan described. Perhaps the rubber baffle material in a stock setup would absorb that pressure. At any rate, I think that many baffle cracks, if not most, are from vibration…especially if the parts are under any preload when installed (forced to fit…another lesson from Paul!)
If anyone has good fixes for my failure modes, I'm all ears! Thx!!
Cheers,
Bob
Dan, Would you envision a glass plenum to be soft enough to attach to the baffle on say cyl's 1 and 5 and 2 and 6 and then do the clamp attachment on cyl's 3 and 4 to keep the stress on the aluminum baffle down?
Yes, but probably unnecessary. In my case the cracking was due to lid and rubber intake duct design. The other cracking seen here has been due to vibration and oil cooler mass.
The plenum is a modified RV Bits -10 plenum, with added carbon fiber layers inside and out.
Now that would make the lid a lot stiffer, carbon being high modulus.
At any rate, I think that many baffle cracks, if not most, are from vibration?
Yep.
...especially if the parts are under any preload when installed
Preload is not a bad thing, in particular regarding high cycle fatigue. Preload to a stress higher than the expected cyclical stress is a standard approach to fatigue prevention. Consider your connecting rod bolts.
rvmills
Well Known Member
Now that would make the lid a lot stiffer, carbon being high modulus.
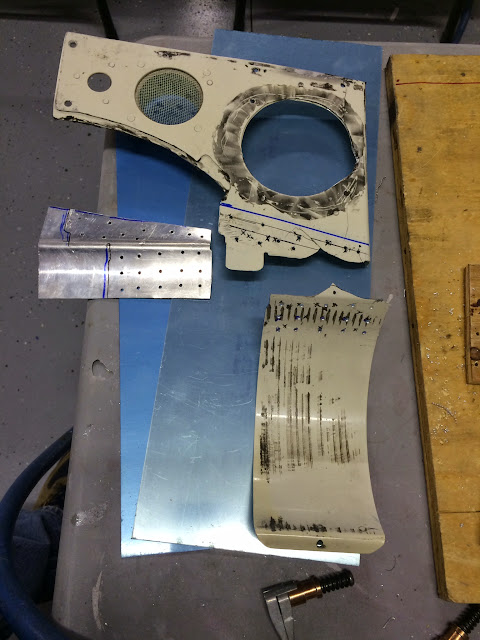
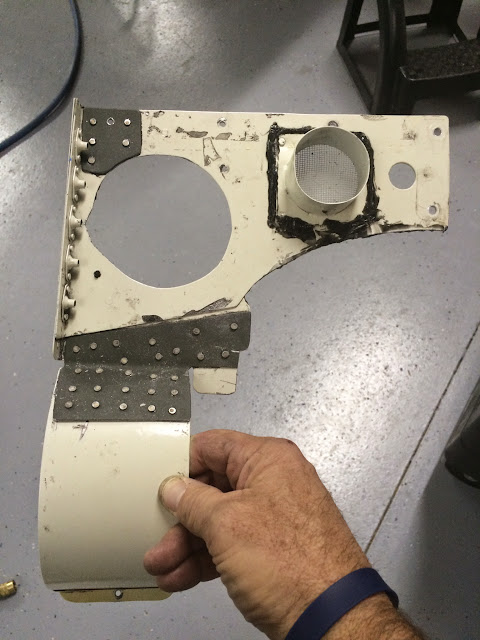
It is much stiffer. Required some reworking after the addition, as it did not fit quite right after the mod. The plenum, as delivered, did not have the front extension length I needed, and had a few weak points at the corners that needed a little beefing up. Here are a couple other pics, from the fab phase. Ended up finishing the inside, after doing the layup and tweaking to fit. Someone else's workmanship was my motivating influence!
Preload is not a bad thing, in particular regarding high cycle fatigue. Preload to a stress higher than the expected cyclical stress is a standard approach to fatigue prevention.
I think Paul was driving more at using good fabrication and debarring techniques, so that the baffle pieces fit well on the engine?not requiring bending and squeezing or forcing to make them fit around, for example, the valve covers. Intersting thoughts about anti-fatique preload-by-design. My plenum does require a bit of preloading to install?perhaps that helps with the stiffness factor too. If I could figure out the direction and frequency of the oil cooler vibration, then perhaps I could beat that problem too?right now it has my number!
Not giving up tho!Cheers,
Bob

