What's new
Van's Air Force

Don't miss anything! Register now for full access to the definitive RV support community.

Biggest oops so far

DaleB

Well Known Member
I bought my -7A with the empennage mostly complete, so I get to make my newbie mistakes on the wing. How exciting!

When I riveted the wing ribs to the rear spar, I had the skeleton on the wing stand. Big mistake. I couldn't see the bucking bar and a lot of rivets ended up way over-driven, plus some of the rib flanges weren't tight against the rear spar. The end result was a fair number of drilled-out rivets. I quickly figured out to do this sort of thing on the workbench from now on.

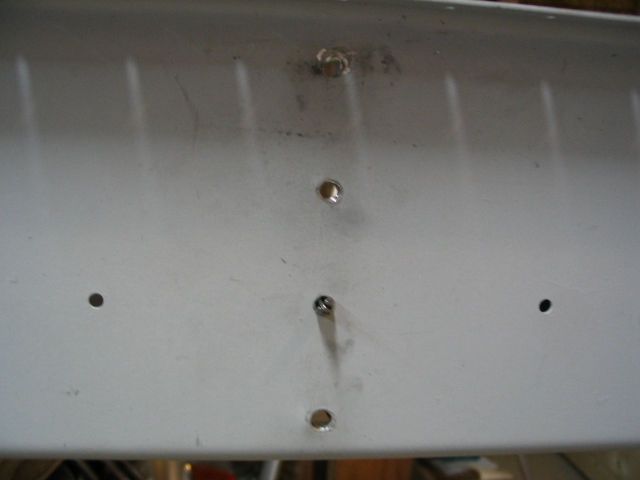
Most of them came out OK, and I bought a pneumatic squeezer that is turning out to be a FAR better solution for this. However, there is one place that I screwed it up pretty well. Fortunately it's the #13 rib -- naturally -- the last one before the wing tip. I ended up elongating the top and bottom holes of the rib and rear spar. A -4 rivet is not going to work in either of those holes.

I can think of two options to fix this:
  1. I believe I could re-drill the holes for a couple of -5 rivets.
  2. I could also make a doubler plate to span all four rivets, and extend up the rib web where I'd set four more through the rib web and doubler plate. Then I would need to make two doublers for the other side of the rear spar -- I can't just use one because of W-724 that intersects that line of rivets. I'd need to put rivets on either side of the original holes.

What would y'all recommend?

IMG_2685.jpg
 
Last edited:
-5 Rivet Sets

I had to drill out a few -4 rivets in the wing walk area and went with -5, but had to buy a -5 rivet set for the gun along with the rivets. If you use a squeezer you'll need a -5 cup set.
 
I had an accident in the shop and had to replace the entire rear spar. Vans recommendation was to make doubler strips and place them on the interior of the wing ribs where needed. I don't recall if I needed any in the area of the flap brace.

For whatever reason, I had a difficult time setting the replacement rivets and will have to remove some of them- haven't gotten around to it yet, but am dreading this because it was such a stupid mistake resulting in a big hassle (skeleton fell off the wing stand).
 
For the rib, it is perfectly acceptable to replace the flange. Cut it off, bend a new flange being sure to maintain proper bend radius, and rivet the new flange onto the rib using the same spacing as you have on the spar if you use 1/8" rivets. You want the part of the flange that you are riveting onto the rib web to be 1" wide. Now you have a clean flange.
For the Spar, if you go "by the book", when you use a doubler, you are supposed to have supporting rivets to each side of the repair. However, since your bad holes are on the end of the row, the only way to do that would be to make your double wider so you could put
one rivet to each side. That seems like a bit of overkill. I suspect a doubler tied to the good holes would be just fine, but....
When it comes to spars, the only authority is the airframe designer or manufacturer, so, once you decide on the repair, contact Van's. I believe they would sign off on a simple doubler but you might discuss the wider doubler idea with them too. It would not take much more time.
 
Rivetting

Dale..... a couple of tips.

If you are using a 3x gun hit the rivet for only about a second you will hear the strikes... ratatatat. Then check the rivet for setting it may need another 1/2 second squirt on the gun it may be OK. Also listen to the tone of the strikes... it changes when the rivet sets.

Also, to prevent things not being drawn together you can do a very short squirt on the gun so it perhaps hits the rivet only once, this will thicken it up so it fills the hole, then put a nut on the shop head side and do another one tap squirt on the gun, this will close any gap.... then you can do a 1 second sqirt to finally set the rivet.

Remember..... often a badly set rivet is often better than a drilled out one and elongated holes.
Thanks for the tips -- I've learned several lessons from this.
  • I need more light in the shop/garage/airplane factory. I have plenty of light over the work bench, but not NEARLY enough over the wing stand. I'll be adding an 8' fluorescent fixture this weekend. Maybe more than that.
  • Wherever possible, I need to get parts on the bench instead of trying to make some other arrangement work. I knew that I could have moved the wing skeleton to the bench. I should have moved it to the bench. But it was on the stand, I was all pumped about having the stand there and the wing skeleton on it, and it would have taken half an hour to clear the bench off. So saving that half hour has now cost me a lot of time, and I needed to do it anyway. Now I have, and I'm wasting time with repairs I wouldn't be making if I'd taken the time to do it right the first time.
  • If I can't see clearly that the parts are securely together, I need to slow down and fix that. Hoping they draw up tight doesn't work.
  • Riveting parts that are not well supported so I can get good pressure on the rivet gun is a recipe for disaster.

You are a quick learner. Don't kick yourself too bad, this is a very minor mistake and you will have it repaired in less time than you spend worrying about it.
 
Thanks for the tips -- I've learned several lessons from this.

One more thing you might consider. See if you can find a friend, or maybe your spouse, to enlist to help with the riveting. I'm a fairly short guy and my wingspan isn't great enough to reliably reach a lot of places. My wife helps with any major component riveting and I couldn't possibly build without her. As a team we make far fewer mistakes than when I try to go it alone.
 
An3 bolt

A quick fix but slight over kill would be to drill the holes out with a #12 drill and put in a AN3 bolt.
 
I measured the holes -- it looks to me like I can drill them out with a #21 and put -5 rivets in there. The holes would be within the max allowed diameter, but not tight by any means. I've got enough other things i can be working on to keep me busy, so I emailed Van's tech support to ask them what they recommend. If I can put -5 rivets in and move on, then great.

The left wing is much farther along... in fact when I picked it up there were already about a dozen rivets in the top inboard skin. I think I'll use the control surface practice project I bought to get my wife familiar with riveting and have her help with that. She thinks riveting is difficult -- I keep telling her it's not, IF you do it right. :)
 
Well, I head back from the Mothership...
A couple of -5 rivets is ok. You probably could use -4s in these holes --they aren't that bad.

I've got a chapter meeting early next week, and one or two guys say they think they have some -5 rivets. Problem solved. Thanks for the feedback folks... for now I'll keep working on the inboard/outboard wing skin overlap on the other wing. :)
 
Maybe just abandon the hole and put 2 -3 rivits on each side. Edge distance might be a bit thin but I don't think it's highly loaded area
 
Back
Top