What's new
Van's Air Force

Don't miss anything! Register now for full access to the definitive RV support community.

Cowling Side Flanges

DanH

Legacy Member
Mentor
Fitting a cowl, no hinges, so a flange is needed along the side for 1/4 turn fasteners or screws/nutplates. The usual method is a riveted and bonded aluminum strip. The problem is that such a strip is flat, while the cowl is rounded, in particular as you near the front. I suspect this to be the cause of some misalignment reports after fastener installation. So, an alternate method for your amusement. I elected to lay up some glass flanges; quite easy to do.

Get the cowl fittted and trimmed to your satisfaction. Sand (40 grit) the inner surface of the lower cowl for good bonding. Paint two coats of PVA on the upper cowl inner surface. Jig the cowl (by whatever means necessary) so the outer surfaces of the two parts are flush and the parts can't shift fore and aft in relation to each other. I used scrap aluminum and clecos plus some shims and tape here and there. The cleco holes are a non-issue; plenty of surface filling in the future anyway.

Cowl%20Flange%20Jigging.jpg


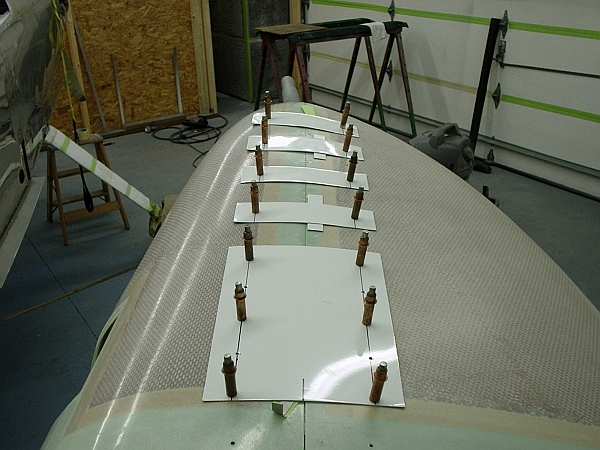
The flange layup is 5 plies of tape, pre-impregnated in plastic and dropped in place whole over a light epoxy "surface prime" wipe. Stipple or roll to eliminate air bubbles.

Cowl%20Flange%20Layup.jpg


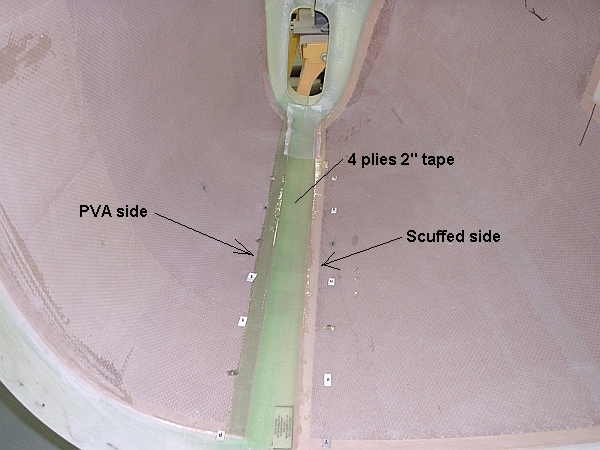
When cured, pop it apart and trim/sand the new flange 1" wide.

Cowl%20Flange.jpg


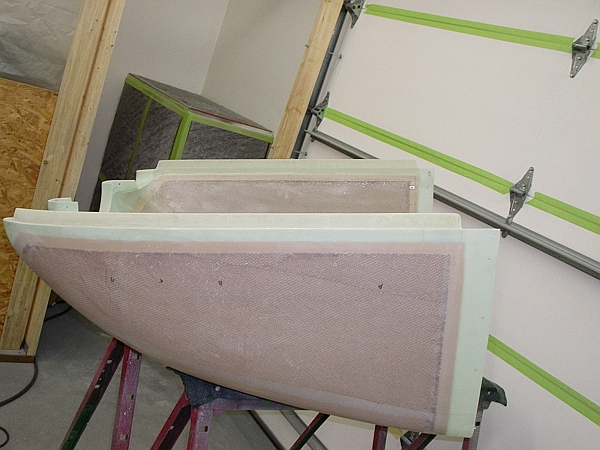
The finished product precisely matches the upper cowl curvature.

After installing all the fasteners, I'll probably go back in and add more flange all across the front around the cooling inlets, just to eliminate any visual gap between the cowl sections.

BTW, with an angle valve 360 or 390 there is not much clearance down the left side (1/2" or so max). I may ditch the planned Skybolts here and use screws/nutplates instead.
 
Last edited:
Dan:

Looks good.

I suggest doing the same to the forward section by the air inlets to give the area some added strength and provide a spot for a screw/nutplate to secure this area tightly. I did this on my -8 cowling (see pics below). I used the conventional piano hinge method for the cowl but thought the forward area could use some extra strengthening/tightness due to its being literally at the pointy end of the stick and taking all the airflow abuse.

Fiberglass buildup before trimming.


And after trimming and adding a platenut. It seems to work well.


Chris
 
Hi Chris,
That's the flange I'm installing later, but I hadn't thought about a nutplate there. Hmmmm, thanks!
 
Dan, did you ever get around to installing the fasteners in those fiberglass flanges? If so, I'd be interested in seeing a photo. I'm sitting here looking at the piece of 2024-T3 I was going to use; after seeing your photos, I think I'm going to use glass instead- they look great. Thanks for posting this!
 
Nice work

Hey Dan,

Nice work. Did you know Skybolt has some low profile fasteners? I got a couple of them for "close" places. I'm doing a 390 in the new project so step on all the land mines for me!!!!
 
Hey Dan,

Nice work. Did you know Skybolt has some low profile fasteners? I got a couple of them for "close" places. I'm doing a 390 in the new project so step on all the land mines for me!!!!

Thank you, no I didn't know that, and no land mines yet. You doing an 8? The 390 has the same "problem" as the other angle valve installs; clearance to the cowl is very tight on the port side. The really tight spot isn't the split line, although fasteners need to be low profile there. It's up near the 1/4-20 screw ears on the heads, in particular at the most forward and rearward corners.
 
fiberglas flange

Dan
How wide is the fiberglas tape you used to make up the cowl side flange?
Also when you preimpregnate the cloth tape, do you lay it up over wax paper on a flat surface and then just lay it upside down within the cowl and peel of the wax paper or lay each of the 5 tapes individually, stippling out the air bubbles as you go?

Thanks
Oldgeezer
 
2" tape, all five plies carefully stacked on a sheet of 4 mil plastic. Wax paper should be fine if that's what you prefer. Dump on lots of mixed epoxy in a stripe down the centerline. Let it sit a few minutes to soak down through the layers; the air in the weave will naturally move out to the sides. Add a cover sheet, squeegee, roll, or stipple to finish the saturation. I like a roller, as it pushes the stack around less and compacts the plies as you go. When saturated, push excess epoxy away from the stack toward the sheet edges, then trim so you have a plastic/glass/plastic sandwich just wider than the glass tape and cut to length.

Prime the sanded surface inside the cowl with some mixed epoxy so the joint isn't starved. Don't paint it on with a brush, as the excess will run down into the gap between the cowl halves. Just wet the corner of a rag with epoxy and dampen the surface.

Peel one cover sheet and lay the whole 5 ply strip in place. Stipple a bit for stick, peel the top cover sheet, and finish by stippling out any air bubbles under the strip.
 
Dan, another way to locate the upper/lower cowl at the outboard leading edges (where the nutplate is suggested) is to dowel them at that point. Its important to have good strong mating & locating structure up there, as the frontal parts of the cowl take a beating in flight.

Flox/glass 1/4 OD stainless pins in the lower cowl and use 1/4 ID SS tubing in the upper cowling.

Its really easy to install, and will positively keep those leading edges located under any condition. Also: its two less screws to deal with to get the cowl on/off.
 
Back
Top