What's new
Van's Air Force

Don't miss anything! Register now for full access to the definitive RV support community.

RV-3 Aft Top Skin ? Our Approach and Lessons learned

Ironflight

VAF Moderator / Line Boy
Mentor
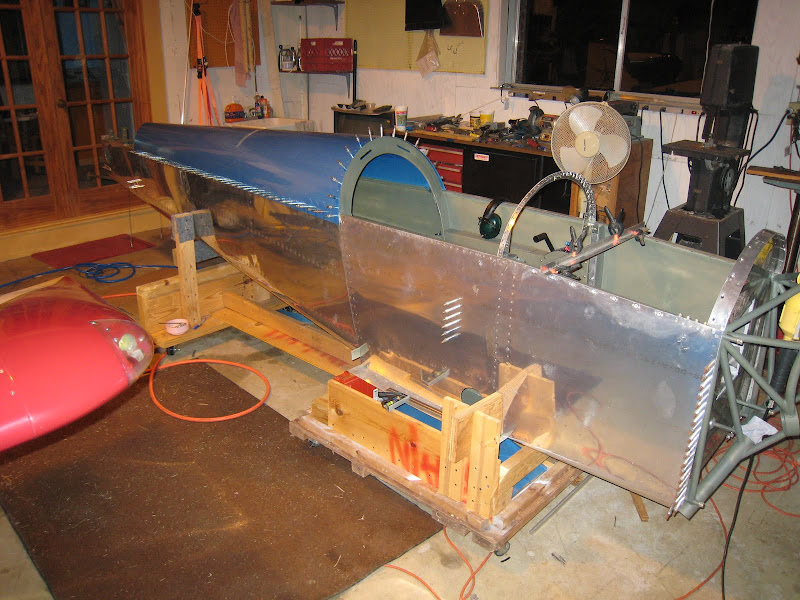
The last major piece of raw material left in our hangar attic for the RV-3 project was the aft top fuselage skin ? the turtle deck. Having run out of excuses and most of the little tasks on the working list being complete, we figured this was a good weekend to give it a go for the initial fitting and drilling. I was shocked when I realized that we had it drilled to all but the F-306 and F-308 bulkheads after about ten people-hours of work! Here are a few of the things we took away from it ? YMMV of course.

IMG_4327.JPG


1) As an experienced airplane builder now working on an RV-3 once said ?what airplane are these bulkheads supposed to be for anyway?? Laying a straight-edge from the rear bulkheads to the seat back showed that there was no straight line to be had here. Since we had put considerable time into the seat back bulkhead, and the F-309 (just ahead of the aft deck) looked pretty good, we decided to make those the baselines, and make the other two (306, 308) fit.

2) Making the 306 and 308 fit was simple ? we cut the flanges off entirely, and ground away web material until we had clearance between the bulkheads and the skin. The Louise made up some flexible new flanges that we?ll rivet in place (with a perfect fit!) once the skin is firmly attached to the longerons and fore and aft bulkheads. This makes for a smooth, straight skin.

IMG_4307.JPG


3) Make sure to accurately locate the center line of the aft skin blank. We were just about an eight off, and it made for no extra edge distance along the longeron on one side at the back end. We could have fixed this by sliding the piece aft before we trimmed the front edge ? good lesson for next time.

4) If you have the tail mounted, take it off. Yeah, it looks really nice in the shop with the feathers on, but they are in the way.

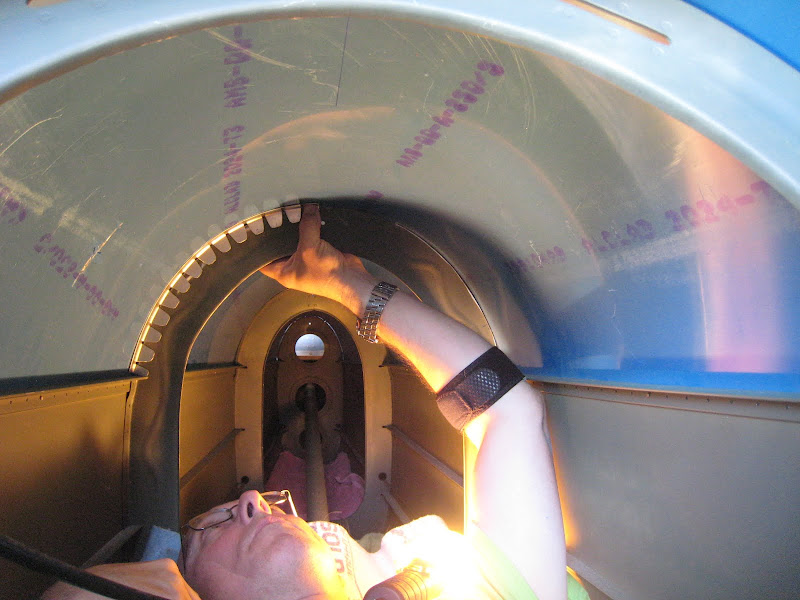
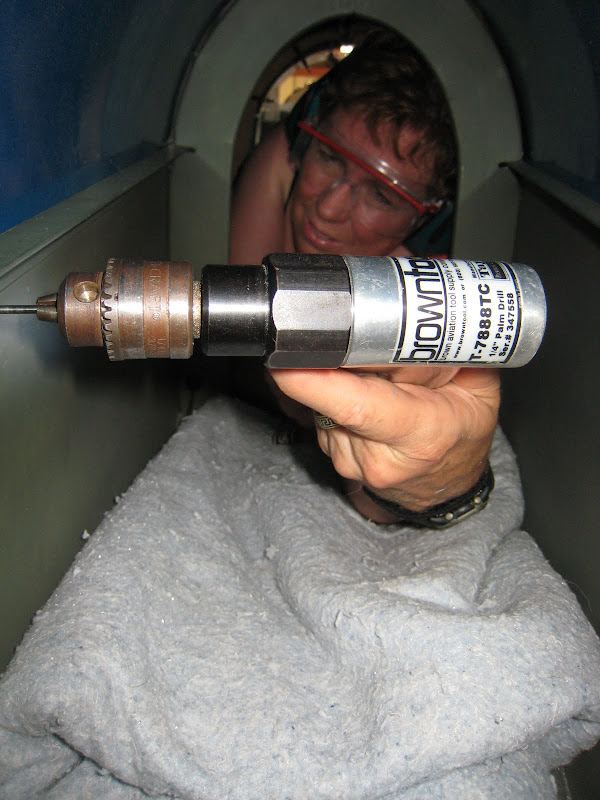
5) A person can actually fit inside the aft fuselage of an RV-3, and do useful work back there! Louise was able to drill all of the longeron rivet holes back to about 6 inches from the F-309 bulkhead before running out of reach. I got those by reaching in through the holes in the aft deck and the -309 to finish the job. Please note ? Louise is an EXPERT cave explorer. It?s her job ? she is a trained professional!

IMG_4326.JPG


6) Tension straps are a must, as they are for any skin fitting on the fuselage. Be very careful, however, not to start collapsing the side skins! It takes very little tension to do this ? go one ?click? on the cams at a time. You have been warned?.

7) Our drilling pattern was this. We predrilled the holes in the seat back bulkhead, and of course, the longerons. We then match-drilled the front center of the skin to the seat back. This was followed by one hole/cleco in the F-309 at the center to keep the skin straight. We then cinched up the tension straps, and drilled the skin to the longeron holes from the inside, alternating from left to right, one ?bay? at a time. We haven?t drilled the -306 or -309 flanges in place yet ? those should be fairly straightforward.

IMG_4317.JPG


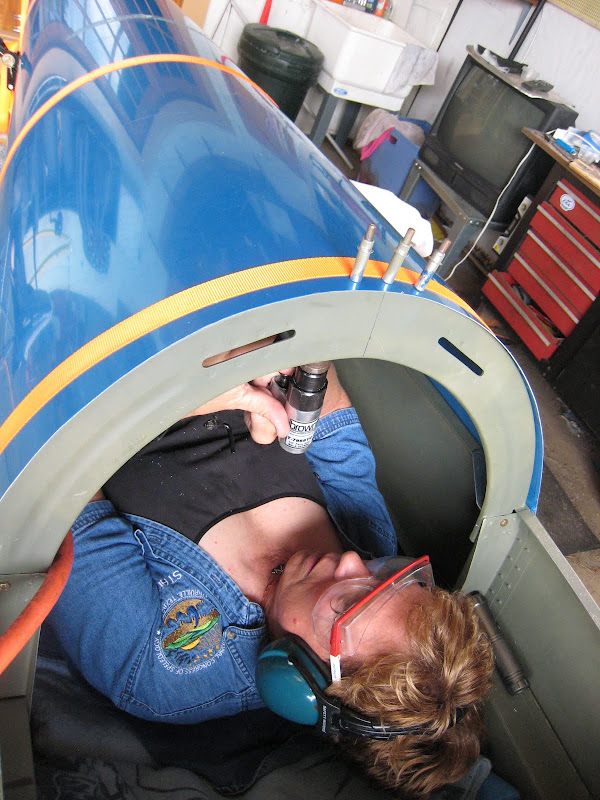
8) Take out the elevator pushrod and bulkhead. The baggage floor we left in place, then stuff moving blankets in to the ?floor? of each ?bay to bring the driller?s body up above the bottom of the bulkheads. Lots and lots of blankets. Much softer than cave rock?.

IMG_4322.JPG


9) We cut out some thin plywood doublers for the 306 and 308 bulkheads, and attached them with C-clamps to make them flat. Once you cut off the flanges, they become noodles, and it will be very hard to get them straight and perpendicular to the fuselage for a nice line of rivets.

10) As always, we went slow, questioned everything we were doing, and stopped ourselves from doing something dumb on several occasions. Take nothing for granted!

More pictures at the Picassa Site: http://picasaweb.google.com/DrKarst/JUNIOR#
 
or (for next time)

to get the bulkhead heights to make a nice straight line, instead of cutting off the bulkhead flange and and rebuilding it, you could cut the bulkhead in two (so you have an upper and lower part), and then rivet it back together at the right height (higher or lower as necessary) with a doubler a la Sam Buchanan - see

http://home.hiwaay.net/~sbuc/journal/fuse3.html

The other important thing of course is to stiffen and support the bulkheads with plywood and braces so that they are not distorted/dislocated when the skin is strapped down for drilling.
Paul, looking good.

Bill Brooks
Ottawa, Canada
RV-6A finishing kit
 
Or, maybe on a -6...

to get the bulkhead heights to make a nice straight line, instead of cutting off the bulkhead flange and and rebuilding it, you could cut the bulkhead in two (so you have an upper and lower part), and then rivet it back together at the right height (higher or lower as necessary) with a doubler a la Sam Buchanan

I don't see this method as working on the mis-fit of our -3 bulkheads. I think it would only have exasperated the problem, frankly. A different kit from a different time...

The other important thing of course is to stiffen and support the bulkheads with plywood and braces so that they are not distorted/dislocated when the skin is strapped down for drilling.

If you look at our photos on Picasa (or one of the posted ones carefully), we did use the plywood trick.
 
Louise,
you could well be right - but I think that the non-prepunched and non "cut to measure" 4 and the 6 kits provide a useful experience for tackling a 3. Certainly I imagine the shock when you open the crates and start reading the "plans" is not so great as it would be going from a 7 to a 3! "Just make it fit" has a somewhat different meaning.
Bill Brooks
Ottawa, Canada
RV-6A finishing
 
to get the bulkhead heights to make a nice straight line, instead of cutting off the bulkhead flange and and rebuilding it, you could cut the bulkhead in two (so you have an upper and lower part), and then rivet it back together at the right height (higher or lower as necessary) with a doubler a la Sam Buchanan - see

That would be another good thing for a builder to try Bill, I agree - but in this case, it wasn't just a height issue, it is the shape (and width) of the bulkheads. They actually didn't extend far enough "outboard" to bring the skin out ot the edge of the longerons - making them shorter would make that worse.

But as you say - this is the world of "make it fit", and whatever technique will do that for you is good!

Paul
 
For everyone dealing with the rear turtle deck let me say what I would do if we had it to do again.

I would not hesitate to make a fastback version of the -3!

You will have to deal with the bulkhead miss-alaignment anyway. By making a fastback version, (have you seen the -8 fastback?):) you will #1 solve the air leaking from the rear canopy skirt (which is a lot) #2 solve the forming of the canopy skirt to bubble:mad:(trouble for all who have done this) It would be soooo much easier to fit the bubble down on to a "lip" on a fastback bulkhead and get a really good fit. Besides, I don't know of ANY 50 year old who can, (like an Owl) turn their head and look backwards. and lastly #3 get a better aircraft profile (like the -8)

Just my 2 cents worth.
 
Last edited:
That's wonderful, Paul & Louise-- I'm printing this out and putting it in my instruction manual. Thanks!
 
Besides, I don't know of ANY 50 year old who can, (like an Owl) turn their head and look backwards.

Interesting points and I may regret the resulting draft, but this 50+ year old can certainly see 360 degrees with my shoulders facing straight forward. I wanted to look all around.
 
This could have been...

That would be another good thing for a builder to try Bill, I agree - but in this case, it wasn't just a height issue, it is the shape (and width) of the bulkheads. They actually didn't extend far enough "outboard" to bring the skin out ot the edge of the longerons - making them shorter would make that worse.

But as you say - this is the world of "make it fit", and whatever technique will do that for you is good!

Paul

...fixed at the fuselage frame jigging time. It was common on some early -4 and -6 fuselages to "adjust" the fore and aft location of the bulkheads from the plan measurements to ensure that the width was correct. Just make the bulkhead widths fit exactly between the longerons.

Then, if necessary, the height of the bulkheads could be adjusted by cutting and splicing as mentioned above to ensure a straight line from cockpit back to the tail of the turtledeck.

Too late for this fix in your case....:D

Actually, in this case, it's just not true Gil. The bulkheads simply aren't shaped exactly right, no matter where or how you place them on the RV-3. There are significant differences to the width of the bulkhead just above and just below the longeron, so you have to use very thick, tapered shims, or come up with some other way of fixing the gaps. The build instructions tell you this, and recommend cutting off the flanges and making new ones to ensure a good fit.

The RV-3 is not at all like the follow-on kits - you really do have to be comfortable with significant modifications to put this one together!

Paul
 
satisfaction?

Completing any RV is an enormous achievement with lots of scope for builder ingenuity and workmanship and resulting well deserved pride and satisfaction.
Completing an early non-prepunched, not "cut to size" airframe I think adds another dimension (actually, many, as there are very few dimensions called out on the later prepunched kit plans!) and a different kind of build experience than the later kits.
It is interesting to compare the type of build assistance posts that appear on this forum today with those that used to appear on the forums when most peopel were building threes, fours and sixes - many more airframe construction questions then, and systems questions now.
And the revival of interest in the RV-3 is interesting - Paul and others - are you attracted to the RV-3 because of, or in spite of, the additional construction challenges and scope for ingenuity?
Bill Brooks
Ottawa Canada
RV-6A finishing kit
 
Point taken...

Actually, in this case, it's just not true Gil. The bulkheads simply aren't shaped exactly right, no matter where or how you place them on the RV-3. There are significant differences to the width of the bulkhead just above and just below the longeron, so you have to use very thick, tapered shims, or come up with some other way of fixing the gaps. The build instructions tell you this, and recommend cutting off the flanges and making new ones to ensure a good fit.

The RV-3 is not at all like the follow-on kits - you really do have to be comfortable with significant modifications to put this one together!

Paul

...I'm just surprised that Van has not changed the dies the formers are made on - instead of re-writing the instructions...:)

The early -6 kits also needed many tapered shims at the longerons, but usually just above the longeron, not below.

Must be those early dies...:)
 
And the revival of interest in the RV-3 is interesting - Paul and others - are you attracted to the RV-3 because of, or in spite of, the additional construction challenges and scope for ingenuity?

Good question Bill,

I think that I am personally attracted to the -3 because of what the finished airplane will be - regardless of the challenges or complexity of the build. Yes, it is satisfying to solve more problems than I did with the QB -8, but that is a side benefit of knowing that we're going to have a little single-seater with great handling and capability.

I really think this is a perfect SECOND kit for folks that enjoyed building a more "modern" airframe first, and doesn't mind stretching a bit the second time around. And I have a lot of respect for those that make (or made) the -3 their first homebuilt!

Paul
 
And the revival of interest in the RV-3 is interesting - Paul and others - are you attracted to the RV-3 because of, or in spite of, the additional construction challenges and scope for ingenuity?
Bill Brooks
Ottawa Canada
RV-6A finishing kit

I was attracted to the 3 because it's a perfect airplane for my mission-- solo flying for the sake of flying & getting away from life on the ground! It came along for the right price, and honestly I didn't realize how much re-engineering it needed til I joined VAF! But, with the help of the experienced builders around me, I'm willing to accept the challenge & learn some serious homebuilding skills along the way. It'll be like earning another college degree.
 
Definitely in spite of....

And the revival of interest in the RV-3 is interesting - Paul and others - are you attracted to the RV-3 because of, or in spite of, the additional construction challenges and scope for ingenuity?
Bill Brooks
Ottawa Canada
RV-6A finishing kit

As the one who first pushed the idea of building a -3, I can firmly say my interest was in spite of the issues (and, even more, in ignorance of the issues). Since both Paul and I do more than 90% of our flying solo, I wanted a -3 when Paul was proposing that we build a -10.

Thank goodness I have a strong partner in the venture or I wouldn't have gotten far at all!
 
Well I must say

The 3 is a delicious looking airplane.

As one who loves flying acro and might be looking for a project after I get done with my PE exam (professional engineer) in October...Well lets say the sales job to "she who must be obeyed" may start in earnest..:)

Frank
 
...Well lets say the sales job to "she who must be obeyed" may start in earnest..:)

Just get her involved!

On our project, Louise is the "builder of record", and is working on every part! The -3 was really her idea (as she said), and I am happy with the decision.

She's off on the oil spill for two weeks, and I am only allowed to work on custom projects like the avionics stack whiel she's gone so she doesn't miss out on anything primary....

Paul
 
And the revival of interest in the RV-3 is interesting - Paul and others - are you attracted to the RV-3 because of, or in spite of, the additional construction challenges and scope for ingenuity?
Bill Brooks
Ottawa Canada
RV-6A finishing kit

It was the only design that would fit in my "shop". But seriously, I never gave the additional challenges much thought. I had never built a pre punched kit so I had nothing to scale the level of difficulty against. That all changed when I built the pre punched elevator bellcrank assembly. It didnt require any cuts, bends or drilling and it fit together on the first try. That experience normalized the level of difficulty in a bad way.
 
Back
Top