VAF Forums

VAF Forums (https://vansairforce.net/community/index.php)
-   RV-12/RV-12iS (https://vansairforce.net/community/forumdisplay.php?f=73)
-   -   RV-12: Engine Mounting Cap Screws Inspection (https://vansairforce.net/community/showthread.php?t=65020)

Geico266 11-17-2010 07:42 AM

RV-12: Engine Mounting Cap Screws Inspection
 
This is a FLIGHT CRITICAL situation that IMHO requires inspection and corrective action before next flight.

Flying RV-12's owners should take immediate action to check the 4 engine ring mount socket head cap screws before next flight. Many bolts have vibrated loose, and several have fallen out!

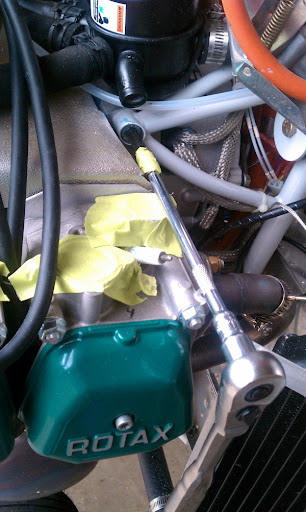
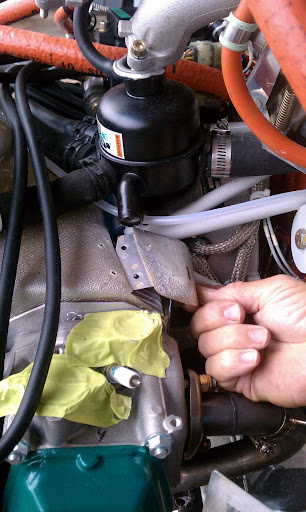
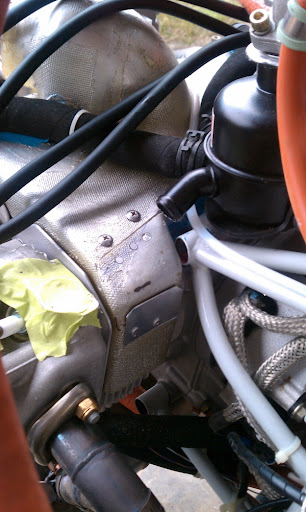
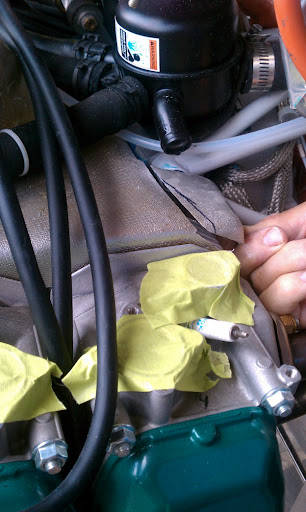
During a recent inspection I found the two bottom socket head cap screws that hold the engine mount ring to the engine had worked themselves loose. I pulled them out, inspected the threads, added blue loctite, and retorqed to 26 ft pounds, and I didn't think too much about it until Tony T contacted several of us last week with the same issue. Then the flood gates opened. Nearly everyone Marty S & I talked to flying the RV-12 has had the engine mounting cap screws come loose around 100 hours.

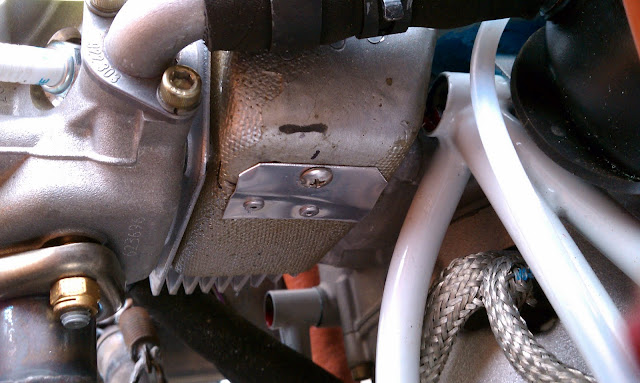
The top two engine mount cap screws have also been reported loose also so all 4 need to be checked. The bottom two are easy access. The top right needs to have the carb & carb socket and drip pan removed. The upper left is inaccessible and the cooling shroud will need to be modified. John Bender was able to get at it by modifying the cooling shroud.

The plans do not call out blue loctite on these bolts and IMHO there should be.

Geico266 11-17-2010 07:58 AM

I first noticed by lower two were loose about 3 months ago when I was changing oil.

Yes, they had lock washers on them.
Yes, I torqued them to specs the first time.
I did not use loctite the first time per the plans.

After adding blue loctite, and re-torquing to 26-30 ft pounds I have flow 50 or so hours with no further problems. I check them every oil change or 25 hours, and whenever I have the lower cowl off. Since they were re-installed they have been fine.

I highly suggest adding "witness marks" with a black marker or torque seal so there is a visual reference on the heads of the cap screws.

JBPILOT 11-17-2010 08:01 AM

THANKS LARRY - NEEDED THREAD
 
I have a lot of hours now ( over 200 ), and likely was one of the first to have this problem. When I first found it, like Larry said, I thought I had made a mistake, and added Loctite 'blue', and did all 4. ALL 4 were loose. I Dremeled out a large enough section of the airduct to give access. I 'glued' the piece back in place and went on. The SECOND mistake I made was to not go back and look at the instructions to see if Loctite was called for. I ASSUMED it was, and I just made a mistake. That mistake was almost worse than the first. After Tony T. sent us a note a few days ago, I realized I made the biggest mistake of all, not telling others of my problem originally. 2 or 3 wrongs does not make a right for sure ! Since I put Loctite on mine ( several months ago ), mine have not moved. I used a marker pen and 'marked' all 4 bolts so I could see if the bolts moved.

We now know at least 7 of us early builders who have had this problem. IT IS A PROBLEM !

THIS COULD BE A MAJOR PROBLEM. Check them and forward the info to Van's.

John Bender

MartySantic 11-17-2010 09:15 AM

To ensure the engineering folks at Van's receive your report, do the following.

There is a reporting procedure (required by ASTM standards) in the RV-12 Maintenance Manual section 16-1. Safety issues should be reported so there is a record.

E-mail to:

engineering@vansaircraft.com
'Safety Alert' (in subject line)

For this issue include your total time, a qualitative description how loose each engine mounting bolt was, and whether or not you added locktite.

SEVEN of us NOW with 85 to over 200 hours have found LOOSE ENGINE MOUNTING BOLTS.

Geico266 11-17-2010 10:26 AM

I have talked to three major Rotax Service Centers and they all say adding violet (strong) or blue (stronger) loctite to the engine mount cap screw certainly will not hurt anything. One even suggested using green (stronger yet) loctite if the bolts continue to move. All of them suggested not to use red (strongest) loctite in this application. Retorquing to a higher level helps for a longer peroid of time, but did not solve the problem of these bolts coming loose. Blue loctite was strongly recommended by experienced Rotax mechanics, and aircraft manufacturers I talked to.

mcems 11-17-2010 02:13 PM

Add one more.

190 hours

Lower right just about all the way out.
Lower left had to go 1/4 turn to get back to specs.
Upper right OK still at specs
Upper left visual only looks OK. (not able to use wrench)

These all looked OK @ time of annual inspection 140 hours. But annual inpection was only visiual looking at the tourge seal I used at the time of the build. Myself and a 30 year A/P both looked at these at anual time.

This is a serious issue. This all took place in the last 50 hours.


Brad Stiefvater
124bj

kell311496 11-18-2010 10:06 AM

Mine also loose - 97 hours. I used a dial-type torque wrench to note the approximate torque before they started turning:

Lower right - 80 in-lbs
Lower left - 120
Upper right - 250

MartySantic 11-18-2010 10:14 AM

Marty, thank you for the data. Based on my info, you are at least the third or fourth builder that has found an UPPER capscrew at less than the original torque.

okiejohn 11-18-2010 09:41 PM

Thanks to Marty Santic for calling me and telling me my plane was grounded. I have 98.5 hrs.

Right lower somewhat loose maybe 3 ft-lbs. reinstalled with blue locktite
Right top still tight, 26 ft-lbs ok. reinstalled with blue locktite

Left lower- backed out by 28 threads....
Left top- looks ok but have not cut cooling shroud yet.

Questions:
What is the length of the lower left capscrew?
What is the length of the upper left capscrew? ( I need to slot the cowling)

I incorrectly assumed that since some of these these capscrews were designed to be inaccessible they were all going to stay put.

One suggestion might be to drill 2 #50 or so holes outside of the capscrew on the tubing and put a safety wire to keep the capscrew in place.

John

JBPILOT 11-19-2010 07:25 AM

Hey John - -
 
As I recall, I had to remove a slot about 1" wide almost to the outside edge of the air duct. I used a Dremel with cutting wheel, and made the cut as thin as I could. The rear corner of the duct will stay in place if you originally RTV'd into place well. I think I used one of the special end socket extentions to allow a slight offset because you can't get a straight shot at that screw. I used the same RTV that I used to intall the air duct to put the piece back in place. I put a piece of clear plastic at the rear so the RTV did not fill the end of the cap screw. Not a fun job, but do-able. I now wished I had taken a little more time and built an alum corner cap that could be screwed on for easier access next time. I don't plan to take it off again unless one of the other 3 show ANY signs of movement. I also do not plan to put a torque wrench on them since it will weaken the Loctite if moved. If the screw has not moved, I feel comfortable with it still being tight enough. After several more hours, mine have remained in place perfectly.

John Bender

JohnF 11-19-2010 01:47 PM

Engine Mounting Cap Screws
 
hmmm...its been two days since this builder alert was sounded and I don't yet see anything from Vans Aircraft. Did I miss something that has been published? I didn't see anything on their web site. Just wondering.

JBPILOT 11-19-2010 02:05 PM

Hey John - -
 
No response yet, but I feel certain they are working on it. The fact the caution is out there now is enough ( I hope ! ). I'm sure they want to issue a response that everyone can do, and not have to visit the problem again. It is a real problem. Now we are finding out other LSA planes have had similar problems. As Larry said, we are saying what WE have done, but nothing official. I feel comfortable with mine now.

John Bender

clucier 11-19-2010 02:20 PM

Rotax engine mounts
 
Interesting and may not be related but there are two Evektor SportStars in Scottsdale that I fly, they were damaged in the big Hail storm in October and during the repairs both had there engine mounts replaced I am trying to find out why. Engine vibration? Loose mount screws cause more damage?

Both were between 700 - 800 hours with 912's

todehnal 11-20-2010 01:47 PM

Discussing The Fix
 
It really shouldn't be that difficult to just strip back off the items on the top of the engine that interfere with the removal of the baffle. We all have detailed instructions and experience with that. The baffle itself may be a little tedious to get off, but I think that, with a little care, we might save most of the seal that we made. I really don't like the idea of cutting into that $200 part. In fact, according to one of the Rotax engine instructors, he thought that the seal that we were making was overkill. Apparently, none of the other users of this engine go through that sealing process. They just trim for a close fit, and rely on the population of parts of top, to keep it in place. Actually, I kind of like the idea of being able to take that baffle off, without going through the clean and reseal process. But the best answer for us folks, still in the build process, is to wait for the Van's fix. That way, I'm sure that we will get the best solution and I would expect that solution to be timely.

Tom

sportkid 11-22-2010 07:42 AM

checked
 
Preparing for a flight to south Texas, this thread (thanks John) got me thinking about checking those bolts. Memory had me guessing whether I
installed those bolts correctly.
Pulled the cowls and as close as possible checked the torque on two of the bolts. But after years of building race engines, I felt confident that I had properly torqued and 'red' locktited all four. Anytime there are metal bolts threaded into case halves it is a good idea to locktite. Mine are good but I hope future builders learn this lesson.

Dick

JBPILOT 11-22-2010 10:01 AM

Hey Dick - -
 
Not sure I would have used RED Loctite. For sure they won't come loose, but you generally have to HEAT 'red' to remove them. Can do, but maybe over-kill here. Time will tell if 'Blue' is enough, but I feel it is. Put plenty on, and fill the voids. Due to adding a lubricant during torquing, I would stay at the 26# figure. If anyone has a problem after adding SUFFICIENT 'blue', for sure let all of us know.

John Bender

DonFromTX 11-22-2010 10:55 AM

For this "gonnabe" builder, does anyone have a photo of any or all of these bolts? I want to be sure I know them when I get an engine.

JBPILOT 11-22-2010 11:00 AM

Hey Don - -
 
Page 46-06 in the instructions cover the bolt installation. Calls for simple split lock washers. The picture is very clear. The issue at this point is how to ensure they stay put. Several of us have had a problem. Some of us have Loctited, 'blue', these bolts. Maybe by the time you are ready to install these, there will be a published solution. Just keep 46-06 in mind.

John Bender

Jetguy 11-22-2010 11:19 AM

Web link to Vans directions
 
You can download this section from Vans web site. Here is the link:

http://www.vansaircraft.com/pdf/revi...Section_46.pdf

Check page 6.

DonFromTX 11-22-2010 01:10 PM

Wow, thanks. I was not aware that was on the Vans site, clears it up real well, and I can well see all the excitement. Losing these bolts could ruin your whole day.

jersey 11-23-2010 07:43 PM

Modify Cowling
 
This is a serious problem!!!!!

Found upper left and lower left bolts finger tight. I removed all bolts and reinstalled with locktite blue. Cut a section of the cowl out to access the upper left. Reinstalled the cut out with nut plates and aluminum tabs for future inspections. I don't fully trust it yet. If anybody is interested, I will be glad to send photos via email.

Gary

JohnF 11-23-2010 08:03 PM

Cut Out Photo
 
Gary, would you consider posting photo of how you make the 'cover' over the cutout that you make to inspect that one awkward to get at bolt? thanks

MartySantic 11-23-2010 08:46 PM

Quote:

Originally Posted by jersey (Post 487641)
This is a serious problem!!!!!

Found upper left and lower left bolts finger tight. I removed all bolts and reinstalled with locktite blue. Cut a section of the cowl out to access the upper left. Reinstalled the cut out with nut plates and aluminum tabs for future inspections. I don't fully trust it yet. If anybody is interested, I will be glad to send photos via email.

Gary

You better believe this is a SERIOUS problem. This issue is more than 1 week OLD and the only notification to those that have flying RV-12s has been via this website. This is indeed a SAFETY of FLIGHT issue, as mentioned in the initial post, and notification to ALL RV-12 owners HAS NOT but should have been made by now. Many have found at least 1 capscrew loose. At least three or more have been flying with 2 of the 4 capscrews loose or missing.

A periodic inspection is NOT an acceptable solution because the condition has been discovered between the required 100 hour ROTAX inspection points. As such, the required inspection MUST not be counted on, a critical situation may develop between the inspection points!!

Statistics dictate this is indeed a major problem. There are NOT that many RV-12s flying!

IMHO, notification to all is much more important rather than trying to find a solution and issuing the notification concurrently with the solution. We can try to notify all via this website, but, Van's has the complete list of RV-12 owners.

Please continue to report your findings to Van's at:

engineering@vansaircraft.com
with "SAFETY ALERT" in the Subject Line

LIMA HOTEL 11-24-2010 05:23 AM

I think the best solution for this problem would be to use the same kind of lock washers under the engine mount cap screws as we use under the prop attach bolts. Lets see what Van's comes up with.
Larry

okiejohn 11-24-2010 06:01 AM

Suggestions
 
I tightened the bolts at 25 hours and at nearly 100 hours I had 3 bolts loose.
Yes, I torqued them and i checked them at the 25 hour oil change, but not the inaccessible one. I erroneously assumed if it was covered up, it meant that access was not required therefore it would stay tight.

I think if you are getting ready to rtv your cooling shroud down, you should either:
1: wait for Vans to come up with a fix
2:moto- tool a slot that you can get a balldriver into to get to the left top screw. Then fiberglass a trough in so you can still get to the screw without leaking air.

If you wait till you get your engine in about the best you can do is rtv an aluminum cover.

I theorise that the tough steel of the engine mount might be as hard as the lockwashers and they don't get a good bite. Van's is so far against the blue medium strength locktite, but the technician at LEAF said it would work good and he recomended it. Without locktite, you need a short inspection interval.

I am not negative about this. With 400 RV-12s flying soon, we will be the largest fleet of new small airplanes, and any safety issues will be communicated on VAF.

jersey 11-24-2010 06:23 AM

John I think your right about the lock washers not performing. I noticed that the engine mounting bracket arm was flexing slightly when I was aligning the bolts. Although they firmed up when I tightened the bolts to the engine it would seem that they shouldn't rely solely on the engine case for rigidity. This is a high speed, high compression engine. It seems to me that a significant amount of energy retention would be concentrating where the brackets clamp to the engine. I'm probably over-analyzing. Hopefully Vans engineers will get back to us soon. In the meantime I will continue to inspect the bolts and enjoy the plane.

Gary

MartySantic 11-24-2010 08:49 AM

Quote:

Originally Posted by jersey (Post 487641)
This is a serious problem!!!!!

Found upper left and lower left bolts finger tight. I removed all bolts and reinstalled with locktite blue. Cut a section of the cowl out to access the upper left. Reinstalled the cut out with nut plates and aluminum tabs for future inspections. I don't fully trust it yet. If anybody is interested, I will be glad to send photos via email.

Gary

Gary asked me to post his photo's as he did not know how to do it. So, here are the photos of Gary's modification to the top shroud. A very eloquent change that allows access to the top left capscrew.


MartySantic 11-24-2010 09:06 AM

Quote:

Originally Posted by jersey (Post 487720)
John I think your right about the lock washers not performing. I noticed that the engine mounting bracket arm was flexing slightly when I was aligning the bolts. Although they firmed up when I tightened the bolts to the engine it would seem that they shouldn't rely solely on the engine case for rigidity. This is a high speed, high compression engine. It seems to me that a significant amount of energy retention would be concentrating where the brackets clamp to the engine. I'm probably over-analyzing. Hopefully Vans engineers will get back to us soon. In the meantime I will continue to inspect the bolts and enjoy the plane.

Gary

The following links and for that matter, the entire website is very interesting. The information and data clearly demonstrates how ineffective split lockwashers are and in some cases the bolt/joint is better WITHOUT the lockwasher. (Look at the graph).

http://www.boltscience.com/pages/vibloose.htm

http://www.boltscience.com/pages/hel...ingwashers.htm

AND the video.....

http://www.boltscience.com/pages/jun...ringwasher.htm

I sent all of this to Van's, last week.

MartySantic 11-24-2010 09:15 AM

Quote:

Originally Posted by LIMA HOTEL (Post 487713)
I think the best solution for this problem would be to use the same kind of lock washers under the engine mount cap screws as we use under the prop attach bolts. Lets see what Van's comes up with.
Larry

A very interesting article on bolt locking devices other than the split lockwasher. The NordLock washer is a VERY interesting device once understood. (No wonder Sensenich uses it!)

http://contrails.free.fr/article_bol...ng_devices.php

This was also sent to Van's last week.

JBPILOT 11-24-2010 09:17 AM

Hey Gary - -
 
EXCELLENT Patch ! Good job ! I really like it ! I did not take as much time. If I ever have to go back in, that will be my choice.

John Bender

Geico266 11-24-2010 06:48 PM

Good work Marty!

If you have not seen the lock washer video Marty suggests you need to see it before you ever use a split washer again. :eek:


***********************


"What we have here is a failure to communicate" ; Coolhand Luke, 1967

While this is a new issue to the RV-12 it is not a new problem. A quick Google search reveals the same documented issues since 1999. The Flight Design CT had the same problem around 2006, before that there was another plane that had the same problem in the late 1990's. In all cases the fix was simple and forth coming from the airframe manufacturer, in this case that should be Van's Aircraft.

This is a classic "it's not my problem" issue. The air frame manufacturer (Vans) claims it's the engine manufacturer's (Rotax) responsibility, and Rotax states in their installation manual (Page 35) it is Vans responsibility. The problem is Rotax cannot and will not speak to every installation of their engine due to so many different applications and mounting hardware around the world. Rotax builds aircraft engines, not airplanes.

However, this is not rocket science. The RV-12 has 4 bolts that secure the engine mount ring using standard hardware, known torque values, and know materials that are vibrating loose under normal operating conditions. The fix should be easy for the sharp, cutting edge engineers at Vans (and I mean that!) so....just do it! We have documented SB's and successful "field tested fixes" of the problem for over a decade from other airframe manufacturers using standard accepted aircraft maintenance procedures, mainly loctite, safety wire, and or cotter pins.

Several phone calls I have made to the largest heavy maintenance Rotax service centers to the smallest certified repair stations, and Flight Design CT service centers have yielded reliable repair info that we can count on, and that I have outlined here and in the first post. It is amazing what can be learned if you put down your pride and pick up the phone and make a few calls to the experts of any given field.

JBPILOT 11-24-2010 07:08 PM

GOOD STATEMENT LARRY !
 
This has been discouraging for sure.

John Bender

MartySantic 11-24-2010 07:36 PM

Larry, agree with all.

What bothers me the most is there has been no official notification by Van's to the general population of RV-12 owners. If an RV-12 is flying and is not monitoring this website, he/she could be flying with 2 or less engine mounting capscrews. NOT GOOD! Some have found this to be the case even though, they have meticulously followed all of the RV-12 and ROTAX periodic engine inspection requirements. A simple e-mail would cure this. IS that too much to expect even though we are now experimental?

History has shown it takes NASA months or has ignored the lonely engineer to make a decision. Should not be the case here. We have HIGHER standards.

Jetguy 11-24-2010 09:13 PM

Way to Go Team Larry!
 
Go team Larry! I think Larry has been pushed to Far. :mad: Its all about liability. Yes its sad. Those darn lawyers. This is an example of the current world we live in. Its not a perfect world but it not to bad either. Gentlemen we have a experimental airplane, collect as much data as you can, each owner feel free to choose the fix he feels are appropriate. The mother ship has spoken and this matter is closed for now like it or not! Move forward and enjoy your plane.
Happy Holidays!

MartySantic 11-24-2010 09:20 PM

Quote:

Originally Posted by Jetguy (Post 487935)
Go team Larry! I think Larry has been pushed to Far. :mad: Its all about liability. Yes its sad. Those darn lawyers. This is an example of the current world we live in. Its not a perfect world but it not to bad either. Gentlemen we have a experimental airplane, collect as much data as you can, each owner feel free to choose the fix he feels are appropriate. The mother ship has spoken and this matter is closed for now like it or not! Move forward and enjoy your plane.
Happy Holidays!

I just cannot or will give up on Van's Aircraft as you suggest. They know what made them successful and do not think they will change their business plan.

vernhendershott 11-24-2010 09:31 PM

Hi Larry,

You need to come to Florida and warm up, you are sounding way to much like me, sadly you are 100% right.

We who are flying can take John's advice and fix it the way we feel is best and I guess we will, it does seem better than having the engine fall off.

The real Catch-22 is the ones who are not yet finished, they must do it Van's way and they have to present an aircraft to their FSDO/DAR for final inspection that will have an un-airworthy condition and they have to represent that it is ready for its first flight. I am not sure how I could do that with a straight face.

Mel, perhaps you could advise us as to how we present an aircraft for ELSA certification with this kind of known defect?

Best regards,
Vern

Jetguy 11-24-2010 09:32 PM

Change comes no matter what.
 
I didn't say give up on them but as history States, Change is inevitable!

Peterk 11-24-2010 11:31 PM

More Words of Wisdom
 
The good news is you have an experimental aircraft and can fix the problem as you see fit and that let's you sleep at night. Thanks to Tony T we were sent down this potential disaster path. We should remember it was another 12 builder and not Vans that saved our butt. That is the only way to survive. Do not count on Vans to hold your hand...he'll, they didn't even check the bolts on their own SLSA or they wouldn't be showing now how to get through the shroud!

Yes it does risk the possibility that someone will lose an engine in flight because they are counting on Vans to prevent that. Unfortunately they are not required to and simply are not going to. Vans airplanes crash on a regular basis...no more or less than other homebuilts. They have over 7000 experimental aircraft flying...that is what they do ...they sell wonderful kits and help you get them in the air. They charge you for that. Once it's airworthy you can do anything you want to it....to include fixing mistakes. Be thankful this Thanksgiving that people like Tony, Marty, Larry, John and others have your back. I know I am!

ErichKeane 11-25-2010 12:13 AM

Since this is a problem that has happened in the past, what have the other manufacturers done about it? Have some used safety wire, or loctite, or what?

rgmwa 11-25-2010 01:08 AM

Quote:

Originally Posted by MartySantic (Post 487758)
The following links and for that matter, the entire website is very interesting. The information and data clearly demonstrates how ineffective split lockwashers are and in some cases the bolt/joint is better WITHOUT the lockwasher. (Look at the graph).

We'll that explains why I periodically lose one or more of the 4 nuts and bolts that hold the mesh cage mounted on my car trailer in place. I used split washers, assuming they would stop the nuts from coming undone, but they don't. There is obviously enough flex and movement in the trailer and cage system while I'm towing to occasionally work the nuts loose.

I'm still a long way from installing my engine, but the plans show that the ROTAX engine mount bolt assembly is basically no different to my trailer setup.

I'm surprised that VAN's apparently still haven't issued a warning to all affected RV-12 builders since the problem was identified last week, as it's clearly a serious safety concern. As far as I'm concerned, it's not a question of blaming anyone. It's about preventing an accident.


All times are GMT -6. The time now is 09:17 AM.