What's new
Van's Air Force

Don't miss anything! Register now for full access to the definitive RV support community.

Another Panel Lettering Question

WingsOnWheels

Well Known Member
I dug through old posts and didn't quite find what I was looking for (probably there somewhere though).

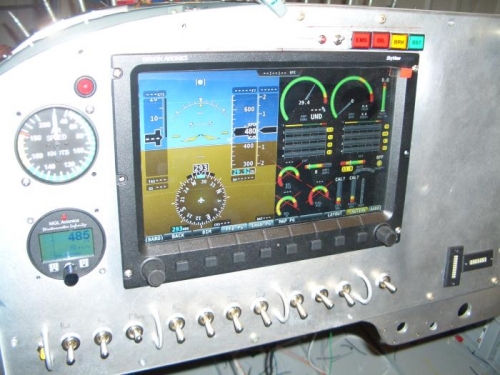
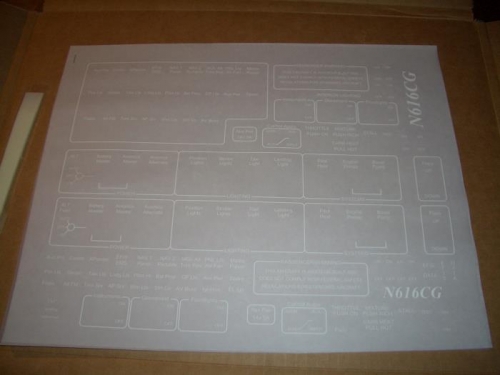
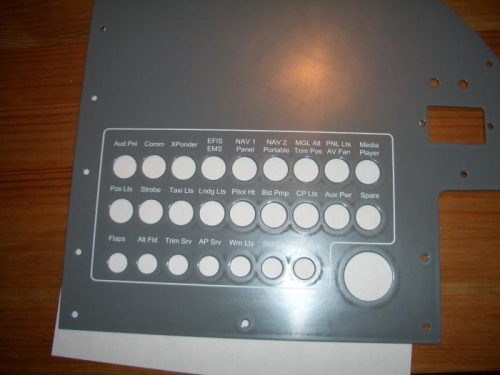
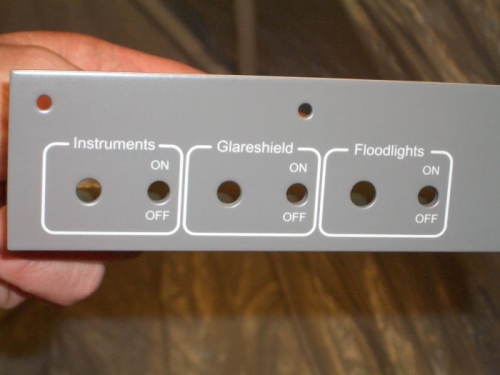
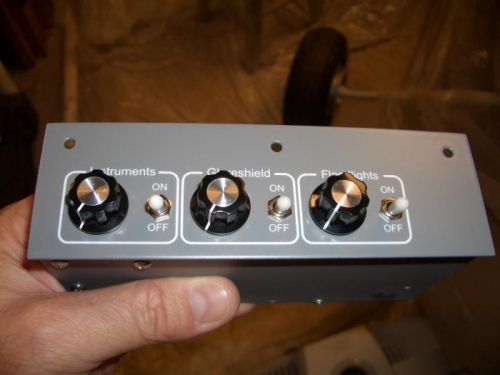
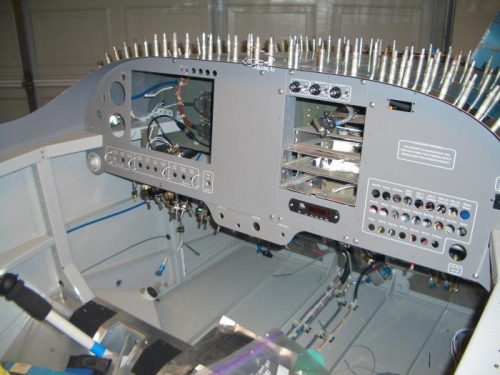
I designed most of my panel cutouts in CAD. As a result, it is pretty easy for me to do the same with the labels. I spoke with Stein about using the water-slide decals, but I would like to be able to tranfer large areas all at once. I have put some snazzy borders and grouping around my switches and since it was cad designed and machine cut it should all line up. With the water-slide I don't think my skill-level is sufficient to move a decal of that size without a screw up.

Taking that all into account I think it would be best to go with dry-transfer decals. However, I don't have much experiance with those. Has anyone applied a large decal? I would do all my switches in one shot and another large one for all my breakers. If you have done something similar, how did it work out for you?

Also, what clearcoats have builders found to work well with the dry transfers? My basecoat will be PPG MTK Urathane and I was planning a low-gloss clear from the same product line over the top of the decals.

Thanks,
 
We use the dry sticky type that the guy that cut our panel fabricated. We installed the large switch one and the large cb one be for populating and then were careful with tht install. We did not use any clearcoat post install. They have held up very well. The name of the,outfit is Sebastian Communications in Merritt Island florida
Phelps
 
Colin,
I don't know how large of a label you are talking about but I had no problem with the multiple switches size. I used the wet slide labels from Stein.
Really very easy to install. Just be careful, the labels I received were not the same size/ scale as the pdf I sent. This caused some switch line up problems.
I used regular PPG clear JC661 but used an additive to dull the clear. As you can see by the pictures I didn't use enough additive. It is still somewhat glossy.
107jggj.jpg
[/IMG]
 
Mark,

Your panel looks great. Has some gloss, but not too much, should be just fine!

My switches are similar to yours. Except grouped a little closer with switch guards separating the functional sections. I would like to do them all in one shot so a good size decal. Steins watersides only come on 8.5x11 which is to small so I would have to break up the switch labels. No a big deal, but if the scaleing isn't accurate it would be an issue.

I think the problematic area would be the CB panel. It is a sqare shape with not much room for placement error. I do like the look of those decals though.

I'll probably try the dry-transfers first and do a test on scrap to ensure paint compatability with the ink. There is a place I can order the transers from that can do larger sheets. Then I can fit everything on one page without breaking it up.
FP15092013A0002T.jpg
 
Laser

If you have it all in CAD, you might consider anodizing the panel and laser engraving the lettering. We did ours that way, and it turned out very well.
 
If you have it all in CAD, you might consider anodizing the panel and laser engraving the lettering. We did ours that way, and it turned out very well.

Doing that would be really nice, but I think the cost may be a limiting factor. Plus I would like to match the grey color of the interior trim.
 
If using CAD you could go a step further and have the panel lettering cut out and then back light them with LED strips. No need to worry about crooked lettering then and it's nice looking during night ops. Just a thought.
 
If using CAD you could go a step further and have the panel lettering cut out and then back light them with LED strips. No need to worry about crooked lettering then and it's nice looking during night ops. Just a thought.

If cost wasn't a concern I would have an entire panel overlay reverse engraved and backlight the lettering and grouping borders. Alas, cost is a concern (time as well), so I don't want to go crazy. I have made that mistake a number of times and added plenty of time to my build.
 
Taking that all into account I think it would be best to go with dry-transfer decals. However, I don't have much experiance with those. Has anyone applied a large decal? I would do all my switches in one shot and another large one for all my breakers. If you have done something similar, how did it work out for you?

Also, what clearcoats have builders found to work well with the dry transfers? My basecoat will be PPG MTK Urathane and I was planning a low-gloss clear from the same product line over the top of the decals.

Yes, I applied entire rows of dry transfers in a single session. If you are going to do multiple rows or a border graphic, then I would use a piece of wax paper to isolate the areas you aren't rubbing to ensure that they don't accidently stick someplace you don't want them.

Since most print shops charge by the 8.5 x 11 page, I made sure that I had 2-3 copies of each graphic just in case I made a mistake in application. I did and was glad that I had extras. Masking tape will take the applied transfer back up.

I used four or five coats of a satin clear to cut down on the glare. I did use very light coats for each layer. Many of the areas on my panel where the lettering are located are going to constantly touched and bumped by hands. I'm not sure they would hold up after time, unless a good clear coat is on top. You do want to test whatever clear coat you use choice on a scrap piece to ensure that it doesn't have a chemical reaction.
 
I used rub-down transfers for my panel. Worked very well.
I used Visio to generate the artwork. Note that the page sizes used are often standard photo sizes, i.e. 8x10, 11x14, etc., not printer paper sizes. Make multiple copies of each transfer so you have a spare if you mess up installation. Nest things like an old model decal sheet to maximize use of area. I actually did not put a clear coat over mine as I found I never actually touch the legends and it makes modifications easy. A toothpick or similar can scrape off the old legend if you want to change a switch function. (you can see the CB I changed). Of course, install the legends before you mount the switches.

1001983h.jpg


I think the vendor was color-vu or something like that.
 
Doing that would be really nice, but I think the cost may be a limiting factor. Plus I would like to match the grey color of the interior trim.

Color matching on anodize is not easy. Grey is certainly possible in a hard anodize. Cost is not outrageous. Depending on the size of the part, if you can do sub-panels is should be relatively inexpensive. We did our full width panel for $300, and it came out very well.
 
Thanks all for the great suggesions!. I worked on my layout some more last night and think the dry-transfer decals will be the best choice for ease and cost. I like the idea of the anodized panel, but don't feel like spending the cash. I already have the paint needed (bought for the interior) so it is just the cost of the decals. An 11X14 sheet run about $90 and will fit all my markings with enough room for duplicates. Plus the longer sheet will let me place all my switch labels in one shot (about a 13" long decal).

Will still need to test the decal for pant compatability though.

Thanks,
 
A follow-up to my prior posts about panel labeling.

I went ahead and decided to use dry transfer (rub-on) decals. I purchased the decals through Avery at drytransfer.com. The vendor was great to deal with turn-around was a little slower than quoted, but I ordered over the holidays, so I will give them a little leeway. Took about 1.5 weeks for me to have them in-hand.

The layout was designed in CAD and then transfered to visio where I had more font options. From that I converted to high-res PDF for the vendor. I included a scaling block on the sheet for reference. I fit all my labels along with duplicates on one 11X14 sheet. I chose that size so that I could put the entire switch panel on as a single label and maintain the CAD-levl alignment.

Along with the labels Avery included a really nice plastic burnishing tool! Total cost was $106 shipped.

FP10022014A0001V.jpg


I painted the panel with PPG MTK Omni Urethane topcoat. This is the same paint I am using for the two-tone interior. The paint is a single-stage so it requires some sanding if a clear os going to be applied. I wet-sanded with 800 grit to provide a good surface for the labels and clear.

The labels went on very easy. I would cut out a section of labels and position it on the panel with the backing still in place. Once happy with the position I would tape it along one edge. I could then lift the label, remove the backing, and lay it back down. Some more tape on the opposite side made sure it stayed put. Some rubbing with the burnishing tool and careful removal of the carrier finished the application.

The CB labels went on as one large label, so there was no concern over alignment. The same goes for the switches and dimmer panel.

FP10022014A0001W.jpg


With all the labels applied, I could shoot the clear. Since this was the only portion of the interior I was planning a Matte finish, it didn't make sense to buy $100 in paint products to clear the panel. Eastwood sells a 2K Urethane clear in a special two-chamber spray can. you use a tool to open the inner chamber and mix the two components. Pot life is about 48hours at a cost of $24 per can.

The one can was enough to apply a few coats over all the panel parts. The paint was easy to work with, dried fast, and seems bullet-proof. Warning, the can does not spray down well, so you have to hang the parts near vertical! I had used a test piece to make sure there were no compatability issues with the base paint or labels. Light or heavy coat made no difference, the labels did not try to lift or dissolve.

All said and done, I am very happy with the results.

FP10022014A0001Y.jpg

FP10022014A00020.jpg

FP10022014A0001Z.jpg
 
If using CAD you could go a step further and have the panel lettering cut out and then back light them with LED strips. No need to worry about crooked lettering then and it's nice looking during night ops. Just a thought.

Man, that'd look so cool. Have you tried this? How's daytime visibility?
 
Back
Top